

The garage door likely gets used much more frequently than the front door in many American homes, getting opened and closed multiple times a day as people come and go about their daily business. This heavy wear and tear can cause the torsion springs that raise and lower the door to wear out over time. But when this happens, is it safe to replace these springs?
Replacing garage door springs is a dangerous job that can cause severe damage to your body and property. The thick cables that comprise a garage door’s torsion springs contain significant energy, creating the potential for substantial damage if this energy is not stored properly.
While there is no doubt that replacing garage door springs is dangerous, replacements can be made by DIYers if the proper preparations are made. There are countless educational articles and videos available that can help safely walk you through the process. However, if you still harbor any doubts about your preparedness to perform the replacement, it is best to call a professional.
Table of Contents
Reasons to Replace Garage Door Springs
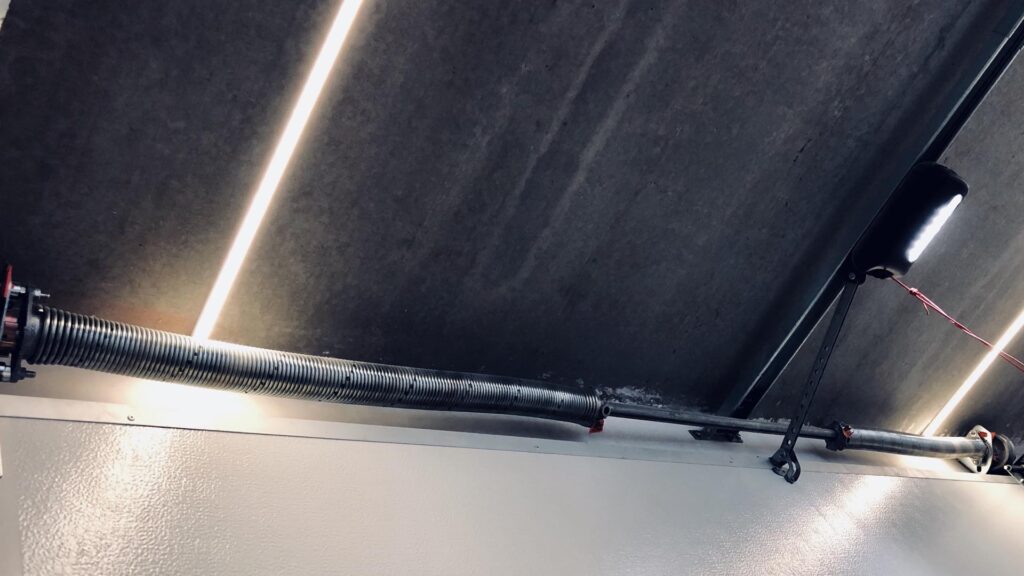
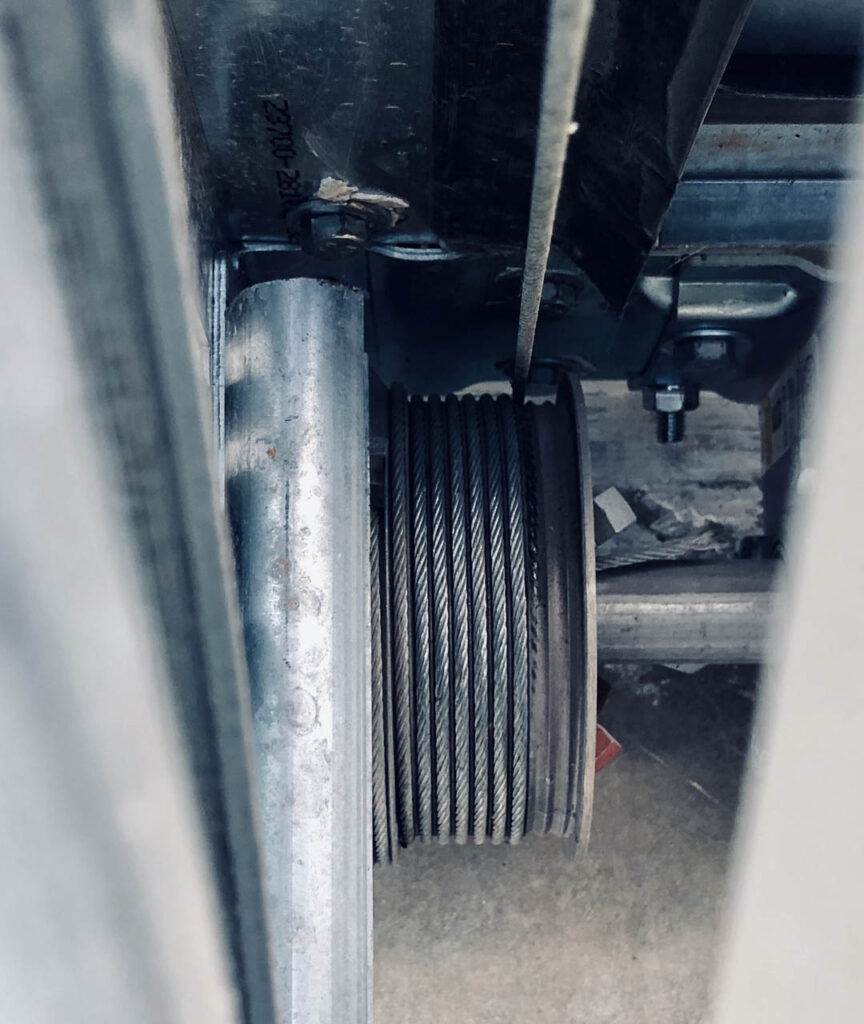
Garage doors use the principle of a torsion spring to raise and lower the door. The door is attached to cables, and as the cables are lowered to close the door, the torsion spring winds tightly to store the necessary energy for raising the door. When the door is ready to be raised, the energy from the unwinding spring helps the cables guide the door up the tracks to an open position.

As garage doors are opened multiple times a day, 365 times a year, the constant wear and tear will cause the spring to lose its ability to perform its intended function. Some signs that your garage door springs are losing their effectiveness include:
- Loose Cables – If the cables connected to your garage door are loose, it is likely because the torsion spring can no longer wind as tightly as it needs to, creating slack in the cables.
- Door Will Not Open All the Way – The torsion spring is meant to support the weight of the heavy garage door. If the garage door gets stuck in a partially open state, it is likely the spring can no longer support the weight.
- Gaps in the Springs – The torsion springs will be directly above the garage door and should have the appearance of a tightly wound coil when functioning correctly. If there are any noticeable gaps or looseness in the springs, they have lost their effectiveness.
- Door Becomes Jerky – Garage doors are meant to open and close smoothly. If there is a noticeable jerk during the opening or closing process, it is likely that one of the springs has snapped, creating an imbalance in the torsion system.
Dangers of Replacing Garage Door Springs
There are myriad dangers involved with replacing garage door springs, from personal injury to property damage.
Once a defective torsion spring has been identified, it is tempting to perform a DIY repair, as you can save several hundred dollars by avoiding a call to the professionals to do a replacement. However, to attempt a DIY garage door spring replacement, you must be extremely prepared and confident in what you are doing, as any of the following can occur:
- A finger could get caught in a gap in the spring, crushing the digit and causing nerve damage.
- The coil could snap, with the released energy causing a whiplash effect that could gash the skin.
- The spring could come flying off the bar, knocking you off the ladder and/or drilling a hole in the wall.
While these are just a few of the dangers involved with tinkering with worn or faulty garage door torsion springs, it does not take much imagination to realize how severely such a powerful spring could maim a person or property if broken or unwound unexpectedly. After all, many garage doors can weigh over 500 pounds, so any spring that can consistently lift and lower them is extremely powerful and should be treated with caution.
How to Safely Replace Garage Door Springs
While the dangers of replacing garage door springs are plentiful, it is possible to replace them yourself if proper precautions are taken. After all, we’re in a golden era of DIY, so there is no shortage of helpful material available to prepare you for this massive undertaking.
If you are someone who wants to attempt a DIY garage door replacement, safety should be the number one priority, with the following points needing to be confirmed before attempting to start the project:
- All cars, boats, and motorized vehicles need to be removed from the garage.
- Anything flammable or combustible due to force should be removed from the garage.
- There should be no bystanders or anyone who is not actively helping in the replacement nearby.
- Only use winding bars to add and release tension to torsion springs when removing your old springs and tightening your new ones. Do not use screwdrivers!
- Make sure you have a stable ladder that does not rock and can be placed on firm, level ground.
- Make sure all tools and materials needed for the repair are in a handy, convenient location that will not cause an accident should you need to come down the ladder quickly.
- Wear safety goggles and a hard hat.
- Be sure to keep your head out of the spring and cone trajectory at all times when making the replacement. This limits the likelihood that the spring would be thrust toward your head should there be slippage or any other accident occurs.
- Above all, make sure that you have thoroughly studied and are entirely comfortable with the process before attempting the replacement. This is not the type of home improvement project that can be “tinkered” with until it is figured out, as the trial and error method can be costly when dealing with powerful torsion springs.
[googleadsycc adunit=”inarticle”]
Once all these safety points are confirmed, the process for replacing garage door springs, while dangerous, is not overly complicated, if the proper steps are taken. There are many great websites and videos, specifically this helpful tutorial offered by DDM Garage Doors, that can thoroughly explain the following spring replacement process down to the most minute detail if further explanation is necessary.
Preparing the Garage for the Spring Replacement
Getting the garage door set for the spring replacement is very simple, but overlooking or getting lazy on any of these steps can create issues later in the process. Therefore, take the following steps to get ready for the replacement:
- Close the garage door. Attempting a torsion spring replacement with the garage door open is a bit risky. If something were to cause the door to roll shut during the replacement, serious injury could result. In addition, it is more challenging to stretch the coils when the door is open, and an open door can be difficult to re-level after replacement.
- Check the winding bars. The cone heads that hold the torsion spring in place will have holes in which to insert the winding bars for tensioning and release. Typically, these holes are ½-inch. If your winding bars do not fit snugly into these holes, do not attempt the replacement with a different size winding bar and/or screwdriver, as this creates a safety hazard.
- Disconnect the door from power. If the winding bars fit snugly, it is time to disconnect the garage door from power. If you have an older hardwired garage door that does not have a power cord, it may be necessary to flip a circuit breaker to turn off the power.
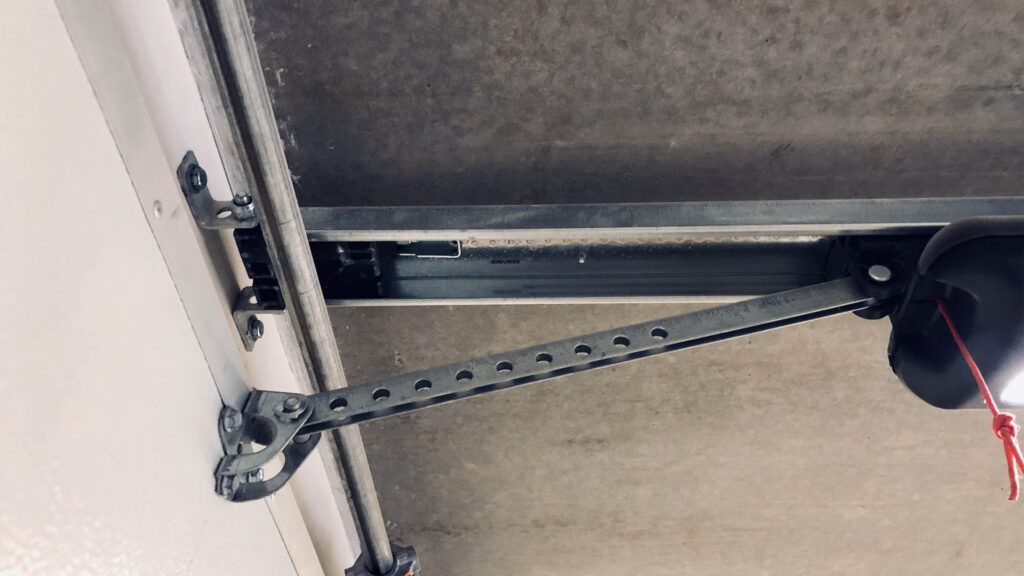
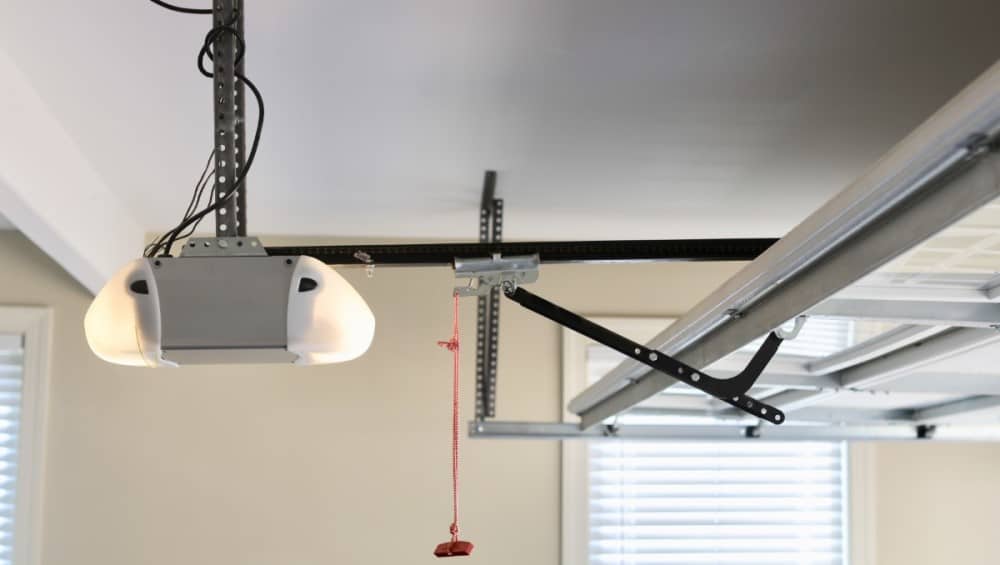
- Disengage the opener from the door. This will be an arm that connects from the top of the door to a trolley just above the torsion spring. You may need to flip the opener into neutral to disconnect it from this trolley.
- Have the new springs ready. In addition to the new torsion springs, you will need a couple of 10-inch vice grips, two ½-inch x 18-inch winding bars, a tape measure, and a crescent wrench. Also, ensure that the garage is well lit.
If You Are interested, Read Our Article About
Garage Door Opener Light Staying On? Here’s What To Do!
Measure Springs
It is vital to verify the length of both the old and the new springs to make sure that you have the correct replacements. In addition to causing the garage door to malfunction, attempting to mount incorrect springs increases the risk involved.
While measuring the springs may seem straightforward, it is actually a very intricate process. Getting haphazard during measurement can cause the old torsion springs to turn, which will potentially undermine the replacement process.
DDM Garage Doors offers an extremely in-depth tutorial for measuring garage door springs if you need additional clarification on the following steps:
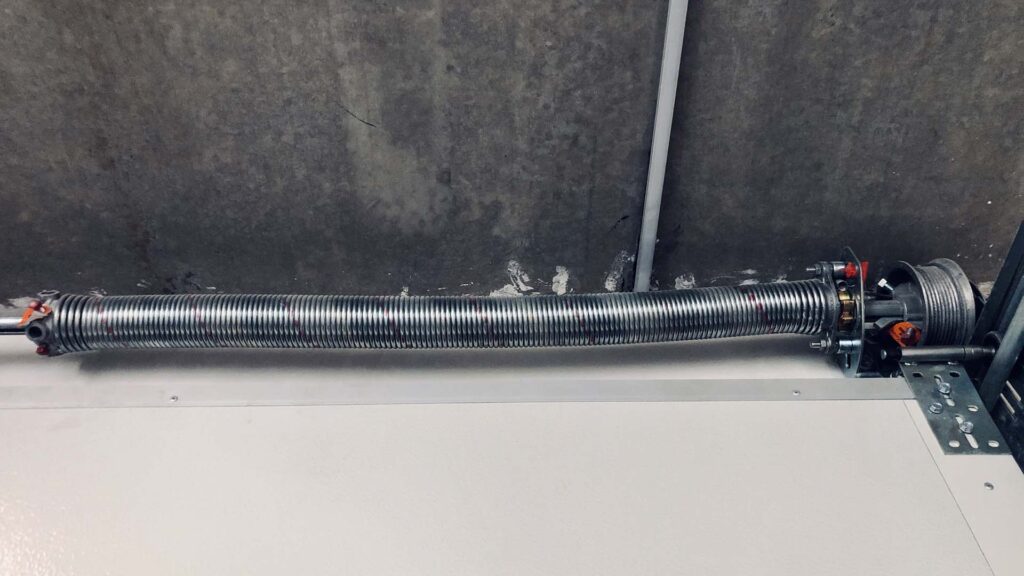
- Measure the length of the spring. This should span from the first coil on an unwound spring to the last coil. Do not include the cones in the measurement. For a wound spring, count off one coil for each turn and measure the remaining length of the spring to determine the length of the spring in an unwound state.
- Determine the wire size. This is the thickness of the wire used to make the spring. To get an accurate figure for this, measure the length of 10 coils and 20 coils and divide by the same figure. If they come out the same, this will give you an accurate reading of the wire size.
- Determine the inside diameter. This is difficult to measure when the spring coils are on the shaft, so look for any indication of the inside diameter on the cones. You may have to use a flashlight to ascertain these markings.
- Check the wind of the springs. This can be confusing because a right wind spring will go on the left of the center support bracket and a left wind spring will go on the right of the center support bracket. To determine a torsion spring’s wind, stand it up on end. If the last coil near the cone opens to the right, it is a right wind spring, and vice versa.
[googleadsycc adunit=”inarticle”]
Mark the Torsion Shaft
This is a crucial step to make sure that the garage door is leveled once the new springs are installed.
- With the cables still tight on the cable drums, mark the drum and torsion shaft at each end of the garage door with a pen to give you a frame of reference for where they need to be when the new springs are in place.
- If at least one of the springs is still wound, do not touch the drums or the shaft because if the cable breaks, the drum could spin rapidly and cause the cable to break bones in your hand.
- If both of the old springs are unwound, wrap the cables around each drum before making your marks.
Unwind the Old Springs

Once all these preparations have been made, it is time to unwind the old springs that have not been broken. It is vital to approach this step with the expectation that the old springs will break at any moment, so make sure you keep your head up, back, and out of the spring path when performing the following steps:
- Insert the winding bar. Insert the winding bar snugly into the winding cone. It is important to remember not to tinker with the set screws until the winding bar is in place and not to attempt to use screwdrivers as a replacement for snug-fitting winding bars.
- Check the set screws. Pull down on the winding bar to make sure that the set screws are tight. Wiggle the winding bar back and forth. There should be less than two inches of play on an adequately tightened torsion spring.
- Mark your winding bars. Use a piece of tape to mark your winding bars, ensuring that they are all the way in and properly set before attempting to unwind the springs.
- Release the set screw. Making sure you are firmly positioned, insert the winding bar until it clicks against the core of the shaft (it should be up to your tape mark as well). While gripping the end of the winding bar firmly, release the set screw with your crescent wrench. Be prepared for the torque of the spring to be transferred to the winding bar.
- Release the cone. Keeping at least one winding bar in the cone holes at all times, loosen all set screws until the cone comes completely free from the shaft. Be prepared for something to break and the spring to go flying at any time.
- Unwind the spring. Now that the cone has been released of its grip on the shaft, it is time to unwind the spring. Keeping at least one winding bar inserted at all times, add the second winding bar into the cone holes. Turn the winding bars down until one comes in contact with the garage door, then releasing and reinserting back at the top. Keep repeating this process until the spring is completely released.
- Repeat for the other spring. If neither spring was unwound or broken before the replacement, repeat this same process for the spring on the other side.
Loosen the Torsion Hardware
Now that both springs have been unwound, it is time to remove them from the shaft. This will involve removing some of the torsion hardware, such as the cable and drums, to clear a path of exit for the old springs. This can be completed with the following steps:
- Loosen the spring bracket. Remove the bolts that connect the center stationary torsion cones to the spring bracket. This will allow the old springs to slide away from the center support bracket.
- Slide old springs out. Slide both of the old torsion springs along the shaft at the top of the garage door toward the cable drums. If this is difficult, the shaft may need to be filed down to allow for the springs to slide.
- Loosen cable drums. Loosen the set screws on the cable drum until the drum turns freely. Remove all cable from the drum. Slide the drum away from the shaft and bearing and remove the old springs. Repeat the process for each spring.
[googleadsycc adunit=”inarticle”]
Insert New Springs
Now that the old torsion springs are off the shaft, you can successfully add the new ones. While this is essentially a reverse process of that used to remove the old springs, there are a couple of points to keep in mind:
- Make sure the old springs are discarded well away from the ladder so that they do not cause injury if you need to descend.
- Double-check the coil of the new springs. Remember, a right winding spring should go on the left side of the garage door and vice versa.
- When the new springs are inserted, make sure the cable drum is squarely back on the shaft bearing and tightened appropriately.
Replace the Cable on the Cable Drum
After the torsion hardware has been replaced and secured, it is time to add the cable back onto the drum.
- Insert the cable into the slot of the cable drum. Once the cable is fully inserted, pull down on the cable to tighten the cable around the outer raised groove of the drum. Twist the garage door shaft until the cable is tightened completely around the drum, using a vice if necessary.
- Once the cable is tightened back on the drum, reinstall the drum set screws to hold everything in place.
- The new springs are now locked onto the shaft. Slide them to the center and using the reverse of the process described above, tighten them into the center torsion hardware, making sure they are secure with the stationary center cones and center spring bracket.
Wind the New Springs
- Insert the winding bars into the new springs, ensuring full insertion up to the tape marks. Continue winding the springs until they get to the marks you made earlier for your point of reference.
- Once the new springs have been wound to the reference point, always keep at least one winding bar in the cone and tighten the set screws in the cone to hold the torsion spring in place. Repeat this process for each cone.
- After the set screws are tightened, and the cones are secured, re-engage the opening arm and connect the garage door back to power. Check the replacement’s functionality and use oil to smooth out any whining sounds, if necessary.
Conclusion
Replacing garage door springs is a dangerous job that can result in serious bodily injury and/or property damage. If you are not well-educated or are uncomfortable with the process, it is a job best left to the professionals.
However, if you are an avid DIYer, several helpful instructional materials can teach you how to replace your worn or broken garage door springs safely and effectively.

0 Comments