

Tools are a large expense for homeowners. Lawnmowers, weed trimmers, shovels, rakes, and every variety of equipment can be found in the average garage. Construction workers use tools for their trade that they store in their garage or shed. Theft can be costly, so avoiding that is optimal and easy – just build a lock cage for your garage tools.
Whether you share a garage or just want some extra security for your tools, building a locking cage inside your garage is a viable option. The quickest way to do that is with pre-fab cages anchored to the studs in the garage frame. But that isn’t the only solution to keep your tools safe.
Beginning with determining your needs to completing your locking tool cage is a weekend project that can offer restful sleep and peace of mind. Like many people, you may have no clue where to begin or this may just be a refresher for you. Either way, the solution to securing your tools is awaiting your hammer and saw.
Table of Contents
Let’s Build a Lock Cage for Your Garage Tools

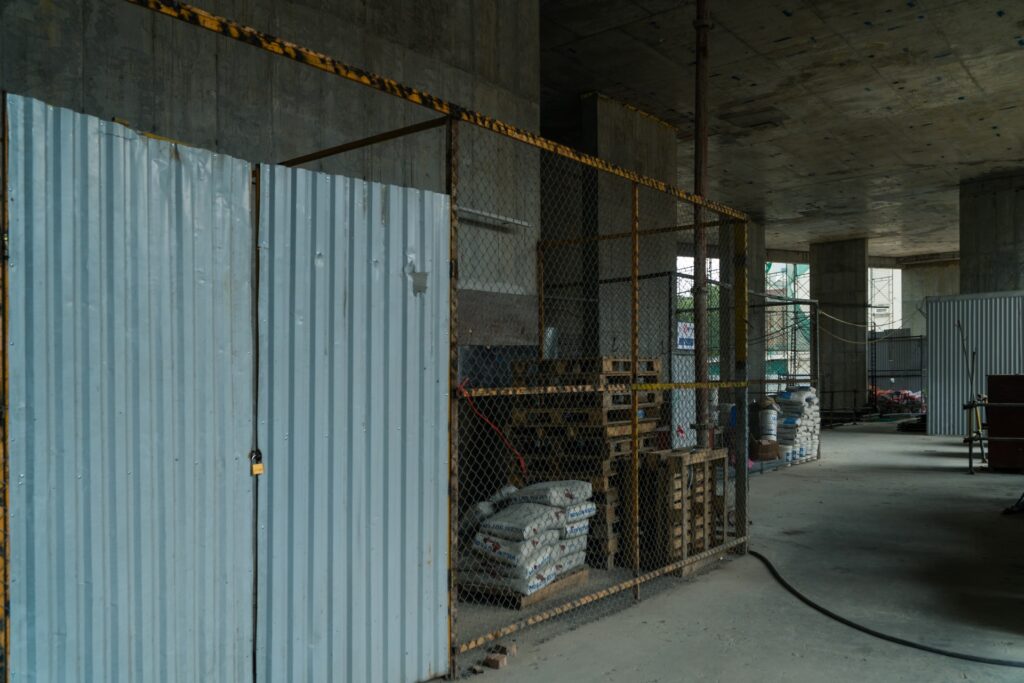
As we stated earlier, the easiest and most expedient way to build a lock cage for your garage tools is by using pre-fabricated panels. These are sold by the piece or in kits. They are easy to assemble and include all the hardware you will need to complete the project.
Rather than going through the step-by-step instructions for this type of enclosure, we are going to help you with the set up and layout issues. The kits come with assembly instructions, so we are avoiding redundancy.
We are also including step-by-step instructions for building your own enclosure using panels you can make in your garage. The materials list does not include exact measurements or amounts, as your list will vary depending on the size of your enclosure.
Determining Your Needs
The first step is to determine your needs. Some questions that need answers:
- What tools do you need to keep in your lock cage?
- Will you be including shelving in the design?
- Are you planning on purchasing new tools in the future?
- How much room do you have to work with?
- Will your structure be free-standing, or anchored?
Those are the basics. Normally, when beginning any project we recommend starting on paper. List all the pertinent information about your project, including your proposed budget. When you are ready to start, your shopping is easier, and the entire project is more organized. Let’s examine some options.
Clearing Space and Laying Out Your Design
We mentioned that you need to determine where you will place your storage cage. This is important if you use your garage to park a vehicle or as a workshop. If you have decided to place the cage at the back of your structure, you will want to make sure that your vehicle still fits.
When laying out your cage, it is helpful to use masking or duct tape on the floor to show the cage size. Whether you place your cage at the rear or along a side wall, you can make necessary adjustments before you begin building. This also allows you to get more accurate measurements if you are designing and building your cage using raw materials rather than pre-made panels.
[googleadsycc adunit=”inarticle”]
Another important thing to factor into your design is the storage cage entrance. If you need to move a vehicle to access the cage when you need a tool, it may interrupt your workflow. Mark the door area when you are masking out the design, including the outward swing needed to access the cage. Before you start building, this allows you to check the space with the vehicle in the garage.
You can also adjust the size of your storage cage to make sure that you have sufficient anchor points along a wall. If you are building a free-standing cage you can adjust the placement during this phase to accommodate your other space requirements.
Free-Standing or Anchored

We’re going to add a few notes on the differences between these types of enclosures. There are distinct differences between the design, cost, and overall security of each.
A free-standing cage or structure means that it stands on its own, without being anchored or secured to anything. With a smaller enclosure, this may not seem to provide as much security as an anchored structure. There are ways to secure a free-standing tool cage, though, so don’t toss this idea out yet.
In this area are the pre-fab cages that you buy, set up, and presto – you have a secure tool cage. The neat thing about the pre-fab units is that they come in bits and pieces based on your design. While there are standard size cages available, you can use the individual pieces to make your cage any size you need. These cages also provide options for shelving, drawer units, and various types of locking mechanisms.
With some pre-fab cage systems, you need to pay attention to the design of the locking mechanism. Your cage will only be as secure as its weakest component. Cages are available from many online outlets and at your local big box home improvement warehouse. Each has advantages and disadvantages, so the choice boils down to evaluating your personal needs.
If you are building a secure storage inside your garage, you will need to examine how much room you have available. If you park a vehicle in your garage, you want to make sure your tool cage is accessible while the vehicle is parked.
Cages can be anchored in a variety of ways also. They can be bolted directly to a wall, using the garage framing. Additionally, the bottom of the enclosure can be bolted into the concrete flooring using concrete anchors.
Shelving or Wooden Cubbies
If your tools are all on wheels and will be rolled in and out of your security cage, you probably don’t need shelving. But, like most people, you worry more about securing hand tools and things that are more easily carried off by thieves. If you are in the construction industry, your hand tools are your livelihood. Keeping them organized and easily accessible will add to your efficiency too.
But do you want open shelving, drawer shelves, or individual cabinets within your security cage? Again, you need to evaluate your personal needs. This means you may end up with a variety of shelving options to hold your tools.
Items such as circular saws can be stored quite well on open shelving. Smaller things like drill bit kits, spare saw blades, and other random items are well-suited to drawer or bin storage. If you have cordless tools with batteries and charging units, those might be well-suited to cabinet storage. Making your storage adaptable to fit your needs will allow the space to grow with your tool inventory.
Obligatory Safety Warning

Because we care about your safety, we should mention using caution while building your security cage. Wear gloves to protect your hands. Use goggles or safety glasses to protect your eyes. Practice proper tool use. When welding, use approved welder’s gloves and a safety helmet or face shield designed for welding.
Keep children and animals away from your work area. You know the routine. Stay safe.
[googleadsycc adunit=”inarticle”]
Where to Get Materials and Hardware
Where you purchase your supplies will depend on whether you want to order your equipment online or buy from a local vendor. The ultimate choice is yours, but we wanted to cover some of the finer points for you before we get into the actual building phase.
While ordering online has the advantage of delivery directly to your doorstep, there are disadvantages also:
- Some vendors add shipping costs
- No pre-purchase ability to inspect items for damage
- Damage can occur during shipping
- Incorrect orders can lead to delays waiting on replacement parts
When shopping online, check out previous customer reviews, professional reviews, and other available information. Selecting a vendor with the cheapest price might result in unsatisfactory results with your final project. Research is the key to a satisfying experience with any online purchase.
Using a local vendor carries many advantages. If you forget the whoozit bolt for the whatzit fitting, you don’t have a two-week wait while it gets shipped to you. Some other benefits include:
- You can hand-select all your parts
- It supports your community
- Spare parts or replacements are close at hand
If you are building from pre-fabricated materials, make sure that you account for all hinges, latches, wall and floor anchoring hardware, and all the bits and pieces you need to complete your project. Many vendors, both local and online, have customer service representatives that can review your list to make sure you thought of everything. Use these services as they will save you headaches.
Beginning the Assembly
Assuming you are using pre-fab panels to create your security cage, assembly is pretty straight-forward. Follow the instructions included with your kit. If you have opted to create your own cage entirely from scratch, we recommend following the directions outlined below for optimum results.
Building Your Security Cage Using Raw Materials

If you have decided that none of the pre-fab kits meet your needs, it is possible to build a cage using raw materials. You will need a little know-how about welding. If you don’t know how to weld, you can always ask a friend for help. MIG and TIG welding machines can often be rented from your local home improvement warehouse. They will offer quick instructions on safety and usage, but you’ll still need a bit of practice.
Step 1: Assemble your materials
- Thick grade wire mesh or chain link fencing
- Angle iron to build framing
- Drill with drill bits for metal
- Honing oil (this makes drilling through metal easier and keeps your drill bits cooler)
- Hack saw (or power saw designed to cut angle iron)
- A welding machine (TIG or MIG are well-suited to this project)
- Locknuts, bolts, and washers (at least 4 sets per joint between panels)
- Large eyebolts with washers and locking nuts (for the lock assembly)
- Clamps (to hold completed panels together for drilling or welding)
Step 2: Make Your Panels
Cut your angle iron pieces to the appropriate size to make the end panels. These will be welded together, so you have options. You can either use 45-degree angles for the corners, which makes a more professional finished product. The other option is to square-cut the corners and overlay them, welding at the overlay points. Both methods work well, so it is a matter of personal preference which is used.
Once you have your basic frames made, lay them with the angle iron flat side down. Measure and cut the chain link or wire mesh to fit inside the frame. You will be welding this to the inside of the frame to complete your panel. As an alternative method, you can drill anchor holes and use u-bolts or j-bolts to attach the fencing or mesh to your frame. The second method is labor-intensive and does not increase the level of security.
Repeat the above steps to build the remainder of your frames. Make the frame for your door a half-inch narrower along the width to allow clearance for opening and closing it.
[googleadsycc adunit=”inarticle”]
Step 3: Assembling Your Structure
Once your panels are assembled, it is time to assemble your cage. If you are building a three-walled enclosure, you will begin by anchoring your first end panel to the existing wall. You can construct the three walls and then anchor the entire structure if that is easier for you. To build your structure:
- Take and end panel and a front panel. Place them upright, corner to corner, flat-side of the angle iron out. This will form a 90-degree angle.
- Using a separate piece of angle iron (smaller scrap pieces at least 4 inches long can be used for this) clamp the two panels together. The angle iron will keep the panels at 90 degrees and provide stabilization.
- If you are bolting your panels together, you will need to drill bolt holes through the stabilizing angle iron and the frame. Place your bolts, washers, and locknuts and tighten them finger-tight for now. Leaving some “play” is necessary at this stage and allows for adjustments and squaring your structure. (NOTE: Be sure to place your bolts with the threaded end on the inside of your enclosure.)
- If you are welding your structure rather than bolting it together, be sure that your first corner is squared properly. Welding is pretty much permanent, so you will have trouble making adjustments later.
- Continue adding panels to your structure. Straight-line joints will not need the extra angle iron, as the two panels will attach to one another. Use clamps and bolt or weld these panels together.
- To add additional stability, you can attach angle iron or straight flat iron to the seams between panels and over the door. While this is a good safety and security addition, it is not a required part of the cage.
Step 4: Adding Your Door
Your security cage will only be as strong as the weakest point. In most cases, this is the door assembly, or more specifically the hinges. We recommend finding good, 4 to 6-inch heavy-duty hinges and using at least three. To attach the hinges, use strong bolts, locknuts, and then weld the hinges to the framing. While this may seem like a bit much, it will increase the security of your weakest point.
We mentioned decreasing the width of the door panel by at least a half-inch. This will allow clearance to open and close the door without effort. If you make the frame too snug, the cage will be difficult to open and close.
When you add a locking mechanism, there are several options. You can purchase a sliding lock and hasp assembly or you can easily make one. We recommend using two heavy eyebolts, one placed on the door and one placed on the frame of the structure. This allows you to use a standard lock to secure your cage and provides more stability than a sliding bolt/hasp-type assembly. We found a great video that shows how to attach eyebolts to your cage.
Once your door is attached, your cage is ready for use. If you did not anchor it to the wall or floor, now is the time to do that.
Finishing Touches
Once all your frames are assembled and welded, you may choose to paint them any color you like. Check all your welded joints and grind down or sand any sharp points in the welds before painting. We recommend a high gloss finish with a rust protector. Since the cage will be inside a building, paint is not required, but it will keep humid air from causing rust.
Once you have painted (if you chose to do that), it is time to finish off the inside. Begin by assembling any shelving systems that you have for the inside of your security cage. Keep in mind the size of the finished shelving unit. If it won’t fit through the door, you’ll want to assemble it inside the cage.
[googleadsycc adunit=”inarticle”]
A Few Words on Selecting a Lock
A lock is a lock, right? Wrong. Locks are available in four basic styles – long shackle, straight shackle, open shackle, and closed shackle. Some use key lock mechanisms while others use a combination dial. They all have advantages and disadvantages. The closed shackle is the most secure, but are limited in uses. Long shackles are easy to attack, but allow greater versatility in use.
There is a difference between indoor and outdoor locks too. While your cage will be indoors, it will also be subject to changes in humidity. Also, key locks are generally thought to be more secure than combination locks. That depends greatly on the style of lock. A locker-style lock with the combination dial on the face is not as secure as a tumbler-style combination lock.
Most locks contain a security rating that is listed on the packaging. This video demonstrates the different ratings and describes how secure they are. While the video only describes keyed locks, the security ratings apply to combination locks also.
Don’t Forget to Lock the Garage Door Too
Now that you know how to build a lock cage for your garage tools, we have another simple reminder for you. Don’t forget to lock the garage door too. While it may seem like your tools are secure (and they will be), why invite additional trouble? Keeping your garage door locked just makes sense.
We hope you enjoyed this step-by-step guide and found it helpful. Let us know about your lock cage experiences in the comments.

0 Comments