For the biking enthusiast, we’ve compiled a list of the best garage bike racks to fit everyone’s needs. These bike racks can keep your ultralight high-end road bike safe while in storage, or hold up to the weight of your heavy electric-assist mountain bike. Whether you’re looking for something budget-friendly or high tech for your top of the line ride, we’ve got you covered.
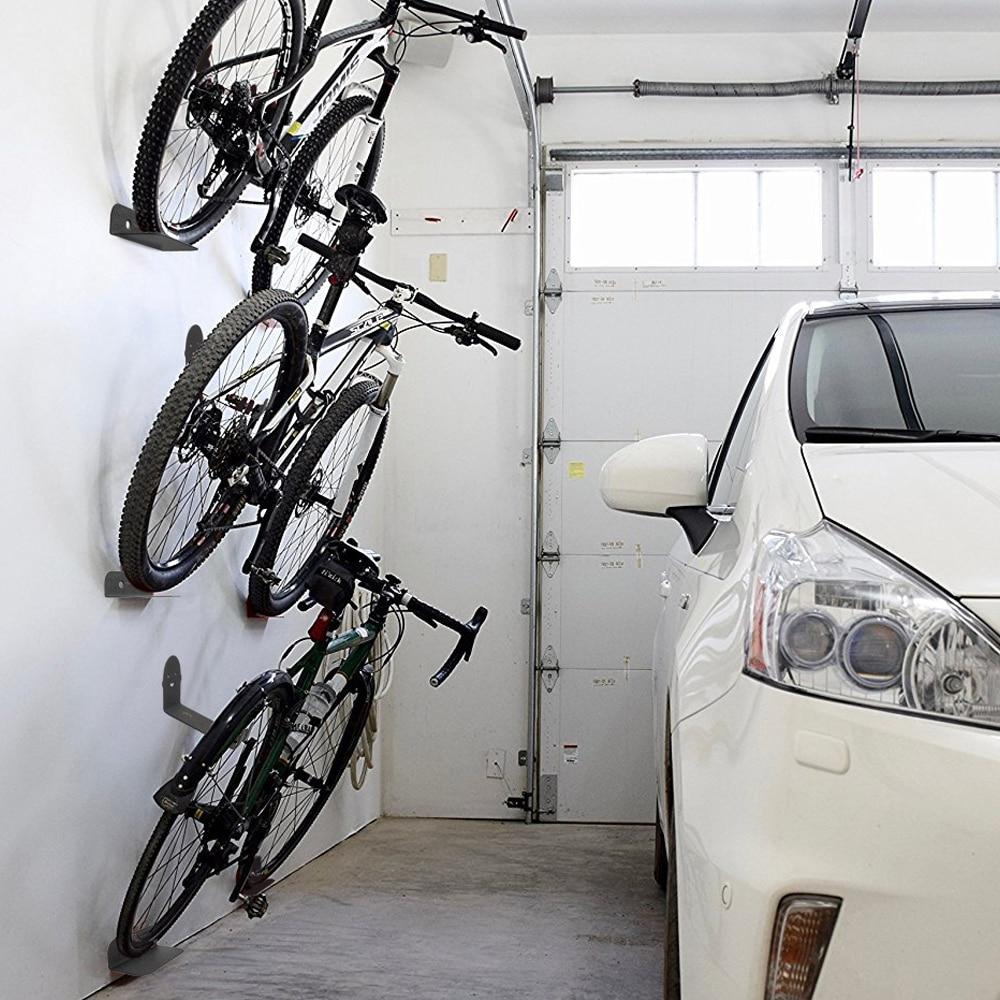
The best garage bike rack is the Dizra Vertical Storage System. The simple yet practical wall-mount bike rack holds up to 65 pounds and has a lifetime warranty. The two-pack is heavy duty and won’t scratch your bike.
Let’s learn more about this bike rack, but also a few other incredible options depending on your specific needs.
Best Bike Racks for Everyone’s Needs
When purchasing a bike rack, you will need to know the weight of the bikes you need to store, the overall size, as well as the type of tires that you normally use. No bike rack is made the same, so the bike rack that is best for you may not be the same as another.
Here are quick links to all the products listed in our post:
The best overall bike rack for the garage is a simple, low tech solution. This hanging system consists of hooks and wall plates to hang your bike vertically against the wall. The wheels of the bike suspend from the hooks, with the tires against the wall.
This system by Dirza costs only $23 holds up to 65 lbs. They say that the hook design prevents the bike from accidentally getting knocked off the rack, preventing damage to the bike or objects around if it fell.
To work properly, these rack hooks should be screwed into studs in your garage wall. When hanging, the bike will stand out from the wall the height of the seat. However, multiple bikes can hang side by side. One bike would then only take up about 70” by 36” of floor space by standing on end.
Some bikers may believe that suspending their bikes from the front wheel might damage the wheel, spokes, or tire. However, others say that the rims are typically damaged if you aren’t careful when hanging your bike. Accidental bumps can still cause scuffs, scrapes, or dents to the rim.
Pros
Easy to install, low cost, and can hold heavy bikes
Cons
Your bike still sticks out pretty far into your garage
Best Vertical Bike Rack without Hooks
If you feel that hanging your bike from a hook will definitely damage your bike, but vertical storage is your only option, there is a bike rack for you.
SteadyRack Bike Rack for wall mounting clamps down on your wheel, rather than hooking through it. The wheel of your bike fit into the bracket so that the tire bears the weight, rather than the rim or spokes accidentally. There are multiple options for different size tires and weights, but the larger racks can carry up to 77 lbs.
The mountain bike version of the rack costs $90. A bottom bracket prevents the back tire from resting on the wall, eliminating dirt and scuff marks. The manufacturer claims that you don’t need to lift your bike off the ground, either. You should be able to pick the front tire up and push it easily into the mount without lifting the back tire.
When not in use, the rack folds up so that you don’t accidentally run into it but can easily fold back down when you’re ready to store your bike.
Pros
Won’t damage wheels, safe solution, easy to install
Cons
Pricy, not flexible for different styles of bikes
Cheapest Garage Bike Hanging Options
The cheapest and easiest bike storage options for your garage isn’t marketed as a bike rack at all. Low-cost wall hooks operate similarly to the Dirza product. However, without a protective plate, your walls could become marred.
To install a bike hook, you’ll need some simple garage hooks from your local hardware store. Choosing the right one might be difficult. Consider how heavy your bike is and how the walls of your garage are built.
For example, this Home Depot Bike Hook costs just $2 and can be installed in minutes. First, predrill a hole in the studs of your garage. Make sure you don’t just drill through the drywall. Then, screw the hook into the wall. Hang your bike from the hook! Alternatively, you can hang these hooks from the ceiling as well.
If you want to protect the wall from tire marks, you can consider some self-adhesive drawer liner. You can even pick a pattern that would cheer up your garage!
Pros
Cheapest option, easy to install
Cons
Your bikes will dirty up your walls, the screw might tend to pull out of the stud
[googleadsycc adunit=”inarticle”]
Best Bike Racks for Minimalists
The most minimalistic bike rack solution simplifies bike storage to a single basic tool. Better yet, the solution doesn’t require any screws, bolts, or complicated mounting solution.
Clug Bike Clip is a simple bracket that pops on to the wheel of your bike. For only $25, the bracket can keep your bike upright without a kickstand, or allow you to lean the bike vertically up against a wall. The package also comes with screws to make your Clug permanent and more stable.
Since bikes have different sizes, the Clug comes in different shapes and sizes to fit a variety of different bikes. The bike stands up on its own weight so the Clug doesn’t need to hold any weight either. This means that if you can’t find a stud, you can screw it into drywall, as long as you don’t pull, twist, or tug on it. Better yet, just rest the Clug against any wall you find, without having to mount it to anything.
Since the Clug holds onto the tire of your bike, you have to make sure you know the size of your tire to order the right size Clug. You don’t want to buy one that is too tight or too loose. Even the pressure of your tire could affect how snug the Clug holds on. Some users say finding the right fit might be difficult.
Pros
Easy to use, doesn’t take up a lot of room, flexible mounting configurations
Cons
High price for what it is, not flexible for multiple styles of bike
Best Rack for Bikes with Trailers or Childseats
With kids, you always have more equipment and supplies to tote around. When you get back to your garage, you need a place to store all that extra stuff. Luckily, you should be able to find a place on your trailer or car seat to hook into.
Consider this pulley system from Hosko costs just $20. On one hook, you can hoist your own bike while on a second one you can lift your child’s trailer. The system can pull objects up to 10 ft up in the air and lifts up to 100 lbs.
While more expensive systems may be able to hold multiple bikes, trailers, or other bulky items, this solution is cheaper for the same number of objects. If you need three pulleys for his and her bikes plus the child trailer, the total cost would only be $60 versus some of the more expensive systems. Any parent with a young child can appreciate a little cash back in the pocketbook!
Like many of the other mounting systems, in order to lift the full weight the rack is designed to hold, you need to attach the bracket to the studs in your garage’s ceilings.
Pros
Gets your bike off the floor, easy to use pulley system
Cons
Each rack uses two hooks to hang one bike or accessory, so need multiple racks for multiple bikes or accessories
Bike Racks for Wall Mounting
Saving floor space in the garage with multiple bikes may mean hanging your bike parallel to a wall. By hanging your bikes against the wall on the long dimension, they stick out less from the wall than other options. Depending on how much height you have, you may be able to stack multiple bikes on your wall.
Zincera makes a rack that saves vertical space and floor space.The system costs about $60 and holds up to 220 lbs on each rack. With multiple racks, you can hang several bikes on a single wall. The frame of you bike sits in the top bracket, while the back tire rests on the bottom plate, which prevents scuffing on the wall.
The product consists of a bottom support shelf and a top hanger that can rotate, adjusting the angle of your bike. Since the top bracket is adjustable, you can pick different angles to allow your bike to sit closer to the wall, or further out into the floor.
So, if you have more height on your wall, you can angle the bike further to stack additional bikes in a shorter height.
Pros
Requires less floor space, adjustable mounting angles
Cons
You may not be able to reach the top bikes first if the other bikes lower are in the way
Best Bike Racks for Ceiling Mounting
If floor space in your garage is limited, consider taking advantage of overhead space for hanging your bikes. You may need to consider the overall height of your garage, the height of your bikes, and the height of any vehicles you park underneath.
This ceiling rack system from Saris is an expandable track system. The basic rack comes with space for four bikes but an add on option adds rails for two additional bikes. The price point is higher than many options at about $245. The add on kit is about $115.
Customers’ reviews indicate that they love the system. However, there may be a minor flaw in one of the clips that can be easily be replaced. With the added strength, the system operates phenomenally.
Depending on the weight of your bike, though, it may be difficult for you to lift a bike over your head. Road bikes weigh about 20 pounds, mountain bikes about $30 pounds, and e-bikes about 50 pounds.
Pros
Easily hang multiple bikes overhead, expandable system
Cons
Expensive, and a small part is prone to failure (though easily fixed), must be able to lift your bike over your head
High-End Bike Racks for the Garage
For those looking for a high tech solution, you can find an endless list of expensive options. Motorized bike racks take the physical work out of hanging your bike on walls and ceilings. If you can’t lift a bike over your head to hang a bike on a hook, a power-assisted option can help.
Garage Gator makes a lift that supports up to eight bikes. The motor is able to lift up to 220 lbs, so if you maximize the number of bikes, each one should be less than 27.5 lbs. However, the price point is $415, making it the most expensive option on this list.
To operate the lift, the bikes should first be hooked into place. The hook wraps around the stem of the seat, where the seat can bear down on the rod. Once all the bikes are hooked in, the wall switch activates the motor, raising the lift up into the ceiling of your garage.
Pros
Motorized system eliminates lifting, can store multiple bikes overhead
Cons
Expensive, doesn’t have a large weight limit
Best Freestanding Bike Rack
Even if you don’t have wall or ceiling studs that you can mount too, you can still find bike rack options to save space in your garage. A sturdy freestanding rack should hold the weight of your bike without toppling over. Even the best-designed racks could topple if you accidentally drop the bike or fall into the stand accidentally.
This freestanding bike rack from Cycling Deal fits two bikes, freeing up floor area in your garage. The rack can support up to 55 lbs per bike and is adjustable to accept different size and style bikes. At about $90, the manufacturer also provides a lifetime warranty if the stand fails.
This option allows you to move the stand around as needed to accommodate space in your garage. If you move around a lot or rent your home, this option prevents you from having to patch holes in your walls.
Pros
Doesn’t require mounting on a wall or ceiling, can be easily moved around
Cons
Could be knocked over
[googleadsycc adunit=”inarticle”]
High-End Freestanding Bike Rack
One of the highest-rated bike rack options is the Delta Michelangelo. Customers love the sleek design and aesthetic appearance. This rack leans against a wall, which means that the more weight added to it, the more sturdy it becomes. While technically it’s not freestanding, it doesn’t require attaching to a wall for support.
There are two bike and four bike options. The max weight of the rack 100 lb for two bikes, similar to the Cycling Deal rack. The Michelangelo costs about $60. The frame of the bike rests in the arms, which can slide up and down on the frame to fit different bike shapes and sizes.
Some customers say that if you need to support a women’s bike with a smaller frame, you might need to add horizontal supports to hang the frame. Others say that you can simply rotate the bike to mount them vertically. While the rack has largely positive reviews, other customers note that the rubber coating on the hooks can split while adjusting.
Pros
Stylish and sleek, doesn’t need mounting screws
Cons
Fragile rubber coating on hooks
A Do-It-All-Bike Rack for the Garage
If you need a place to store your bike, helmets, water bottles, gloves, packs, or other biking accessories, you may want a rack that can offer storage for more than just your bike.
BirdRock makes a freestanding bike rack and storage solution to hold multiple bikes. This rack costs about $93 and holds up to three bikes. There’s no lifting involved as you just roll the front tire into the bracket. This rack is similar to many public bike racks and is easy to use.
The top basket measures 10.5” wide by 31” long by 4.5” high, which should hold multiple helmets or other objects. There are also hooks on the sides of the rack for additional storage.
If you’re a family on the go, this rack will keep everything in its proper place, keeping your garage organized and clutter-free. However, the overall rack size with the length of the bikes takes up more floor space than other solutions. With three bikes on the rack, the total floor space used would be about 4’ wide by 6’ long.
Pros
Holds multiple bikes, provides storage for accessories, easy to use
Cons
Requires some assembly, uses more floor space than other options
Best Bike Racks for Everyone’s Needs
When purchasing a bike rack, you will need to know the weight of the bikes you need to store, the overall size, as well as the type of tires that you normally use. No bike rack is made the same, so the bike rack that is best for you may not be the same as another.
Here are quick links to all the products listed in our post:
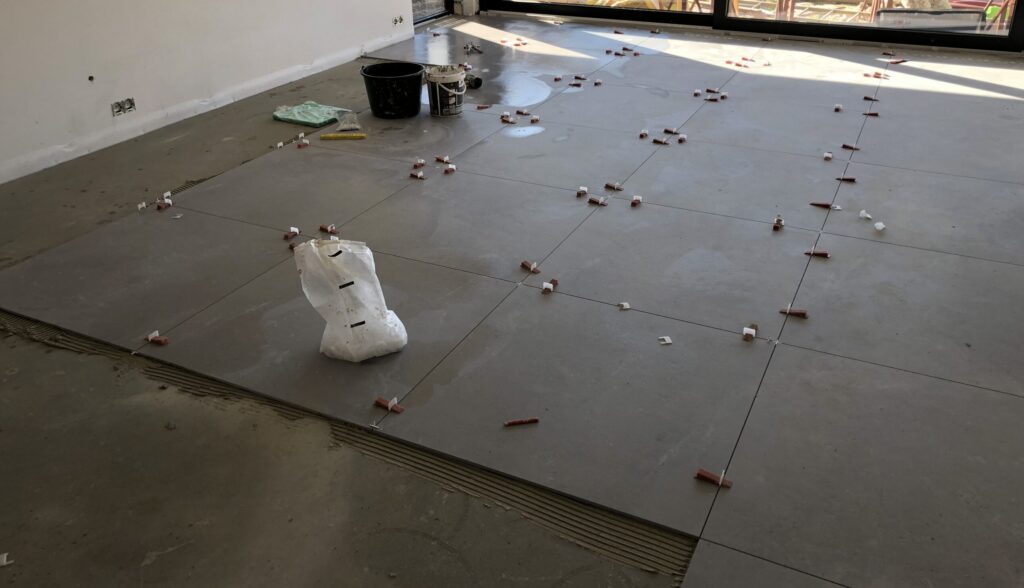
Garage floor tiles offer an easy opportunity to protect your concrete garage floor while simultaneously enhancing both the aesthetics and functionality of your garage space.
The best garage floor tiles are ones that have been deemed to be durable, affordable and also useful for protecting your garage’s concrete surface. These tiles usually are connected via interlocking patterns, removing the need for any grout or tools.
Here you will find out which garage tile will best suit your needs. You will find that these tiles are shockingly easy to install. More importantly, they serve their purpose by making it easier to clean and take care of your garage surface. You would certainly like to keep your garage’s cement flooring in good shape for as long as you can. These flooring options offer an excellent opportunity to do so.
What Is The Best Garage Floor Tile?
There is no singular answer to the question of which is the best garage floor tile. The answer to the question really depends upon what you are looking for. Garage floor tiles can be fit into two different groups: functional tiles and stylish tiles.
Functional tiles include the following types discussed here:
Rubber interlocking tiles
Polypropylene interlocking tiles
Roll out mats
Open rib tiles
Maximum traction tiles
Vented drain tiles
Stylish tile options include:
Vinyl Peel and Stick Tiles
Checkerboard Patterns
Porcelain/Ceramic Tiles
Rubber tiles are a great addition to any gym or home recording studio but vinyl tiles will suit a home auto showroom much better. Vented drain and maximum traction tiles will serve functional purposes that will certainly elevate the status of your garage as a workshop. Scroll down to see some of the highest rated options in the relevant categories.
[googleadsycc adunit=”inarticle”]
What Are The Benefits To Using Garage Floor Tiles?
Floor tiles are a versatile finisher for garage floors. They come available in a wide array of materials and designs. Whether you’re talking about a way to spice up the presentation in your sports car showroom or just simply looking to add padded flooring, you are sure to find a garage floor tile set that suits your plans.
The numerous benefits of installing garage floor tiles include:
Padded comfort for your workshop
Sound deadening
Ease of installation
Design aesthetics
Insulation
Extending the lifetime of your cement garage floor
Affordable as far as garage finishing options go
There are many different options for garage floor finishes. These options include epoxy, paints and other solutions. You are encouraged to use garage floor tiles as a diminishing touch. They are easy to install and they usually last pretty long as long as you get a tile that is made out of a durable material.
High-Impact Polymer Tiles Are The Most Durable Garage Floor Tiles
Garage floor tiles are not often seen as a long-term solution. Many feel that these flooring options do not last long or are prone to damage. Cold climates may be seen as particularly troublesome, due to the intrusion of road salt for at least part of the year.
Among the most durable of garage floor tiles is the Speedway Diamond Garage Floor 6 Lock Diamond Tile. These tiles are made out of heavy-duty polymer and interlock with each other so that they are less prone to shifting. Damage from ice and moisture should not be of major concern since these tiles are designed to allow air and water to flow beneath the flooring layer.
Installation is also a fast process. The tiles simply interlock like pieces of a jigsaw puzzle. Each package comes with tiles that are 1 foot by 1 foot in size. The only unfortunate aspect of this is that they do not adhere to the surface of the garage. You may consider this a positive though, as removal will always be easy.
Open Rib Tiles Allow For Maximum Air And Water Flow
One potential concern with floor tiles may be related to the time it will take for the layer to dry out. Some may worry that they will have to occasionally remove the tiles in order for them to dry out. Luckily this is not the case, as there are tiles that are specifically designed to handle lots of moisture and still dry out fast anyways.
The RaceDeck Free-Flow Interlocking Garage Floor Tiles come with an open-rip design rather than being one solid layer. This means that there will be less total surface area to dry out, even though you will still be able to enjoy the benefits of having a covering over your garage floor.
The open-rib design allows for maximal movement of water and air. If you drag a bunch of snow into your garage during wintertime, you will not have to worry about puddles in your garage anymore. The water will not stick to the surface, rather it will flow from the surface and out through the bottom of your garage.
[googleadsycc adunit=”inarticle”]
Polypropylene Tiles Are A Recyclable Option
If you are looking for a sustainable flooring option for your garage flooring, look no further than garage floor tiles that are made out of polypropylene. These materials can be seen as a sustainable option for multiple reasons.
First of all, the garage tiles will protect your cement floor and lengthen the amount of time that will spend without having to replace your cement floor. This can be an environmentally- intensive process when you consider the equipment and power needed to produce concrete. Polypropylene tiles are also recyclable after they are eventually removed.
Research from Stanford University has shown that the production of polypropylene-based products used less carbon than the production of other similar materials. These materials will serve further uses once they have reached the end of their life as garage flooring and will not take up space underneath a landfill.
interlock together like many of the other options.
Interlocking Rubber Tiles For Your Home Gym
If you have dedicated all or part of your garage to be a workout space, then interlocking rubber tiles are sure to make your garage more cozy. These tiles will certainly be a more comfortable workout surface than the cold and hard concrete floor. Rubber flooring is also an essential part of any home recording studio.
The BalanceForm Puzzle Exercise Mat Interlocking Tiles will enhance your recording studio or workout space. The tiles are made out of a high-density EVA foam with non-slip surfaces on both sides. They should be pretty durable, but if you accidentally scrape one side of some of the tiles, you can simply turn them over and nothing will change.
Rubber floors have been shown to reduce vibrations in home recording studios and are highly recommended by the L.A. Film School. The thicker the rubber flooring in the studio, then the better the sound will be. The BalanceForm Exercise Tiles are ¾ inches thick and present themselves as an affordable addition to the garage recording studio.
These rubber tiles will also help to reduce vibrations from the sounds of your home gym. Your workout equipment will last longer, as it will no longer be under the threat of becoming damaged from being dropped on a concrete floor. Best of all, these tiles are both simple to install and remove. No tools will be needed during this process.
Rolling Floor Mats Are Easy To Install
The easiest type of garage floor tile to install is the roll-out floor style. Installation is pretty simple when all you have to do is roll the tile out onto the floor space. This is an excellent solution for making your workspace or personal gym more comfortable. Perhaps the only negative of this type of garage floor tile is that they do not naturally adhere to the floor.
The rubber-cal diamond plate flooring roll is outfitted with diamond patterned protrusions in order to maximize traction. This makes these garage floor rolls a popular option amongst those who have their own personal workout space in their garage. The rolls come in 4 foot wide sections of varying lengths.
Roll-out garage flooring is perhaps best used as a temporary solution. It will be an affordable option but it will be hard to keep in place in the long term without adding your own adhesive or using some other method to ensure that the material doesn’t move around so often.
Peel And Stick Tiles Are More Likely To Stay In Place
If you are looking for a longer-term solution, then peel and stick tiles will likely satisfy your needs. These types of tiles have an adhesive on their underside that adheres directly to the cement garage floor. This kind of garage floor tile is often seen as more stylish than interlocking tiles which serve a more functional purpose.
As for ease of installation, these tiles will still be relatively easy to install but the process as a whole will require some degree of preparation. You need to make sure that your cement floor is clean and dry before you apply the tiles. Keep in mind the fact that it will be harder to reverse course if a mistake is made. Interlocking tiles are much easier to adjust when necessary.
The biggest plus of these types of tiles is that they are typically much more stylish than the interlocking tiles. The interlocking tiles have a “grid-like” appearance while peel and stick tiles glisten in the light. This feature makes the peel and stick tile a popular option among those looking to add more of a showroom feel to their garage.
The Achim Home Furnishings Nexus 12-Inch Vinyl Tile is a stock and peel tile that is made out of vinyl. This type of tile has traditionally been marketed as a flooring option for bathrooms, kitchens and other interior surfaces. However, this is also certainly a viable option for the garage as well.
The SF Gatenotes that these types of tiles perform the best in warm and dry climates. Interlocking tiles are much more durable in cold and wet damage. The stick and peel articles do not have a tendency to respond very well to moisture. They may lose their ability to adhere to the cement floor.
Vented Drain Tiles Prevent Dirt Build-Up
Perhaps you are tired of dirt build-up on your garage floor. Vented drain flooring is specifically designed to help carry this debris out.Dirt and mud will be easy to remove, as you will be able to take a hose to the surface and watch as all the dirt travels to the bottom of your garage and out and away from the garage.
The IncStores Vented Grid-Loc Garage Flooring represents an opportunity to make garage floor clean-up much easier. These tiles are made out of impact-resistant plastic, so there is no need to worry about the lattice structure of the tiles being crushed underneath the weight of your vehicles.
The product listed above also comes available in ten different colors, so there will be plenty of chances to get creative with your design scheme. The options are pretty unique with colors like purple, yellow, red and blue among the mix.
Porcelain Tiles: A Beautiful Addition To A Concrete Floor
Switching gears up a little here, one alternative to vinyl, rubber or plastic tiling is to apply porcelain tiling to your cement garage floor. This material is a long-term installation while many of the other materials discussed here are short-term options. Thus, porcelain tiles are a much bigger commitment. Porcelain will also require more careful planning and the installation process itself will certainly be more time-consuming and difficult.
You certainly can lay porcelain tiles on top of cement. There are many benefits to having porcelain tiles in your garage, as is described here:
It resists stains better than concrete
Less susceptible to damage from road salt and chemicals
It can be cost effective
DIY installation is practical
The drawback to porcelain tiles is that they require much more time and effort to install. They are also slippery, meaning that they may not be practical as an option for a garage that is also commonly used as a work space.
The SomerTile Albe Floor And Wall Tile will provide you with a natural stone look in your garage. The P.E.I Rating V is built for both residential and high-traffic commercial use. These tiles are also considered to be marginally skid-resistant.
The floor must be cleaned and rigid, floors will have to be even
An installation plan must be determined
Thin-set should be spread across the cement floor with a notch
Plastic spacers will help ensure that you are setting straight grout lines
Coin Pattern Tiles Allow Extra Traction
There are a few different patterns that are used in garage floor tiles to enhance the amount of traction on otherwise slippery surfaces. These are an alternative to the open-rib patterns and diamond patterns that are commonly seen in garage floor tiles.
One of the most popular options with the coin pattern is the IncStores Coin Nitro Garage Tile. This tile comes available in a wide array of color options. There are 6 different color options for this specific model of garage flooring tile, just in the coin pattern alone.
[googleadsycc adunit=”inarticle”]
Complement Your Sports Car With A Checkerboard Scheme
You can transform your garage into a showroom for your prized auto collection at little cost by adding a checkerboard design scheme to your garage floor. This nice added touch will complement your sports car nicely.
One of the most popular options as far as checkerboard garage floor schemes go are these self adhesive black and white vinyl flooring tiles. Vinyl flooring is a realistic option for garage flooring. This will be the case as long as you are located in a warm and relatively dry climate. According to SF Gate, classic vinyl flooring does not hold up well in cold and wet climates.
The benefit of vinyl tiles are mostly tied up in how neat the design scheme is. If you are in a cold and wet climate, you are encouraged to keep your car inside and your garage closed as much as possible if it is cold and wet outside.
You can always make a checkerboard pattern with more durable tile materials too. The RaceDeck Free-Flow Interlocking Garage Floor Tiles come in three different color options: alloy, black and graphite. The only difference is that these tiles will not pop with the same shine as the vinyl floor tiles. It will certainly be a more durable option though.
When it comes to industrial cutting methods, you have many different options to choose from. Two of the most common are plasma cutting and laser cutting. Although they sound alike, they’re often used for different things. So, what is the difference between plasma and laser cutting?
Plasma Cutting
Laser Cutting
Uses gas to create plasma which cuts material
Uses a high-power CO2 laser to cut material
Can cut through metal >25mm thickness, cheaper to operate
Fast cutting speed, higher precision, can cut more than metal
Produces harmful gas and radiation, cuts are not as clean
Cannot cut through very thick metal, expensive to operate
While that’s a basic breakdown, it is more complicated than that. We’ll go into their history, best applications, the benefits and drawbacks of each, and much more in detail below.
Laser Cutting Versus Plasma Cutting
In order to have mass production of metal goods, you need to be able to cheaply and quickly cut custom pieces from larger metal sheets. Over the years people have come up with many different ways to make this happen, including:
Using cutting wheels (“turning metal”)
Using high pressure water jets
Flame cutting
Plasma cutting
Laser cutting
While all of these are methods to achieve the same goal, they still have many differences between them. Plasma and laser cutting are two of the most popular methods used today, so let’s explore the differences between them in detail.
Origins and Explanation of Both Methods
In order to understand the modern differences between plasma and laser cutting, it can be helpful to understand when they were developed and for what reason. We’ll also talk a little about how they work—a must-know if you’re going to be dealing with them.
[googleadsycc adunit=”inarticle”]
Plasma Cutting: What Is It and How Does It Work?
The method of producing and using plasma to cut through metal was first patented in the 1950s. Back then, if you wanted a specific piece cut from a metal sheet then your main option was to have it cut out with a regular oxyacetylene torch. However, plasma cutting didn’t catch on until the 1970s because that’s when:
A lot of industrial factories were using gantry machines, which is the crane that holds the torch above the cutting piece and moves it around
The methods used in plasma cutting were more developed
The cost of using plasma to cut also dropped
With all of those things in place, it set the stage for plasma cutting to jump in and become one of the most popular and effective methods.
Plasma cutting works like this:
Gas (usually nitrogen) flows down the tube and out the cutting head
An electrode inside the tube of the cutting head creates a highly charged electrical arc between itself and the metal to be cut
This arc is extremely hot, and as it arcs through the flowing gas inside the cutting head it superheats it into the fourth state of matter, plasma
The plasma is squeezed through a very tight opening in the cutting head as it exits, which increases its speed significantly
The incredibly hot plasma moving at a very high-speed cuts through the metal below it
That’s the basic explanation. In reality, there is a lot of physics and chemistry going on in to make it happen, and plasma cutting heads are precisely engineered.
Laser Cutting: What Is It and How Does It Work?
Using a laser to carve up material sounds like something out of a sci-fi novel. However, this technology dates back to the 1960s when the Western Electric Engineering Research Center produced a machine capable of drilling holes with a laser. From there, the tech received a lot of development over the years, including:
Further precision modifications for aerospace engineering tasks
Adapting different types of lasers to cut different materials
Optimizing the power usage to make it more efficient
In modern manufacturing, laser cutting continues to make strides and is quickly catching up to the abilities of other cutting methods.
Here’s how a laser cutting machine works:
First, light is generated by “stimulating” a material with electric discharge or other method
The extra energy added to the material causes it to emit photons or light
The light emitted is filtered through internal mirrors until only the correct wavelengths for the application are left
The laser is reflected down a tube and towards the cutting head
The lens inside the cutting head focuses the laser on a single specified point and distance, greatly increasing its power and ability to cut
Laser cutting uses a lot of different methods for getting through material. Some of these methods include
Vaporizing
Cracking it with thermal stress
Melting it and blowing it out of the way with high pressure gas
[googleadsycc adunit=”inarticle”]
Benefits of Plasma Cutting
Plasma cutting remains one of the most popular cutting methods for certain applications, and it has many qualities that make it an excellent choice. We’ll explain more in detail below
Lower Startup and Maintenance Costs
Since plasma cutting has a long history of development and use, it means that it is almost always cheaper to use.
The initial equipment for cutting metals with plasma has a lower cost than a laser cutting setup. This allows you to spend more of your budget on upgraded models with:
More cutting power
A higher number of useful digital features
Lots of backup nozzles and electrodes
That last point is essential. When using a plasma cutting machine, be prepared to spend extra money on the nozzles and heads as they will wear out. This does add a recurring cost to using a plasma cutter.
Can Cut Thick Materials
Plasma jets are extremely hot and moving extremely fast. While this does add some danger, it also means that it can punch through a lot more material. With advancements made in directing the plasma correctly, plasma cutting machines can cut through steel greater than 25mm in thickness.
Can Be Made Portable
Plasma cutting machines are typically more portable than laser cutting machines because they use gas instead of light. Since light has to be reflected in straight lines down to the cutting head, laser cutters require rigid structures, which leads to less portability.
Since plasma cutters just use gas and electricity as their source, you can have flexible hoses and overall a much more portable design. The nozzle itself could even fit inside a handheld cutting torch.
Drawbacks of Plasma Cutting
While plasma cutting is great for cheaply cutting thick material, it does also have its downsides. Chief among these are:
The time it takes to cut thin materials
The dangerous byproducts of plasma cutting
The extra time needed to refine the cut products
Cutting Materials Can Take More Time
For various reasons, plasma cutting heads cannot cut certain depths and materials as quickly as a laser cutter. Especially when cutting thin sheets of materials, the plasma cutter falls behind a typical laser cutter.
However, this is not always the case. Surprisingly, when it comes to cutting medium-thickness sheets, a plasma cutter can often outpace a laser cutter because of the way it cuts. Still, for thin sheets, it is much slower.
Plasma Cutting Produces Dangers
Forcing a jet of superheated plasma through a sheet of metal is just about as dangerous as it sounds. Thankfully there are many safety features and regulations in place. Still, this doesn’t mean all the dangers are eliminated, and there are some things you should be aware of:
Radiation created from the plasma can damage the cells in your eyes and burn your skin, much like welding
Depending on the type of material and gas being used, harmful gases can be produced by the cutting process which requires special precaution
Hot slag created from the cutting process can sometimes act unexpectedly.
Various numbers of shields, guards, software and hardware level safety features, and good shop safety can drastically reduce these dangers.
[googleadsycc adunit=”inarticle”]
It Can Leave Rough Product
While plasma cutting is still a precisely engineered process, there are just things that are hard to overcome because of the method used to cut. One of these is excess slag or molten metal produced by the process.
It very rarely poses a safety concern, but it still impacts the production process. The cuts with a plasma cutter almost always need cleaning up afterward. These include
Smoothing
Polishing
Grinding away and solidified slag
Benefits of Laser Cutting
Vaporizing material with a laser not only sounds cool, it brings a lot of great benefits to the manufacturing process. We’ll cover a few of the more major ones in detail below.
Laser Cutting is Ultra Precise
Lasers can be focused to ultra-fine points, meaning that the cutting precision you can achieve with a laser far outstrips a plasma cutter. This allows more pieces to be cut from a single sheet as well as finer details to be added.
Lasers Can Cut Very Fast
The cutting speed of a laser cutter is a bit complicated. It depends on a lot of factors, such as:
Material
Cutting depth
Angle
The reflectivity of the material
However, in general, when the laser cutting is working on thinner sheets of material, it can cut much faster than a plasma cutter. The story changes as the material gets very thick, but a laser can burn through thinner plates of metal faster than any other cutting method.
Lasers Can Cut More Than Metal
One of the biggest advantages of a laser cutting device is its ability to cut much more than just metal. Laser cutters can cut all sorts of different materials, such as:
Ceramics
Textiles
Plastics
Rubbers
Wood
The list of all the materials a laser can cut is too long to put here. Plasma may be good at cutting strong metals, but it’s just too rough and ineffective on other materials.
Lasers Produce Clean Cuts
Another factor in the overall precision of a laser cutter is the clean cuts it produces. Since the laser vaporizes its way through the material, there is little to no slag left behind.
The cut edges left behind after a laser cutter often need little to no cleanup, reducing the overall cost and effort of cutting pieces.
Drawbacks of Laser Cutting
Laser cutting devices work wonders in a lot of ways, but they are equally ineffective in some others.
Laser Cutters Cost More
Laser cutting technology isn’t necessarily that much newer than plasma cutting, but it is definitely newer in terms of broad industrial use. Because of this, both buying and maintaining laser cutting machines is more costly than the typical plasma cutter.
This is especially true if the buyer wants to stay on the cutting edge of the new laser cutting technology. There are many different ways and types of producing and directing a laser to cut, including:
CO2 stimulation via electric pulse
CO2 stimulation via RF radiation
Neodynium lasers (for boring holes)
Neodynium-yttrium-aluminum-garnet (for very high-power applications)
High power, fiber directed lasers are going to cost a pretty penny—much higher than a similar plasma cutting machine.
Lasers Don’t Do Great with Thick Metal
While plasma jets can punch right through very thick sheets of metal, lasers can have a comparatively hard time keeping up. The thicker the material is, the longer and longer it will take to cut with a laser cutter. This relationship isn’t linear, either—due to some of the mechanics involved in laser cutting, the length of time required to cut thicker materials is not a linear equation.
Additionally, once most metals are thicker than 25mm then lasers probably won’t be able to effectively cut it at all. More and more developments occur every year to help expand their cutting ability, but currently they cannot cut as thick of metal as plasma cutters can.
How to Choose Which Method to Use
Now that you know a little bit about the history, benefits, and drawbacks of each type, we’ve put together a few considerations to keep in mind when choosing which method to use for your project.
These tips can apply to whether you are only having a few pieces cut by another shop or if you are looking to invest in either type of machine yourself.
How Intricate Is Your Piece?
The first question to ask is how intricate and detailed your pieces need to be. As we discussed above, if your pieces require fine detail then a laser cutting solution is the best fit.
However, if your pieces don’t require an extreme degree of precision, then a plasma cutting method can be just as good. Plasma cutting machines are by no means imprecise—they are just less precise than the extreme precision of a laser cutter.
[googleadsycc adunit=”inarticle”]
What’s Your Budget?
Budget can play a major or minor role in your decision depending on whether you are having pieces cut or directly buying the machine as a company.
If you are just looking to have some designs cut by a third party, then it just comes down to your needs rather than your budget. If your pieces require high precision, then have them laser cut. If not, then plasma cutting them will do just fine.
If you are looking to make an investment in an entire machine, then ask question like:
Do I have a need for high-precision cuts at all?
How often do I need to perform ultra-precise cuts?
How much maintenance and replacing of heads do I want to do?
Do I have the manpower or time to clean up cut surfaces?
Will the ability to cut other materials than metal speed up my shop process?
At the end of the day, it comes down to the needs of your exact shop. If you never do precise cuts, and you don’t mind replacing cutting heads and cleaning up the cut edges, then a plasma cutting device may be a fine solution. If you plan to make enough precision cuts that it makes sense to do them in house rather than contract elsewhere, then a laser cutter could be a good investment.
Reduce Your Costs Through Good Design
How you design your pieces to be cut can have a large impact on your needs for the project. Smart design can often get around the unfortunate limitations of whatever machine you have on hand.
Here are some examples:
Implementing more thin support structures instead of fewer thick supports can remove the necessity to cut pieces from thick materials
Increasing the size of intricate pieces by a small margin may put them within a precision range your plasma cutter couldn’t previously match
The Difference Between Plasma and Laser Cutting
Plasma and laser cutting machines are both incredibly useful, high precision manufacturing devices. While they accomplish the same goal, they use different methods to do it. Remember that plasma cutting:
Works by using a jet of superheated plasma to melt metal
Is cheaper to operate and can cut very thick material
Also is not as precise as laser cutting, and has some dangers
Laser cutters, on the other hand:
Work by focusing a high-power laser to vaporize or melt material
Are very precise and fast when cutting thinner materials
Are also more expensive and cannot cut very thick metal
Now that you know the difference, their benefits and drawbacks, and some strategies to decide which to use, you have the tools to make an informed decision!
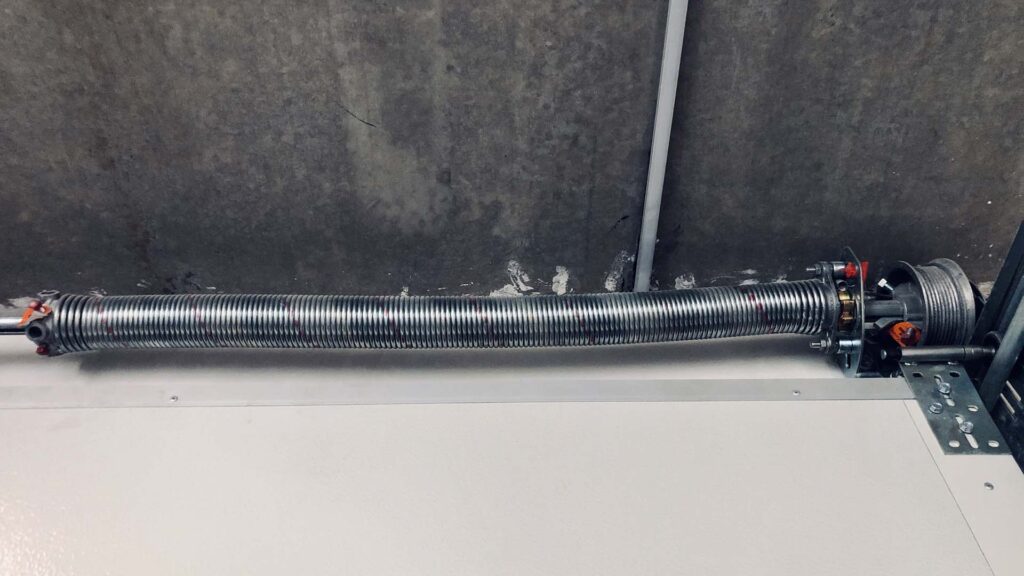
The garage door likely gets used much more frequently than the front door in many American homes, getting opened and closed multiple times a day as people come and go about their daily business. This heavy wear and tear can cause the torsion springs that raise and lower the door to wear out over time. But when this happens, is it safe to replace these springs?
Replacing garage door springs is a dangerous job that can cause severe damage to your body and property. The thick cables that comprise a garage door’s torsion springs contain significant energy, creating the potential for substantial damage if this energy is not stored properly.
While there is no doubt that replacing garage door springs is dangerous, replacements can be made by DIYers if the proper preparations are made. There are countless educational articles and videos available that can help safely walk you through the process. However, if you still harbor any doubts about your preparedness to perform the replacement, it is best to call a professional.
Reasons to Replace Garage Door Springs
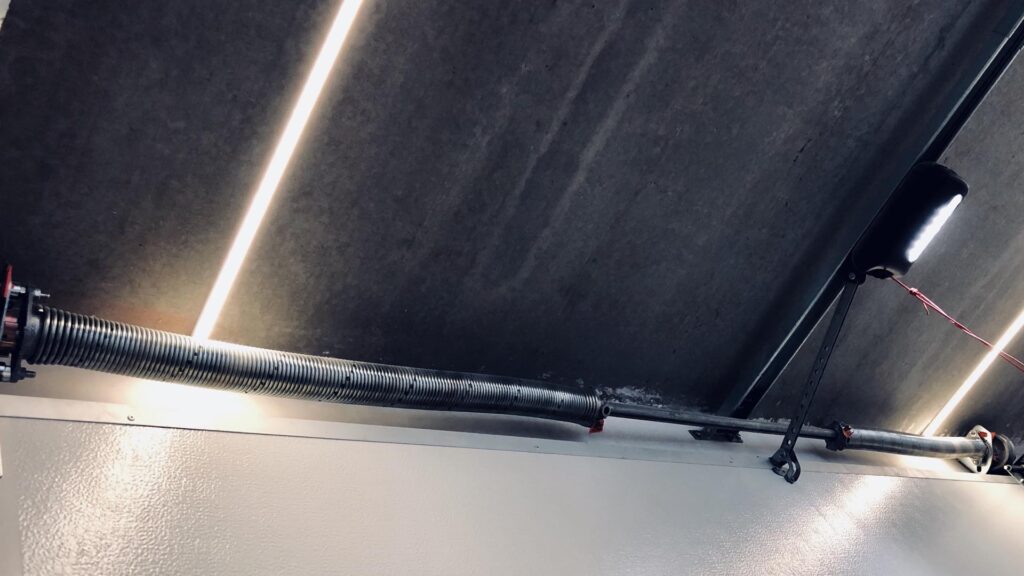
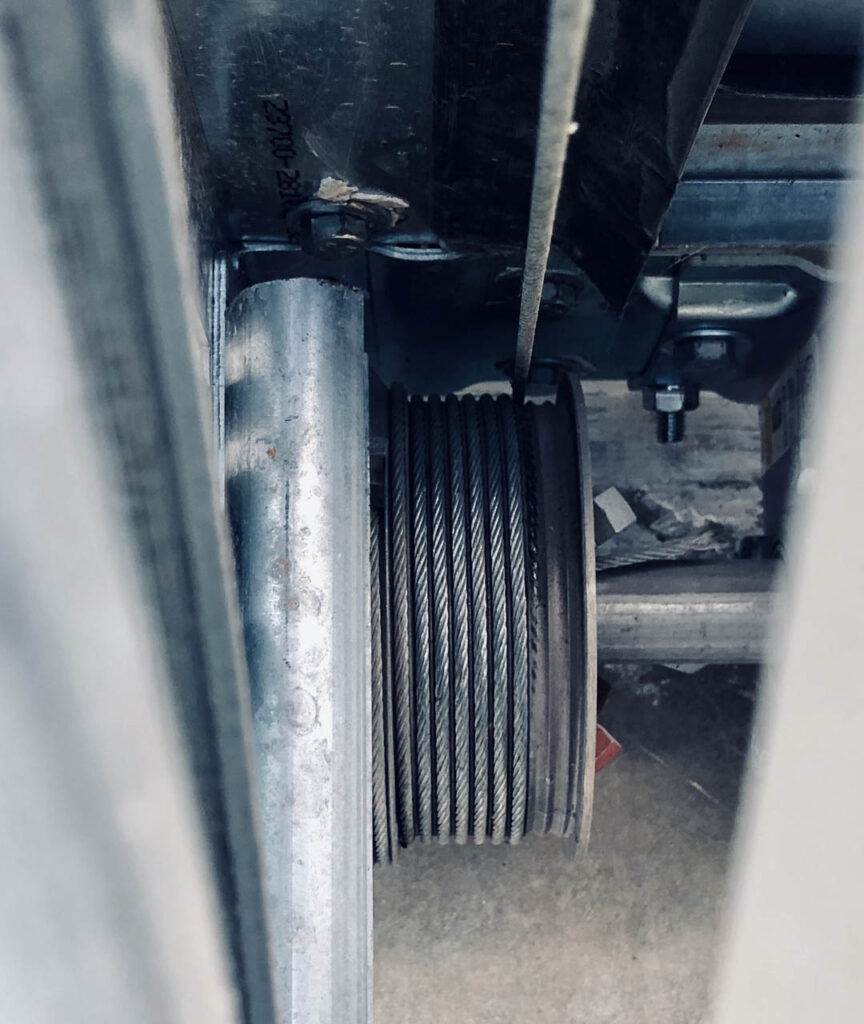
Garage doors use the principle of a torsion spring to raise and lower the door. The door is attached to cables, and as the cables are lowered to close the door, the torsion spring winds tightly to store the necessary energy for raising the door. When the door is ready to be raised, the energy from the unwinding spring helps the cables guide the door up the tracks to an open position.
As garage doors are opened multiple times a day, 365 times a year, the constant wear and tear will cause the spring to lose its ability to perform its intended function. Some signs that your garage door springs are losing their effectiveness include:
Loose Cables – If the cables connected to your garage door are loose, it is likely because the torsion spring can no longer wind as tightly as it needs to, creating slack in the cables.
Door Will Not Open All the Way – The torsion spring is meant to support the weight of the heavy garage door. If the garage door gets stuck in a partially open state, it is likely the spring can no longer support the weight.
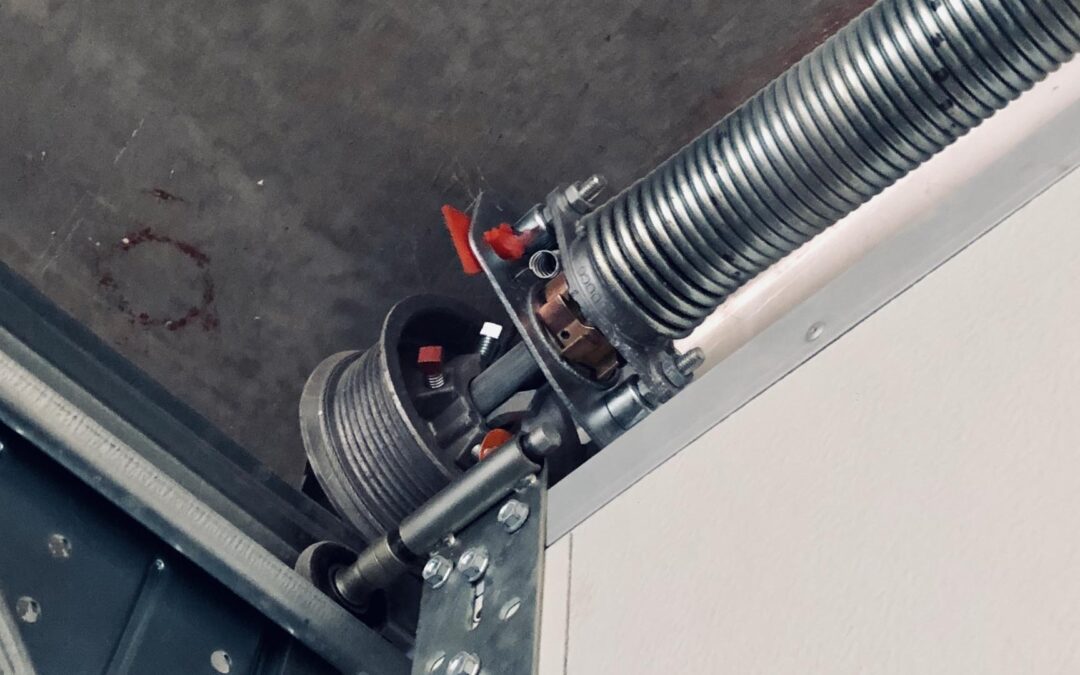
Gaps in the Springs – The torsion springs will be directly above the garage door and should have the appearance of a tightly wound coil when functioning correctly. If there are any noticeable gaps or looseness in the springs, they have lost their effectiveness.
Door Becomes Jerky – Garage doors are meant to open and close smoothly. If there is a noticeable jerk during the opening or closing process, it is likely that one of the springs has snapped, creating an imbalance in the torsion system.
Once a defective torsion spring has been identified, it is tempting to perform a DIY repair, as you can save several hundred dollars by avoiding a call to the professionals to do a replacement. However, to attempt a DIY garage door spring replacement, you must be extremely prepared and confident in what you are doing, as any of the following can occur:
A finger could get caught in a gap in the spring, crushing the digit and causing nerve damage.
The coil could snap, with the released energy causing a whiplash effect that could gash the skin.
The spring could come flying off the bar, knocking you off the ladder and/or drilling a hole in the wall.
While these are just a few of the dangers involved with tinkering with worn or faulty garage door torsion springs, it does not take much imagination to realize how severely such a powerful spring could maim a person or property if broken or unwound unexpectedly. After all, many garage doors can weigh over 500 pounds, so any spring that can consistently lift and lower them is extremely powerful and should be treated with caution.
How to Safely Replace Garage Door Springs
While the dangers of replacing garage door springs are plentiful, it is possible to replace them yourself if proper precautions are taken. After all, we’re in a golden era of DIY, so there is no shortage of helpful material available to prepare you for this massive undertaking.
If you are someone who wants to attempt a DIY garage door replacement, safety should be the number one priority, with the following points needing to be confirmed before attempting to start the project:
All cars, boats, and motorized vehicles need to be removed from the garage.
Anything flammable or combustible due to force should be removed from the garage.
There should be no bystanders or anyone who is not actively helping in the replacement nearby.
Only use winding bars to add and release tension to torsion springs when removing your old springs and tightening your new ones. Do not use screwdrivers!
Make sure you have a stable ladder that does not rock and can be placed on firm, level ground.
Make sure all tools and materials needed for the repair are in a handy, convenient location that will not cause an accident should you need to come down the ladder quickly.
Be sure to keep your head out of the spring and cone trajectory at all times when making the replacement. This limits the likelihood that the spring would be thrust toward your head should there be slippage or any other accident occurs.
Above all, make sure that you have thoroughly studied and are entirely comfortable with the process before attempting the replacement. This is not the type of home improvement project that can be “tinkered” with until it is figured out, as the trial and error method can be costly when dealing with powerful torsion springs.
[googleadsycc adunit=”inarticle”]
Once all these safety points are confirmed, the process for replacing garage door springs, while dangerous, is not overly complicated, if the proper steps are taken. There are many great websites and videos, specifically this helpful tutorial offered by DDM Garage Doors, that can thoroughly explain the following spring replacement process down to the most minute detail if further explanation is necessary.
Preparing the Garage for the Spring Replacement
Getting the garage door set for the spring replacement is very simple, but overlooking or getting lazy on any of these steps can create issues later in the process. Therefore, take the following steps to get ready for the replacement:
Close the garage door. Attempting a torsion spring replacement with the garage door open is a bit risky. If something were to cause the door to roll shut during the replacement, serious injury could result. In addition, it is more challenging to stretch the coils when the door is open, and an open door can be difficult to re-level after replacement.
Check the winding bars. The cone heads that hold the torsion spring in place will have holes in which to insert the winding bars for tensioning and release. Typically, these holes are ½-inch. If your winding bars do not fit snugly into these holes, do not attempt the replacement with a different size winding bar and/or screwdriver, as this creates a safety hazard.
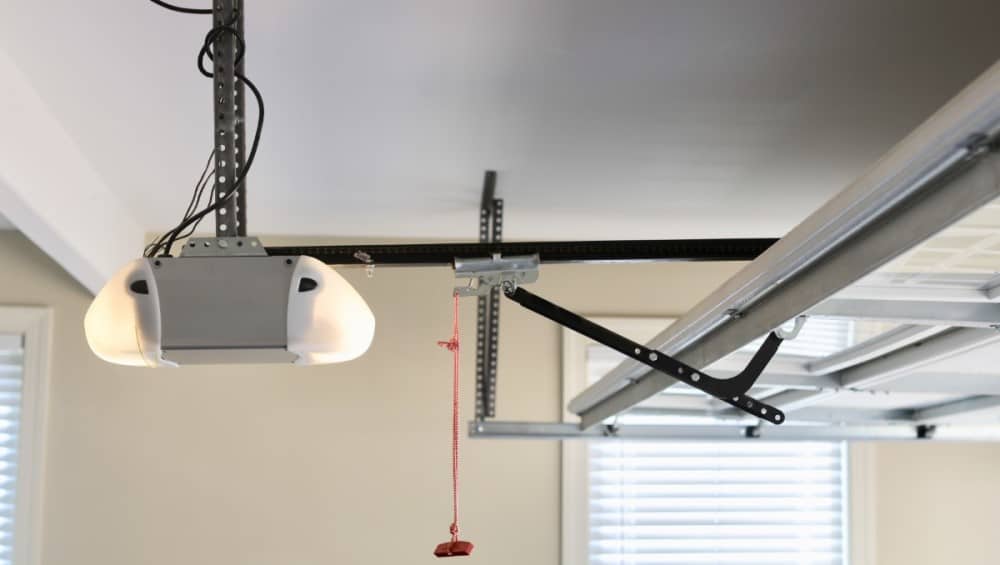
Disconnect the door from power. If the winding bars fit snugly, it is time to disconnect the garage door from power. If you have an older hardwired garage door that does not have a power cord, it may be necessary to flip a circuit breaker to turn off the power.
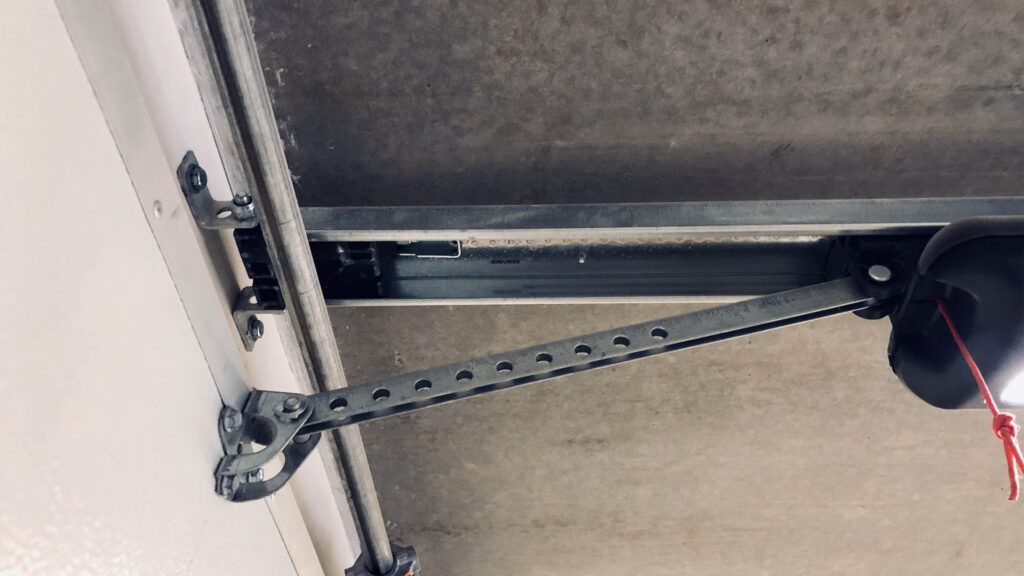
Disengage the opener from the door. This will be an arm that connects from the top of the door to a trolley just above the torsion spring. You may need to flip the opener into neutral to disconnect it from this trolley.
Have the new springs ready. In addition to the new torsion springs, you will need a couple of 10-inch vice grips, two ½-inch x 18-inch winding bars, a tape measure, and a crescent wrench. Also, ensure that the garage is well lit.
It is vital to verify the length of both the old and the new springs to make sure that you have the correct replacements. In addition to causing the garage door to malfunction, attempting to mount incorrect springs increases the risk involved.
While measuring the springs may seem straightforward, it is actually a very intricate process. Getting haphazard during measurement can cause the old torsion springs to turn, which will potentially undermine the replacement process.
DDM Garage Doors offers an extremely in-depth tutorial for measuring garage door springs if you need additional clarification on the following steps:
Measure the length of the spring. This should span from the first coil on an unwound spring to the last coil. Do not include the cones in the measurement. For a wound spring, count off one coil for each turn and measure the remaining length of the spring to determine the length of the spring in an unwound state.
Determine the wire size. This is the thickness of the wire used to make the spring. To get an accurate figure for this, measure the length of 10 coils and 20 coils and divide by the same figure. If they come out the same, this will give you an accurate reading of the wire size.
Determine the inside diameter. This is difficult to measure when the spring coils are on the shaft, so look for any indication of the inside diameter on the cones. You may have to use a flashlight to ascertain these markings.
Check the wind of the springs. This can be confusing because a right wind spring will go on the left of the center support bracket and a left wind spring will go on the right of the center support bracket. To determine a torsion spring’s wind, stand it up on end. If the last coil near the cone opens to the right, it is a right wind spring, and vice versa.
[googleadsycc adunit=”inarticle”]
Mark the Torsion Shaft
This is a crucial step to make sure that the garage door is leveled once the new springs are installed.
With the cables still tight on the cable drums, mark the drum and torsion shaft at each end of the garage door with a pen to give you a frame of reference for where they need to be when the new springs are in place.
If at least one of the springs is still wound, do not touch the drums or the shaft because if the cable breaks, the drum could spin rapidly and cause the cable to break bones in your hand.
If both of the old springs are unwound, wrap the cables around each drum before making your marks.
Unwind the Old Springs
Once all these preparations have been made, it is time to unwind the old springs that have not been broken. It is vital to approach this step with the expectation that the old springs will break at any moment, so make sure you keep your head up, back, and out of the spring path when performing the following steps:
Insert the winding bar. Insert the winding bar snugly into the winding cone. It is important to remember not to tinker with the set screws until the winding bar is in place and not to attempt to use screwdrivers as a replacement for snug-fitting winding bars.
Check the set screws. Pull down on the winding bar to make sure that the set screws are tight. Wiggle the winding bar back and forth. There should be less than two inches of play on an adequately tightened torsion spring.
Mark your winding bars. Use a piece of tape to mark your winding bars, ensuring that they are all the way in and properly set before attempting to unwind the springs.
Release the set screw. Making sure you are firmly positioned, insert the winding bar until it clicks against the core of the shaft (it should be up to your tape mark as well). While gripping the end of the winding bar firmly, release the set screw with your crescent wrench. Be prepared for the torque of the spring to be transferred to the winding bar.
Release the cone. Keeping at least one winding bar in the cone holes at all times, loosen all set screws until the cone comes completely free from the shaft. Be prepared for something to break and the spring to go flying at any time.
Unwind the spring. Now that the cone has been released of its grip on the shaft, it is time to unwind the spring. Keeping at least one winding bar inserted at all times, add the second winding bar into the cone holes. Turn the winding bars down until one comes in contact with the garage door, then releasing and reinserting back at the top. Keep repeating this process until the spring is completely released.
Repeat for the other spring. If neither spring was unwound or broken before the replacement, repeat this same process for the spring on the other side.
Loosen the Torsion Hardware
Now that both springs have been unwound, it is time to remove them from the shaft. This will involve removing some of the torsion hardware, such as the cable and drums, to clear a path of exit for the old springs. This can be completed with the following steps:
Loosen the spring bracket. Remove the bolts that connect the center stationary torsion cones to the spring bracket. This will allow the old springs to slide away from the center support bracket.
Slide old springs out. Slide both of the old torsion springs along the shaft at the top of the garage door toward the cable drums. If this is difficult, the shaft may need to be filed down to allow for the springs to slide.
Loosen cable drums. Loosen the set screws on the cable drum until the drum turns freely. Remove all cable from the drum. Slide the drum away from the shaft and bearing and remove the old springs. Repeat the process for each spring.
[googleadsycc adunit=”inarticle”]
Insert New Springs
Now that the old torsion springs are off the shaft, you can successfully add the new ones. While this is essentially a reverse process of that used to remove the old springs, there are a couple of points to keep in mind:
Make sure the old springs are discarded well away from the ladder so that they do not cause injury if you need to descend.
Double-check the coil of the new springs. Remember, a right winding spring should go on the left side of the garage door and vice versa.
When the new springs are inserted, make sure the cable drum is squarely back on the shaft bearing and tightened appropriately.
Replace the Cable on the Cable Drum
After the torsion hardware has been replaced and secured, it is time to add the cable back onto the drum.
Insert the cable into the slot of the cable drum. Once the cable is fully inserted, pull down on the cable to tighten the cable around the outer raised groove of the drum. Twist the garage door shaft until the cable is tightened completely around the drum, using a vice if necessary.
Once the cable is tightened back on the drum, reinstall the drum set screws to hold everything in place.
The new springs are now locked onto the shaft. Slide them to the center and using the reverse of the process described above, tighten them into the center torsion hardware, making sure they are secure with the stationary center cones and center spring bracket.
Wind the New Springs
Insert the winding bars into the new springs, ensuring full insertion up to the tape marks. Continue winding the springs until they get to the marks you made earlier for your point of reference.
Once the new springs have been wound to the reference point, always keep at least one winding bar in the cone and tighten the set screws in the cone to hold the torsion spring in place. Repeat this process for each cone.
After the set screws are tightened, and the cones are secured, re-engage the opening arm and connect the garage door back to power. Check the replacement’s functionality and use oil to smooth out any whining sounds, if necessary.
Conclusion
Replacing garage door springs is a dangerous job that can result in serious bodily injury and/or property damage. If you are not well-educated or are uncomfortable with the process, it is a job best left to the professionals.
However, if you are an avid DIYer, several helpful instructional materials can teach you how to replace your worn or broken garage door springs safely and effectively.
You’ve saved up for the vehicle of your dreams, and now you must consider things such as maintaining your new investment, how to care for it, and proper storage. If you are concerned about sunshine diminishing your paint job, and rust entering the engine, you should be. However, there are ways that you can protect your car, and one of them is keeping it in a garage.
Do garaged cars last longer? Yes, a vehicle sheltered by any storage that protects it from snow, paint fade, sunshine, and rain will stay in excellent condition longer than a car that is not protected from external elements. However, it is not always best to store your vehicle in a garage in colder climates as the lack of ventilation can accelerate rust production.
This article will cover the benefits of storing your car in the garage, the conditions when a garage might be a bad idea, as well as alternative methods that can extend the life of your vehicle!
Do Garaged Cars Last Longer?
Storing your vehicle in a garage will often increase its resale valueas well as offering:
Protection from the sun for the internal mechanics which can overheat your vehicle, add extreme pressure on the engines as well as the coolant and fans
Protection for the paint job from ultraviolet exposure
Reducing risks for water or rain to remain in the engine, which leads to internal and external rust
Overall stability of your vehicle’s performance and safety by maintaining the engine
If you care about your car and want what’s best for it, storing it in a garage is the straightforward answer. However, there are conditions in which a garage can worsen your issues. It may help with one thing, like sun protection, but produce a new problem such as slush melting in your engine.
Will a Car Rust in The Garage?
Garage storage is optimal in warmer climates, but a garage is not always the ideal storage place for your car in cold climates. Environments that are prone to freezing will not be suitable for parking your vehicle, at least not immediately.
The issues that can arise if you enter a garage too quickly after being in a colder environment are:
If your garage is closed, the dampness will not evaporate, and the lack of ventilation will leave your car wetter than it should be. It ends up being wet more often than it’s dry, which only allows the road salt to continue its dirty work.
Road salt can be retained in the engine and cling slush to your vehicle.
Slush will melt from the extreme heat of your vehicle, which turns to liquid and increases your likelihood of premature rust, especially as the road salt magnifies the moisture retention, and the two elements make problems significantly worse.
Condensation permeates the inside of your vehicle, and the rust-causing properties will contribute to further damage and expensive repairs.
Throughout the colder seasons, you are repeating this vicious cycle, so your vehicle never catches a break or gets to rest in a preferable state of dryness.
The best course of action to combat difficult winter slush and road salt will be the wipe your car down when you get home and not leave it covered in condensation.
The Solution – Keep a towel in the garage, specifically for this purpose, and remove any moisture or salt buildup that you fear could creep into the inside of your vehicle or compromise its integrity.
[googleadsycc adunit=”inarticle”]
Ways to Make Your Car Last Longer – With a Garage
Some of these will apply regardless of whether you have a garage, but tips for vehicle longevity with a garage include:
Always Utilize a Car Window Shade– This will protect your car from overheating and against UV Rays that can affect your sensitive interior.
Regularly Wash Your Car – This may sound basic, but a little TLC never hurts. Removing debris, dust, dirt, salt buildup, etc. will ensure the exterior is not harboring a thick foundation of crust.
Park with Intention – Always look for parking spots in the shade. Search for shade as well as a place where debris and sticks falling on your vehicle can be avoided. This is a small daily habit that add up to an increased life expectancy for your car.
Avoid Air–Drying – Leaving water residue after washing your car will only increase the harsh effect of ultraviolet sunlight and deposit those droplets into water-spots. Always dry your vehicle after washing it.
Maintain the Cooling System – The first signs of wear and tear will be in your fans and coolant materials that keep the engine from overheating. If your vehicle is being overworked, you will need to keep an eye on the hoses, belts, and coolants to repair them as soon as necessary, avoiding further damage.
Ways to Make Your Car Last Longer – Without a Garage
If you want to protect your car in more ways than one, this section is for you. It’s also for those who may not have access to a garage system and need innovative ways to protect their prized possession.
If you do not have a garage or you want additional ways to make your car last longer, the following is recommended:
Purchase a Waterproof Car Cover – This affordable investment will not only protect your vehicle from rain and sunshine, but it also can save you money by decreasing car washes and maintenance. You can use this even if you are storing it in the garage to protect from dust.
Purchase a Carport– This is a more costly investment, but it will also act as a mock garage. You will need to be aware that many don’t close fully or might be missing the doors and walls. If this is the case, you’ll need to take preventative measures to secure your car from theft. Carports of a higher-quality can increase the value of your home if you do not already have an established garage.
Regularly Seal and Wax – This is a protective coat that you can put onto your car to protect it from harsh environmental impacts. Keeping this protective sealant fresh can go a long way, whether you have a garage or not.
[googleadsycc adunit=”inarticle”]
Final Takeaways for Vehicle Longevity
Proper care for your vehicle will lead to a longer-lasting and better-functioning vehicle that will make you feel safe and secure. Knowing the signs of elemental wear and tear is the best first step you can take to care for your car and make it last.
To summarize:
Cars will be increasingly protected by a garage and will, in all likelihood, experience extended functionality.
Garages can be suboptimal for people in freezing climates. Yes, you are protected from the snow, which is better than nothing, but the lack of ventilation will create an environment for condensation, moisture retention, and premature rusting.
Especially if you live in a colder environment, prevent rust in your garage by drying off your car.Don’t leave it out to be wet from the snow, rain, and road salt all night.
Regular car washes will impact your car’s longevity, with periodic inspections and maintenance being crucial.
In Conclusion
The more you take time to learn what your car needs, the more savings you will see regarding repairs.
Luckily for you as a consumer, cars are lasting longer than ever before, making your investment even more worth it, which has little to do with garages. Cars are being built to last for a quarter of a million miles presently, and they are setting an industry-wide standard.
Your garage may assist with the longevity of your car, but only if you maintain it, do regular inspections, and take measures to keep your car dry (which should be prioritized whether you have a garage or not).