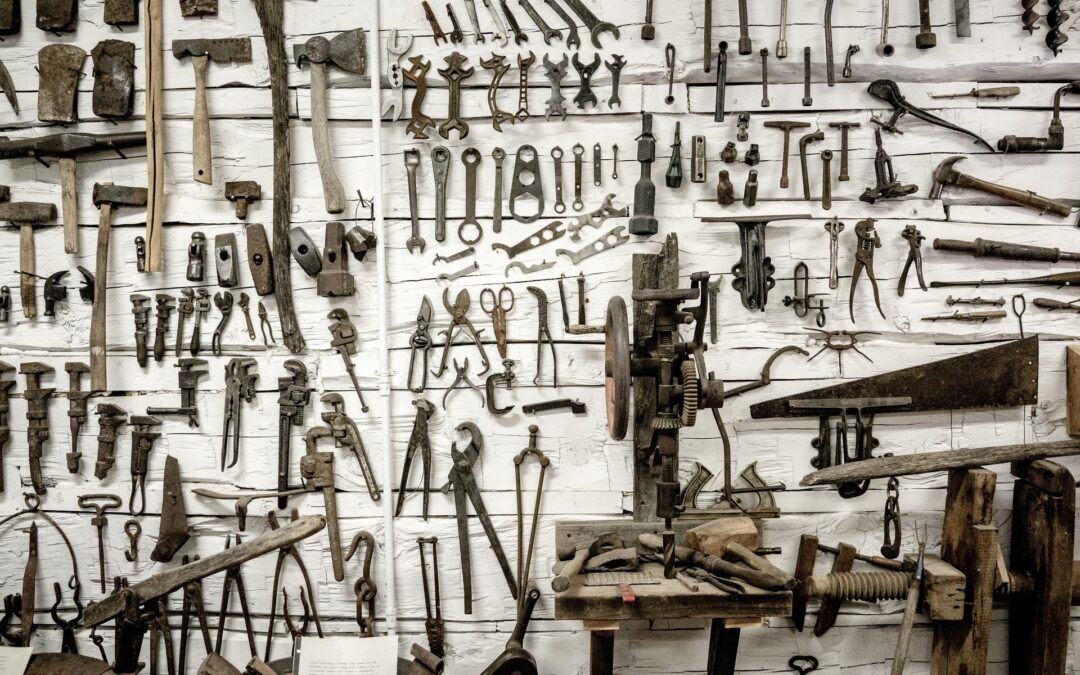
A garage tool board is a great way to store your tools, equipment, and supplies safely and efficiently. Whether you’re into DIY, home improvement, woodworking, sports, or just want to get your home more organized, a garage tool board can help you reach your goals.
So, you’ve got the tools and other items you want to be stored away. You’ve already selected the board. Now the big question is, how are you going to accessorize it? The answer depends on what kind of board and tools or other storage needs you have.
Whatever your tool board setup, there are plenty of accessorizing solutions to fit your space and your lifestyle. This article will explore four of the most common types of garage tool boards and some great accessory options for each.
Garage Tool Board Accessories for A Pegboard
Whether made from wood, acrylic, or metal, whether with round, oblong, or square holes, the pegboard style of garage tool board is probably the most popular style around. Take a look and it’s easy to see why: with all of those handy holes already in place, accessorizing (and changing your mind about where to put things) should be a cinch. So, what exactly are the options?
Different Types of Pegboard Hooks
If you’ve seen one hook, you’ve seen them all, right? Wrong! Not all hooks are created the same, or serve the same purpose. Whether shopping online or in the hardware store, know exactly what type of hook you are looking for and how it can help you accessorize and organize your tool board.
J hooks are one of the most common storage solutions for pegboards. Their unique shape will ensure that whatever you choose to hang on them will stay firmly in place without slipping off. Since many handheld tools have a hole in the handle end for hanging, this makes the J hook an easy storage choice. For longer tools such as rakes, or for tools without a hole in the handle, consider hanging two or more J hooks in a line to cradle the tool of your choice.
If you are seeking a pegboard hook without a dramatic curve to it, L hooks are another valuable option for your pegboard. Tools with particularly bulky or thick handles might not store easily on a J hook, but an L hook might be the perfect alternative.
The S hook’s shape makes it one of the most versatile hooks you can incorporate into your pegboard system. You could use this item on its own, or pair it with another type of hook to store individual tools or items of clothing close together. Any handheld tool with a look would naturally pair will with an S hook. This is also a handy option for any items that come in pairs.
Straight hooks are a bit of a misnomer: many of them are not perfectly straight, but have only a slight curve at the end to keep items from falling or slipping off. This type of hook is another viable choice for your pegboard, especially if you are looking for a less permanent alternative to shelving or a way to incorporate bins onto your garage tool board. Two straight hooks placed close together are also a useful way to store longer items such as brooms or dustpans.
Double utility hooks tend to take after straight hooks in shape while giving you twice the amount of storage in one unit. If you like to keep your tools close together, or want a quick and easy shelving solution for a small tool or tool bin, consider a double utility hook. This nifty accessory will save the time and trouble of trying to line single hooks up next to each other.
Ring hooks come in a variety of sizes to help you customize your pegboard storage. This unique type of hook can be used to nest slender hand tools, such as screwdrivers. Other ring hooks are designed to support the shape and weight of bins, which are often sold together in the same kit. A ring hook with a bin is a great way to hold smaller items that tend to pile up or get lost, such as nails or screws. If you have small items that hang, The ring hook itself could also be used to house items such as keys.
Any of the hooks mentioned above could theoretically function as a shelf or as a shelf attachment. This is fine for a few or lightweight objects. However, if you have larger or heavier items to store on your garage tool board, consider adding shelf brackets to your list of tool board accessories, especially if your pegboard is made of wood. The triangulated design of the brackets will more safely support your shelvin and protect both your belongings and your pegboard from the damage of a fall.
Paper towels (or any kind of towel) are essential to have around for your projects. With a paper towel holder as an accessory, you can keep cleanliness within arm’s reach and make it easy to tear off however much you need at a time. Furthermore, much like other types of hooks, a paper towel holder can be used to hand other useful items, such as keys or an extension cord.
[googleadsycc adunit=”inarticle”]
Bins and Baskets for Your Pegboard Tool Board
Hooks are a terrific accessory for your handheld tools, but what about your smaller accessories, such as drill and screwdriver bits? This could be a job for a bin or basket.
Plastic bins are sold in a wide variety. Many are designed for easy access and labeling, which is a perfect way to keep some of your smaller tools or tool accessories safely organized. Plastic bins can be made to sit on top of hooks or brackets, or attached with an adhesive, though many are manufactured with a back that will easily attach to the holes in your pegboard.
For larger or heavier items, such as cleaning supplies or paint cans, a more durable wire basket may be the better option. Like their plastic counterparts, these baskets come in a variety of sizes and depths and are often made with their own attachment for fast and easy installation. A simple S hook configuration can add this item to your pegboard in no time at all.
Organizing jars and another fun and attractive way to organize your materials. The lids both keep your items secure, while securing them to your pegboard, and the clear jars themselves ensure that you can find what you’re looking for right away.
DIY Hooks For Your Pegboard
If you want to get organized on a budget, it is possible to create your own pegboard accessories with items you probably already have around the house! To do so you will need the following materials:
Wire coat hangers or rebar wire,
Pliers for shaping
Wire cutters
With these simple tools, you should be able to shape your own hooks to the desired length and design for your needs. If you have the time and are willing to make the effort, you can get your garage tool board pegboard up and running for very little money. If yo are willing to trade-off to get your system up and running.
Garage French Cleat Board Accessories
The French cleat board is an elegant and attractive way to store your tools and accessories. This ingenious system relies on 45-degree angles to make it work. The “cleat” portion is cut to one 45-degree angle, while the back of the organizer is fitted to be the matching angle. The strengths of this storage system are that it is very durable and yet flexible – it’s simple to just move your storage accessories around to where you want them.
[googleadsycc adunit=”inarticle”]
The Downside of French Cleats?
While a French cleat tool board is extremely customizable, it also requires a lot of customization up front: it’s not simply a matter of buying a board and accessories. If you don’t have a lot of time or skills to build your own attachments or aren’t crazy about DIY, this system might not be the best for your lifestyle.
Garage Slatwall Tool Board
The slatwall tool board, whether made from metal, VPC, or wood, is a neat system if you don’t want to worry about screws of any kind. The accessories you purchase for this system will come with a flat hook or slats that allows them to rest comfortably between slats on the board. This also makes it easy to arrange and rearrange your supplies for optimal use.
As with the pegboard storage system, slatwall accessories also are available in kits. It is important to make sure that your accessories are the correct:
Size
Material
Width
There are plenty of hardware accessories available for your metal slatwall system. Here are just a few of the options.
Accessories for Your Slatwall Tool Board
Just as with the pegboard tool board, J hooks, L, hooks, and so on can also be purchased to organize and accessorize your slatwall tool board. Here are some additional accessory options to consider for your slatwall tools board.
A utility hook is great for your large or heavy items, such as ladders. With a slatwall and the proper utility hook accessory, it is easy to hang and store such items.
Having a bike in the garage or basement can take up a lot of precious space. With a bike hook accessory for your slatwall tool board, you can store your bike or bike tires conveniently and save yourself some space. This variation on the J hook can carry loads of up to 100lbs.
A magnetic tool bar is an elegant and ingenious way to store your tools without fumbling with extra parts. Keep items of the same kind together, within easy sight and reach without having to search for what you need, when you need it.
For sports fans, storing equipment can be a real puzzler. Save yourself from tripping over balls, finding extra space in your home, or deflating and reinflating your equipment every time you need it by adding a ball rack to your storage repertoire.
Think of those useful little “arms” in the clothing or drug store: the ones that hang at a downward angle with a separate notch or ball for every hanging item on them. Now picture one of these as part of your garage tool board. Consider a chrome faceout to keep the handheld tool close, but separated.
Last but not least, the gridwall is a particularly low maintenance way to store your tools, supplies, and appliances. Any accessories you purchase will hook on easily and hang from the back. This system is a good option if you anticipate a move or don’t have a permanent location for your supplies.
The same types of accessories listed above will prove a useful addition to your gridwall tool board. Like the other tool board systems, a gridwall is highly customizable in terms of deciding how to organize things. For instance you can incorporate:
Bins
Shelves
Hooks
Clips
These are easy to incorporate and install.
Your Garage Tool Board System
The make and materials of your garage tool board system will have a significant impact on the types of accessories you choose to purchase. Common materials for a garage tool board are
Wood,
Acrylic, and
Metal.
Which material you choose for your tool board system depends on how many tools you have, what kinds of tools you have, and how much money you care to spend. Your garage tool board accessories must be able to adhere to whichever board you choose without damaging it or falling off. Also, check and adhere to weight restrictions carefully.
Another consideration is the state of your garage and how you expect your accessories to wear. If you are purchasing metal accessories for example and your tool board is in a damp environment, consider accessories that will be able to stand up to rust and corrosion over time. This will help you to get the most out of your investment and time.
When shopping for accessories, many people choose to go with a shelf kit. This is an easy way to get a variety of accessories at the same time that is sure to be compatible with whatever board system you are choosing. A typical shelf kit will come with a wide array of hooks and bins to meet your storage needs.
Whether buying a kit or purchasing separate accessories, make sure that your attachments are the correct size and width for whatever board system you have chosen. This will save you headaches and hassle.
Extra Items for Your Accessories
Occasionally, you may find that your need to accessorize your accessories, so to speak. Check and see if any of the following items might be of use to you.
Rubber Protectors for Hook Ends
If your garage tool accessories are made of metal, it is a good idea to invest in rubber protectors for your hooks. This will help keep you and your loved ones stay safe and make for easy storage if you need to move or reorganize your garage tool board. Some kits include rubber protectors, but if purchasing additional or separate hooks, or if you lose some, you may need to buy your own. Luckily, they are very affordable.
Peg Locks for Garage Pegboard Tool Board
If you have a pegboard, peg locks are another helpful investment for your garage tool board system. This often-overlooked little tool will make sure that your hooks stay securely in place. Peg locks help keep you and your tools safe and save your money by preventing accidental falls, shifting, and breakage.
Car hail damage is one of the most vexing problems that can plague a car owner, especially one living in an area where hail is common. An unexpected hailstorm can total your car in some cases, as repairing the damage is extremely expensive if undertaken professionally. Thankfully, there are some DIY hail damage repair methods you can try before you throw in the towel.
There are many ways to remove hail damage without seeking professional repair. Methods include using heat, cold, and dent repair kits to “pop” dents out of the body panels of the car. DIY hail damage repair methods have varying degrees of success, depending on the skill of the person using them.
Below, we’ll look at what you can expect from your DIY car hail damage repair. We’ll also check out the different recommended methods to deal with hail damage – especially in the parts of your car that you can’t just replace.
Reasonable Hail Damage Repair Expectations
Before we begin, it’s important to note that your results may vary wildly. Taking on DIY car hail damage repair is not a guaranteed solution to the problem most of the time, and how you go about it can determine how ‘professional’ the results look.
Here are some of the factors that can influence how well your DIY hail damage repair works:
The number and frequency of dents and damage
How deep the dents are
The location of the dents (i.e., a dent on a hood vs. a dent on a curved body panel)
The method you use or the type of kit you purchase to deal with hail damage
There is no real replacement for professional hail damage repair. You can attempt to do it yourself to varying results, but professional bodywork guarantees that work is completed correctly. If you are very concerned about your car looking its best, take it to a body shop.
[googleadsycc adunit=”inarticle”]
However, professional hail damage repair can be costly. The body shop may recommend replacing some body panels, considerably increasing the expense associated with the repair. If you are willing to pay for a complete repair, taking your hail-damaged car to a body shop is always the best option.
But we recognize that this isn’t always an option. For whatever reason, removing the hail damage yourself can often seem like a more attractive choice. Just keep in mind that DIY car hail damage repair jobs rarely look as good as professional work.
Choose Your Method
There are a handful of different methods that DIYers like to use to remove hail damage. Let’s take a quick look at each of these options so you can choose one that works for you.
As you can see, most of these methods require some degree of skill. If you’re going to try these methods, it may take some trial and error to learn how to use the necessary tools.
Sunlight Method
The sunlight method relies on simple heating to help pop dents out of your car’s body panels. Note that this method (and most of the methods on our list) work best when attempted on smaller dents, as deeper and more significant dents take more work to remove.
When metal is heated, it expands. At higher temperatures, this may be enough to pop out some of the smaller dents on your car’s body.
The idea is to park your car in direct sunlight for days at a time, preferably during hot days. Make sure that to take care of the leather or plastic surfaces inside your vehicle. Direct sunlight can damage these surfaces, so cover them or use a leather protectant to keep them looking great.
[googleadsycc adunit=”inarticle”]
This method requires no skill and no tools, but it also doesn’t always produce results. There is a chance that some of the smaller dents could pop out due to the metal expanding, but usually, the temperature must be much higher to produce the desired effect.
Sunlight + Hairdryer Method
In most cases, sunlight isn’t going to be enough to remove the dents in your car’s body panels. While this method can work, it often requires hotter temperatures than the sun can produce on its own.
For this method, you’ll need to run an extension cord out to your car, which needs to remain in direct sunlight. Using a hairdryer, you can attempt to direct heat to specific sections of the metal to cause it to expand.
Use the hairdryer on the hottest setting, making sure not to touch the car with the hairdryer. Most experts recommend holding it between 5 and 7 inches from the surface of the metal for no more than 2 minutes at a time. Make sure to keep an eye on your paint. If it begins to look damaged or change color, stop applying heat immediately.
Sunlight + Hairdryer + Dry Ice Method
This option compounds upon the other two methods listed above. This is the last and most drastic heating/cooling method for getting dents to pop out, and it requires a lot more skill and agility than the others.
First, you’re going to need dry ice chips and gloves to carry them. Dry ice can damage your skin, so make sure that you will be wearing gloves as you try this method. Don’t use dry ice without gloves to protect your hands.
You’ll want to run the dry ice all over the dent. If your car has been sitting out in the sunlight, it may take a few ice chips to cool down the heated metal. Rub the dry ice over the entire area to cool the metal, and then immediately turn the hairdryer onto the same spot. The rapid heat and change of temperature may cause the dent to pop out on its own.
[googleadsycc adunit=”inarticle”]
This method requires you to switch between the dry ice and the hairdryer rapidly, or have help from another person. Even then, it may not work – the hairdryer may not get the surface hot enough to expand. The quick temperature change is the key to getting this method to work for smaller dents.
Dent Puller Method
This option involves using a suction puller. These are small devices that you can use to pull the dents out of your car’s body panels with the force of suction alone. These can be useful in most cases, but they are not the most effective method we’ll look at today.
These devices work best on medium-sized dents. Smaller dents won’t benefit from the use of a suction puller, as most pullers will be larger than the size of the dent itself. However, with medium-sized and larger dents, this device can come in handy.
Before you get started, make sure that you’ve read the instructions that come with your puller. You’ll want to heat the metal using sunlight (as above), or using a hairdryer exclusively. Get the dent warm so the metal will be more natural to manipulate (and potentially more willing to snap into place).
You’ll also want to use a little bit of water on the surface before you begin. Using some moisture will help the suction part of the device create a more durable seal. The strength of this seal can determine if the dent puller works as intended.
[googleadsycc adunit=”inarticle”]
Dent pullers come in different sizes (including some that are small enough for regular hail damage patterns), so make sure you purchase one that is around the same diameter as the dent you’re trying to pull. The suction puller shines when working on larger dents for this reason.
Once you have a perfectly-sized dent puller and the surface is ready for it, you can place the puller over the dent. Make sure that you press lightly to form a seal – the seal is imperative in making sure the dent puller works.
With the dent puller attached, use the handle to pull it towards you. Hopefully, this motion will be enough to pull the dent out.
When using a dent puller for larger dents, make sure to start in the middle and work your way to the outer edges of the dent. The finished surface will be much smoother for it.
Dent Repair Kits
The last method for DIY car hail damage repair also requires the most skill and is often the most expensive choice. There are a ton of different dent repair kits that you can purchase at most automotive stores. The thing to remember about these repair kits is that you get what you pay for.
A cheaper dent repair kit ($20-$60) are often not equipped to handle dents well. The use of budget materials leads to a decrease in effectiveness (not to mention a few of them don’t include all of the required components).
That said, how much you want to pay is ultimately up to you. You can find DIY dent repair kits at most budget ranges. If you’re willing to spend some money (but not enough for a professional repair), this is the option you’ll want to go for.
However, the use of these kits comes with a warning. If you don’t know what you’re doing, you’ll want to practice. Even if you think you know what to expect, misuse of these DIY car hail damage repair kits can leave your car looking worse instead of better. To avoid creating more dents in your vehicle, test the equipment out first.
There are two main types of DIY dent repair kits in this category.
Glue Puller Kits
A glue puller kit includes a strong adhesive and a puller. When used together, they can sometimes remove more stubborn dents without damaging your paint. As always, use these tools carefully for the best results.
Here’s a quick rundown of how to use a glue puller kit.
Choose a glue tab that is the proper size for the dent you’re attempting to remove. These kits usually come with multiple glue tab sizes for a variety of dent diameters. Note that these tabs are not meant to be adhesive themselves; instead, this is the place where you’ll put the glue to create a secure seal.
Using the hot glue gun, apply a small amount of hot glue to the glue tab. This should be no larger than a pea. Don’t spread the glue around; you’ll want it to have some volume. A perfect application of hot glue should be a sphere on top of the glue tab.
Attach the glue tab to the dent gently. Don’t squish the glue into the panel so that the tab touches the paint. Gently press it against the body of your car, making sure that the glue creates a barrier between the glue tab and the vehicle itself. Wait for the glue to dry before moving on.
Attach the pulling device to the glue tab. The feet should be flush with the panel to avoid creating more dents on the panel’s surface. Make sure that there is a secure bond between the glue tab and the puller. Otherwise, you may not get the results that you’re after.
Situate yourself in a position where you can get the most leverage. Using the handles on the pulling device, pull it back towards you. If you followed all the steps above correctly, the dent should pop out a bit, decreasing its size.
Deal with high-spots (spots that pop out too much) by tapping them down with a rubber hammer. It may take some work, but with some patience, you can create a smooth surface. If it isn’t perfect, it is at least better to look at than the hail damage.
Note that glue puller kits can get expensive. Despite their claims to be paintless DIY car hail damage repair kits, the adhesive still has a chance to pull off bits of your car’s paint. Also, consider that this is not the best kit to use for smaller dents.
Dents, where you can easily use a smaller dent puller, should be handled with one, as using this much force on a minor dent can cause the opposite problem.
If you have practiced and have some skill or knowledge of how this kit works, this can be an excellent option for removing larger dents. Keep in mind that there is the possibility to create more dents and use the equipment carefully.
Slide Hammer Kits
A slide hammer kit is more closely linked to what a professional would use but on a much smaller scale. You can choose to purchase a slide hammer kit with a glue pull base or a suction cup base, depending on which you prefer.
Whichever option you choose, a slide hammer is simple to use. It’s easier than a glue puller because it requires very little upper body strength to pull out a dent – especially a smaller one.
You’ll need to attach the end of the slide hammer to the suction cup or glue tab using the end with the prongs. Then, slowly pull back on the moving handle to release the dent, popping it back out of the body panel.
Always be careful when using a slide hammer kit. Follow the instructions provided with the equipment carefully and make sure that you are using it cautiously. A slide hammer can quickly produce enough force to bend your body panel the other way.
If this happens, you may need to repair the damage with a rubber hammer and other dent tools before moving on.
Further Considerations
As noted above, taking your car to a professional body shop is the best way to ensure that hail damage is fully repaired. It is costly, and with older cars, it can cost more to repair the vehicle than the vehicle is worth.
However, if you are considering fixing your hail damage yourself, consider your options carefully. Make sure that you factor in your skill level and the tools that you’ll need, as well as how much you’re willing to spend.
And if all else fails, you can try filling in the dents rather than trying to pull them out. On pieces that can’t be replaced (such as the roof, fenders, and other parts that can’t be removed from the vehicle), you could use some sort of long-term adhesive that dries hard to minimize the appearance of the dent.
With these methods, you can attempt to paint over the adhesive once it has dried. But beware of these methods, as you can leave your car looking worse than before.
Conclusion
Before you commit to DIY car hail damage repair, know what you’re up against. Weigh your options carefully and make sure that you can follow through with the repair. These DIY methods may help reduce the size and appearance of some dents, but professional dent repair is the only way to ensure that the damage is fixed correctly.
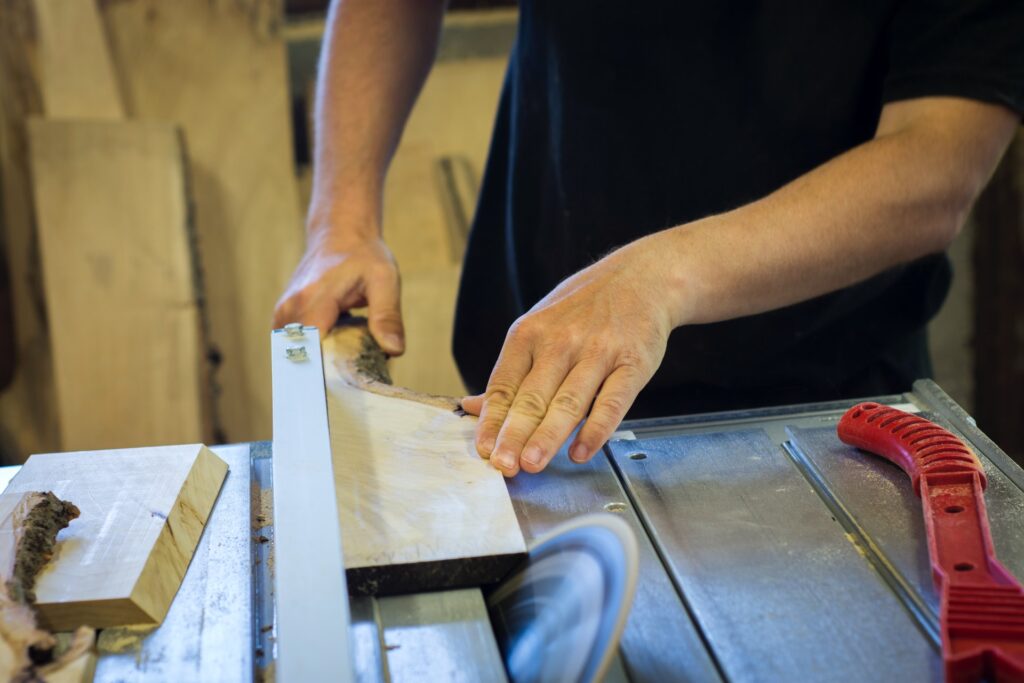
Skiing is a very popular past time and can be incredibly rewarding, but unless you live on a permanently snow-covered mountain, you will have to put your skis away for certain periods of the year. Luckily, building a ski rack in your garage is easy with a few simple tools, and doing so will help preserve your skis for longer.
There are many different styles of ski racks, from wall mounted pegs to standalone pillars with slots to everything in between. However, this guide will show you what I believe is the easiest and cheapest way to build a ski rack that will also have room for your own personal touches.
Getting Your Tools and Space Ready
As with any DIY project, setup is vital to ensure your safety and a successful project. Much of the labor for this project, as with many woodworking projects, is greatly mitigated through the use of power tools.
However, for the sake of accessibility, this guide will revolve primarily around the use of hand tools. Additionally, an important thing to keep in mind is that this supplies list may differ depending on how many skis you want to store. I will cover this more as we get into the build. For three pairs of skis, you will need this.
The choice between a 1×6” and 1×4” or a 2×6” board is up to you. Later on, the 1×4” will be cut to have a 1” offset from the 1×6” board, and then mounted on top of the 1×6.” This will be to add some additional support to your dowels later on.
But, you can forgo this by using a 2×6” that will add that additional depth needed for the dowels. That covers what you will definitely need, but if you want to add a little more to the look and overall stability of your rack, then you can also add these optional parts.
Now that you have the necessary supplies, it is time to set up your space. If you have not done this already, now is the time to pick out a spot on your wall where you want to hang your skis.
Keep in mind that the skis will be hanging down from wherever you pick, so make sure you pick somewhere with enough clearance from the floor for your skis to hang. This also means that you will need to clear the space below your chosen spot of junk or other items.
Additionally, make sure to consider that this project will be 28” wide unless you choose otherwise and that you will need to mount your rack onto the studs of your wall.
Measuring and Finding Studs
Studs are usually 16 or 24 inches apart. Depending on how long you plan on making your rack, this might affect your placement. Ideally, you want your rack to spread the length of at least two studs, which is why this guide is for a 28” rack.
If you cannot manage to place it over two studs due to space or the size of your rack, then you will later need to mark your wood in the center and use drywall anchors to help support the weight.
Now that we know what size we are looking for, we can start finding the studs. The easiest way to do this is with a stud finder, which can be found at any local hardware store or online. Using this style of the stud finder is very simple and will save you a lot of time in the long run.
Your stud finder should come with instructions, but here is a video tutorial as well. Once you have found the studs you are going to use to mount your board, mark them with a pencil. Make sure to mark both the outer edges of your studs so that later you know where to screw.
[googleadsycc adunit=”inarticle”]
The last thing for setting up your space is making sure you can move around safely without tripping or knocking things over. With that, we can now move on to the wood.
How to Make the Actual Rack
Now that you have your tools ready and your space is ready for action, you can get started on the actual construction of the rack.
Measure and Mark the Wood
Before you can start cutting anything or screwing, you will need to mark up your wood in a few places. To start, you will need to decide how long your rack will be. Whatever length that maybe, 28” in this guide’s case, cut your 1×6 board to that length using whatever saw you have available to make a clean cut. Suppose you are going the 2×6 board route, cut that instead.
Now that you have your wood cut to size, measure where the studs will be on the board. Keep in mind whether your studs are 16” or 24” apart or if you are only mounting on one stud. This will affect where you mark.
Also, make sure that when marking your board to denote both outer edges of your studs like you did on the wall. Make sure to mark two countersink holes per stud.
Cutting the Dowels to Size
How many dowels you need will vary depending on how long your mount will be and how many pairs you plan on making. However, the ideal size to cut these dowels to is 8”.
This size gives enough room to firmly place the dowels in the holes you will drill later while still leaving 6 ½” of space for your skis. Conveniently, cutting down to 8” will also give you exactly six properly sized dowels if you chose the 48” dowels to start with. With your six dowels, you now have three pairs to place on your board.
Marking the Dowel Holes
To mark where your dowels will go, you need to keep a few things in mind. First, the ideal space to have between the two dowels of each pair is ¾ of an inch.
So, when marking the points on your 1×6, make sure to leave ¾ of an inch between the points, but remember that these points will be the edges of your dowels and not the centers. If you have a compass, make a 1 1/8” mark to show where the edges of your dowel are. If you don’t have one, then you can use the dowel to make the mark.
The second thing you need to keep in mind is the markings you made for your studs. Do not place a dowel where a stud is because it will prevent you from screwing the mount onto the wall.
[googleadsycc adunit=”inarticle”]
Lastly, keep your spacing in mind. Leaving enough space between each pair of dowels will allow you to place coat hangers to hang your ski poles, and spacing evenly will help your finished product look its best.
Marking the 1×4 Board
To mark the 1×4 board, you will first need to cut it down to 26”. By doing this, you will later be able to place it on top of your 1×6” board with a one-inch offset. Mark up your 1×4 the same way you did with the previous board making sure to show where your studs are and lining up your dowel hole marks.
Remember to keep in mind that your 1×4 will have a one-inch border all around it. If it will help you make proper marks, measure one inch from each side of the 1×6 and place the 1×4 in this space. If you chose to just use the 2×6,” you do not need to worry about doing this. You are now ready to start drilling.
Drilling Your Holes
The first holes you will want to drill will be the dowel holes. Use your 1 1/8” paddle bit to drill completely through the 1×4 board at your designated spots. Next, drill no more than a quarter-inch into the 1×6 board.
This will provide extra stability to your dowels, but this is not necessary if you do not want to do it. Later we will have additional ways to help support the dowels. Next, stack your 1×4 on top of your 1×6, making sure to line everything up.
Using your countersink bit, drill countersink holes through the top of your 1×4 all the way through your 1×6 at the designated stud points. Clamping your wood down to avoid movement is recommended. If you are using only the 2×6, make sure to not drill your dowel holes deeper than 1 1/4”.
Attaching Everything Together
Before placing your dowel holes in place, you first need to attach your two boards together. To do so, simply spread wood glue on the backside of your 1×4. Make sure to avoid gluing over your pre-drilled holes.
Press the back of the 1×4 onto your 1×6 and wipe off any excess glue that might squeeze out the sides. Clamp your boards together or weigh them down with something to keep them firmly together. Now let them sit for at least an hour.
Now apply wood glue to the inside of your holes and at the end of your dowel. You can use your finger or another applicator to spread it out. Once you have an even coat all around, you can place your dowel into each designated hole.
Ideally, the fit will be a little snug, but if it is not, do not worry. The wood glue will solidify harder than wood, and we will have the opportunity to add additional support later. Again, make sure to wipe off any excess that may squeeze out the sides of the holes and let the dowels sit for an hour.
Optional Support
If you feel that your dowels are still not supported enough after your glue has dried, don’t worry. A great way to add support is to turn your mount around so that you are looking at the backside of the 2×6 board.
At this point, everything should be attached together, so it should all be lined up. Once you are looking at the back of the 2×6, locate where the dowels would be if they were coming out the back of 2×6. Here you can use the countersink bit to drill additional holes.
You can now screw the 2” wood screws through these holes and through the dowel. You should still have a flush backside to place on your wall, and your dowels have additional support.
Optional Ski Pole Hangers
This is a completely optional step, but it is nice to do. If you have coat hangers or purchased some for this build, you can use them as hangers for your ski poles.
Simply screw them to the board in between the pairs of dowels. Now when the board is mounted, you can hang the wrist straps over the hooks and have everything neatly stored together.
Mounting the Board on the Wall
At this point, hopefully, you have everything attached together, and it all lined up perfectly. You should be looking at a finished ski rack except for not having it hung on the wall. Now is the time to do that. Place your rack up on the wall and line it up with the stud marks you made.
Having a level here is very helpful to make sure you are attaching your rack evenly. Once you have your rack lined up, use the 3” wood screws to drill through the pre-drilled countersink holes.
This should result in screws that are flush with your wood and will be embedded an inch into your studs. Once all the screws are in place, you should have a useable ski rack.
To use the rack, simply place the bottom of your skis together and place them between the dowels. The curve at the ends of your skis will not be able to pass through the 3/4” hole. For a nicer fit, there are Velcro straps used to hold skis together.
The length of the dowels should be long enough to hold racing skis, cross country skis, or even wider ones.
Additional Information
At this point, your rack is finished, and your skis can be easily stored. However, if you want to add some additional flair to your rack or see the solution to common issues you might be facing, read on.
Drilling too Far
As stated in the guide, drilling into your 2×6 is not entirely necessary, and if you do, you should not drill more than a quarter-inch in. The reason for this is so that you do not run the risk of making a hole straight through your 2×6.
If you decide to drill your dowels into place, it is very possible that the countersink bit will meet the hole made by your paddle bit. This completely defeats the purpose of drilling your dowels into place since you will only be drilling into the dowel instead of drilling it to something.
If you feel like you drilled your dowel holes too deep into your 2×6, I recommend not drilling your dowels into place.
[googleadsycc adunit=”inarticle”]
Alignment
If you decided to use the 2×4 and 2×6, then you will have to attach the 2×4 on top. However, you do not want to line the edges of the 2×4 with the 2×6. Instead, you want to center it.
By cutting it to the designated 26,” you should be able to place it directly in the middle of the 2×6 with a one-inch border. When marking your 2×4, make sure to keep this additional inch in mind.
So, if you marked 4” away from the edge on your 2×6, you will need to mark 3” away from the edge of your 2×4. This will help to keep everything lined up properly.
Finish and Other Customizations
If you want to add a more personal touch to your project, you can add a finish and some paint. To do this step, find a stain or finish that you like and apply it before mounting it onto your wall.
The best time to do this is after everything is attached but before mounting. Doing this can make your project look even more professional.
Another step you can take is chamfering your edges. For this step, it is probably best to do before attaching your dowels or boards together. For those who don’t know, a chamfer is when you make your edges have an angle instead of a straight ninety-degree edge.
There are many different types of chamfer bits, so if you decide to do this, keep in mind that you will need an extra bit or will need to already own a set.
Also, keep in mind that if you decided to stack your 2×4 and 2×6 that chamfering both will affect the way the finished product looks significantly. So, make sure to pick an angle that suits your taste before doing it.
Woodworking in the garage can be a worthwhile hobby even if it’s just done for leisure, but it’s also a hobby that has the advantage of being able to provide the person practicing it with monetary rewards if they’re willing to sell their work.
Any woodworker can make money woodworking in their garage by completing a wide array of either simple or advanced woodworking projects and selling them. Woodwork can be successfully sold either locally or online. Woodwork is especially popular to sell at craft and holiday fairs and can be made more valuable by woodburning designs or monograms.
Woodworking can be an expensive hobby, so it takes some planning to do it in a way where you can turn a profit. Keep reading to learn more about how you can make your woodworking hobby a profitable side business out of your garage.
Tools You Need to Get Started Woodworking in Your Garage
Before you can get started making money woodworking in the garage, you need to have the proper tools. You don’t need a ton of different tools to get started woodworking, but there are a few fundamental tools that you’ll need for basic projects.
Here are a few of the woodworking tools that you’ll want to invest in for woodworking in your garage:
Circular saw: A circular saw is one of the most basic saws you’ll need for a functioning workshop, and since it is used for so many different projects, it’s worth investing in a high-quality machine. Be sure to choose a circular saw from a manufacturer with a good reputation for reliability, even if it means a slightly higher price.
Jig Saw: Jigsaws are used to cut curves and complicated shapes in woodwork and can come with a variety of different blades designed to achieve different patterns. Jigsaws are versatile tools and can be used for many different woodworking projects. (Source: Home Depot) You’ll need one for any woodworking project that doesn’t involve straight or angled lines.
Power drill: Like investing in a high-quality circular saw, you’ll want to get a nice power drill if you plan on using your garage to actually make money on your woodworking projects. Since you’ll be using the drill a lot more than the average homeowner, you’ll be putting it under heavy load. Make sure you get a tough drill with a lot of torque that can handle the abuse.
Orbital sander: Many woodworking projects require a polished finish, and the best way to achieve this is by using an orbital sander. Sandpaper can also be used to sand projects by hand, but this is a much more tedious process than using an electric sander.
Woodburning tool: This is an optional tool for your woodworking garage, but learning how to use a woodburning torch to monogram your projects or add decorative pyrography can help add aesthetic beauty and value to your final results. The more intricate your work is, the more money you can sell it for.
Once you have these basic woodworking tools, you should be all set up to get started making money woodworking in the garage.
[googleadsycc adunit=”inarticle”]
The Costs of Woodworking in Your Garage
Photo by Dominik Scythe on Unsplash
The major challenge in trying to turn a profit woodworking in the garage is that woodworking can be an expensive hobby. More exotic types of wood that are prized by woodwork collectors can be pricey to work with and difficult to work with, increasing the chances of a mistake that requires fixing. It might even require scrapping the project and starting over.
Major Expenses
Tools: While many tools are a one-time investment, they sometimes require repair and often require replacement components, such as new saw blades. This means that depending on the quality of the tools you buy, you may have to buy more replacement parts. A cheap saw might seem like a good idea until it starts throwing blades, and then it becomes an expensive buy.
Materials: The wood you use in woodworking projects can vary in price, but raw lumber is only suitable for the roughest of projects. That means that for more sophisticated woodworking projects that have a better chance of selling, you’ll have to invest in a slightly more expensive and higher quality softwood to work with.
Electricity: Unless you’re using a hand saw, you’re going to see a spike in your utilities if you use your garage to run your electric saws a lot for woodworking projects. The electrical cost of woodworking is kind of hard to work around, so it has to be factored into pricing your woodworking projects to offset the costs.
Vendor fees: Whether you sell your woodworking projects online or sell them locally, you’re likely to run into fees involved. This can either be a rental fee for the stall you use to sell woodwork at a craft fair, or commission fees through an online market. Like electrical costs, vendor fees should be factored into the final price of your woodworking projects.
While it’s a good idea to try and source cheap (but good quality) materials whenever the opportunity presents itself, the main reason that woodworkers have a hard time turning a profit woodworking is that they underestimate the operating costs of their workshop.
These costs must be passed on to your customers to some degree in the final price so that you don’t end up eating these costs yourself. Otherwise, your woodworking hobby may not make enough money to make it worth the time and energy.
What Wood to Use in Your Woodworking Projects to Profit
The type of wood you decide to use in your woodworking projects can have a serious effect on how much money you’re able to make off of them. While rough lumber is cheap and a good idea for practicing on when you’re still learning your chops as a woodworker, you’ll need to look at a higher-grade surfaced lumber for most woodwork.
Regular 2x4s can be used for some simple woodworking projects that are easy to sell if executed well, such as picnic tables. Even though the base wood is relatively cheap, often, these projects can be stained or varnished for a more polished result that can command a higher price.
[googleadsycc adunit=”inarticle”]
How to Price Woodworking Projects for Sale
Pricing woodwork can be difficult for many novice woodworkers, especially if they’ve never run a business or tried to sell their own artisan crafts before. As a result, many novices may charge a lot less money for their finished woodworking projects than the amount of time and effort they put into them deserves.
The first thing you should determine when you are learning how to sell woodwork out of your garage for profit is how much you want to pay yourself in labor. The biggest mistake many woodworkers make is failing to pay themselves for the time they spend at the craft.
In fact, it’s a good idea to keep track of how many hours you work on each project. Whatever rate you decide to set your labor at, you need to multiply it by the number of hours you put into your project.
The next factor to look at when you’re trying to figure up prices for woodwork is the price of materials, vendor fees, and utilities. Whatever the cost of the materials was for the materials in the woodworking project goes into the base price of the resulting project. As for utilities and vendor fees, a small amount should be added to the cost of each project to help offset these operating costs.
Once you have added your labor rate with the cost of materials, you’ll have a base price for your woodworking projects that allows you to make a small profit on them. As you become more experienced and your woodworking projects become more intricate, you can begin to set your prices higher to reflect the extra time and energy you’re putting into them.
Remember these tips when pricing your woodworking projects for sale:
Don’t forget to include the cost of materials other than wood, such as varnish, screws, or other secondary supplies.
Don’t forget to factor in your labor costs! Even if you’re a novice woodworker, your time is still worth money. There are other things you could be doing other than woodworking, and if you underprice yourself, you also undercut the prices of other artisans as well.
Don’t overprice your work, especially if your skill level is still low. This is as important as not underpricing your work. Selling your work too high can hurt your reputation in the local markets, and you’ll end up sitting on a bunch of pieces you can’t sell.
If you use the simple formula of adding up your labor costs and your materials costs with a small amount added for pure profit, you should end up at a price that people will find reasonable.
How to Sell Woodworking Projects Locally
One way that you can make money woodworking in your garage is to sell your woodworking projects locally. This can be done through a variety of locations:
[googleadsycc adunit=”inarticle”]
Thrift stores, antique stores, and flea markets: Many thrift stores and flea markets are good hunting grounds for woodworkers to set up vendor stalls.
Artisan and craft shows: Artisan and craft shows are a good place to get your work in specialty markets alongside other woodworkers. Artisan and craft shows are especially good for selling more advanced forms of woodwork or wood sculpture that may be more difficult to sell in other local venues.
Holiday fairs: Many woodworking projects are perfect holiday heirlooms and decorations, and these projects sell like hotcakes at holiday fairs. Woodworkers can also take advantage of the holidays to sell monogrammed projects since these projects sell well as holiday gifts.
While you are practicing your first woodworking projects and getting the hang of more refined designs, it’s a good idea to start getting your ear to the ground about some potential local venues. That way, once you have several samples prepared as well as some items for sale, you’ll already have an idea of where you might be able to start selling locally.
How to Sell Woodworking Projects Online
Another option for making money woodworking out of your garage is to sell your finished products online. There are many advantages to selling woodwork this way, including some of the following:
Set up your own marketplace. Setting up shop online with your woodwork lets you set up a curated collection of your pieces that you can display to show the widest range of your work, even work that isn’t easy to transport back and forth to local venues.
Show your work in its best light. With online markets, it’s easy to get really high-quality photographs of your work that show them off the best way possible, and vivid item descriptions can also help you sell your work.
Online sales are good for introverts. Many artisans—including woodworkers—are more artistic and introverted in nature, which means they might not necessarily be that comfortable selling their work face-to-face at an art fair. In contrast, selling things online is a simple process, and everything is handled digitally.
No haggling. With some exceptions, online sales take out a lot of the haggling in selling handmade crafts, which can be rampant at flea markets and craft shows. For woodworkers who hate to haggle, online sales are a much better option for getting the price you asked for without having to argue about it.
For many people, websites like Etsy and eBay are becoming more and more tempting as options to sell their hobby woodworking projects. Each online market has different rules for selling and buying, so be sure to read the FAQs at each website carefully during the vendor application process.
[googleadsycc adunit=”inarticle”]
Woodworking Project Ideas to Sell
Photo by Jessica Delp on Unsplash
If you want to make money woodworking in your garage, you should stick to woodworking projects that are relatively easy to make, sell well, can be made of simple materials, and are easy to complicate with advanced designs in order to increase their value.
Here are a few ideas for simple woodworking projects that sell well:
Picnic tables
Planters
Wine racks
Bowls, spoons, and other culinary utensils
Cutting boards and knife blocks
Dog houses
Custom terrariums or rabbit hutches
Simple furniture like tables and benches
Picture frames
Fruit bowls
Shelves
Shadowboxes
Coffee racks
Birdhouses
The benefits of many of these projects are that they can be replicated quite easily, and they can also be easily customized to add value.
Advanced Woodworking Projects to Sell
Once you’ve gotten better at your woodworking and you’re more experienced, you can branch out into more advanced woodworking projects to sell that can be sold for higher prices. Here are a few examples of more advanced woodworking projects you could sell:
Sculptures
Wooden inlay work or marquetry (Source: First Dibs)
Pyrography or monogrammed work
[googleadsycc adunit=”inarticle”]
While these types of advanced woodworking projects may require more advanced tools to add to your workshop, these tools can be acquired gradually as you gain more experience in your hobby. After you develop a certain level of skill and begin to take on harder projects, you can both charge more for your materials and increase your labor rate as well.
Tips for Making Money Woodworking in Your Garage
Photo by Blaz Erzetic on Unsplash
It can take a while to start making money when you do woodwork out of your garage, but that’s no reason to get discouraged. Here are a few quick tips for when you’re first getting started out as a hobby woodworker for profit:
Choose projects that you love. Don’t decide you’re going to build dog houses for sale just because you think they’ll sell well if you don’t care anything about dogs or dog houses. You’ll burn out halfway through your third house. Instead, choose woodworking projects that you enjoy and that you don’t mind repeating. These are the projects that will form the bread and butter of your woodworking shop.
Be sure to work up some samples. Even if you can’t bring your entire collection of woodwork to an art show or trade fair to sell, you can still bring representative samples and photographs of your entire inventory to sell pieces that are too unwieldy to transport to the vendor stalls. This includes woodworking projects such as porch swings, picnic tables, and other furniture.
Build up slowly. Don’t expect to earn a complete living doing woodworking out of your garage, or even breaking even at first. It takes a while to figure out where you can successfully sell your projects and what projects you make sell well. Be sure to enjoy the journey along the way as you become a more experienced artisan and woodworker, rather than focusing on profit alone.
Remember, at the end of the day that you’re wanting to start selling your woodworking projects so that you can profit from a hobby that you love. If selling your work sucks all of the joy out of your hobby, it isn’t worth the trade-off.
Woodworking Out of Your Garage Can Be Profitable
Depending on what projects you decide to sell, how talented you are, and what the local markets look like, a woodworker can easily profit from projects that they build-out of their garage. While it might take years to achieve a level of mastery that allows you to make a full-time living from woodworking, the garage is a great place to start for anyone who is looking to make some extra money off of a leisure activity they already enjoy.
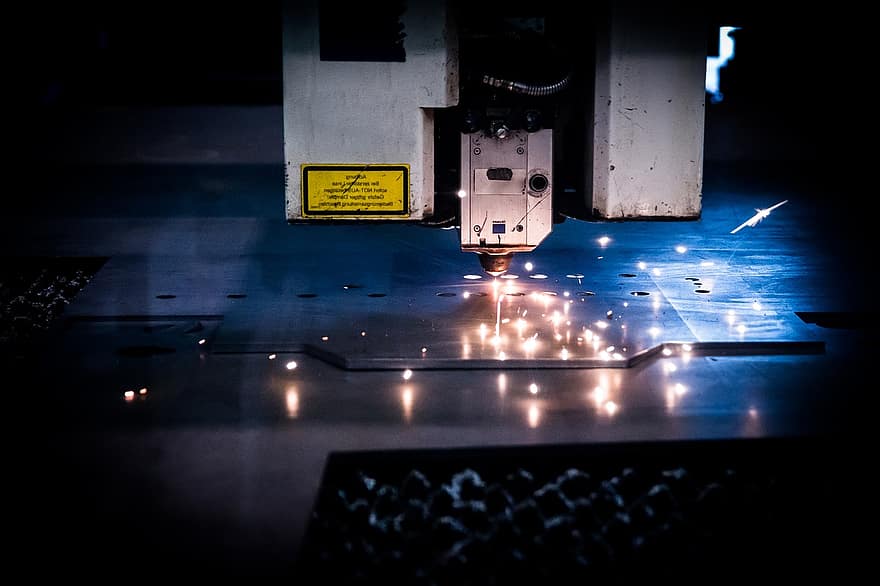
Every man cave needs a custom sign. But a custom plasma cut metal sign takes a man caves’ décor to the next level. Custom plasma cut metal signs are the latest and greatest in man cave design, and they’re something you need to have in yours’.
Whether you outsource to a company or decide to do it yourself, a custom metal plasma cut sign can be a great addition to your hang out cave. However, the multitude of options and materials out there can be overwhelming, so read on to get a better idea of where to start.
This article will not serve as a full how-to guide to build your own plasma cut sign, but it will serve as a primer. There are many materials to pick from, CNC versus hand-cut, outsourced or DIY, sizing, proper file formatting, and much more to consider. So, let us get started on understanding what all this means.
Getting Started with a Design
Before you begin cutting, getting tools, or anything else, the first step is to decide where you want your sign. Once you have that figured out, you need to plan your design. Starting with pencil and paper is a great option to get your ideas down, but as we go on, you may have to transfer those ideas.
Putting your ideas into a photo editing software, 3d modeler, or outsource it to a graphic designer is the best way to go about starting your design. Additionally, I would not recommend getting too attached to one design, as the material you choose and your methods of cutting will limit your options.
Important Information to Keep in Mind
If you decide to outsource your designing process to a graphic designer, then a simple sketch and instructions should suffice for this first step. Your graphic designer will ask more questions as needed to meet your specifications.
However, if you are going to design it all yourself, then there are a few important factors to keep in mind. First of all, it is “orphan shapes.” A term that refers to pieces of your design that are meant to be a part of your finished product but are not attached to anything.
Think of it like bubble letters. If you were to draw a bubble “B,” the two small holes in the center would be wanted as a part of your final design. However, when cut, there would be nothing holding those shapes in place, so they would be cut out and not be in your final design.
To remedy this, you need to attach bridges from these holes to the rest of your design. To see a visual example of this, I highly recommend going online and looking at plasma cut projects. You will notice that letters, along with everything else, are attached to the overall design through bridges. This is best seen in the letter “O” where there will be a metal bridge at the top and bottom to connect it to everything else.
[googleadsycc adunit=”inarticle”]
An Exception to Bridges
There is an important exception to this bridge idea. This idea of having everything connected is for when you are designing something that will be all a square plaque or as part of a larger sheet of metal.
However, you also have the option of having a design that is free from a surrounding piece of metal. Imagine a design that is just cursive lettering or where the design is free standing.
The difference between the two would be a Labrador cutout where the free-standing one would be the piece of metal that is cut out from the larger sheet, and the one that needs bridges would be the empty space the Labrador left in the sheet.
Ultimately this design choice is up to your personal taste.
Design Software
If you plan on doing all your cutting yourself, then using design software is not completely necessary, though it is helpful. Learning it will allow you to quickly see different permutations of your design, quickly edit and erase, as well as being a useful skill for future projects.
However, if you plan on designing yourself and then sending your design off to be cut somewhere, then you will probably need to learn. The main types of software to choose from will be 2d design software such as Photoshop or 3d design software such as Autocad or Fusion360.
The choice between these will be up to you, but both are very useful in the long run for DIY projects.
Do Your Research
However, if you are going the route of designing yourself and outsourcing the cutting, I highly recommend looking at different companies that offer to cut. This could dictate what you need to learn.
Companies may prefer certain types of files over others. Additionally, depending on the company you choose, you may not have complete control over your design. This is because some companies will have a set group of clip art designs you can choose from to mix and match or stand-alone.
There is a plethora of options for companies that offer a variety of services at different prices, so look around and find one that fits your needs and budget.
Sizing Your Design
The last main aspect to keep in mind for your design is the size. This, of course, encompasses the overall size and space you have for your finished sign, but also to the intricacies of the design itself.
Whether you go the CNC route or the hand-cut route, your design will ultimately be cut out of metal. This means that if you have very fine details in your design, they may be lost in the final cut.
As a rule of thumb, do not design anything that is smaller than 1.5x the thickness of your chosen material. This will help your design look how you intended and will help you pick a material.
What Type of Metal is Best for Plasma Cut Sign
There is no one type of material that is best, but there are a few commonly used ones that will yield different results.
The type of metal you choose will also, in part, dictate the intricacy of your design, the overall look, and the price. Regardless of which you choose, I highly recommend looking up projects that have been done in the material you are looking at to make sure you like the look of it. After all, you are going to be hanging this up in your space.
Carbon steel
This type of metal is very strong and brittle. You probably already have some of this metal in your kitchen. Good quality works are made of carbon steel. Carbon steel is a fairly popular option due to its relatively low cost and versatility.
Keep in mind that certain environments may cause it to rust, but this can be counteracted with an exterior coating. If you go the DIY route, then oxygen will be your best option for gas when cutting this material, but we will talk a little more about gas later.
If ordering from a company, just make sure you like the finished look of this type of metal.
Aluminum
Aluminum is a little different. There are many types of aluminum that all have slightly different properties and applications.
Overall though, they will have high conductivity, will be lightweight, and will be relatively affordable. It is affordable, and if you plan on welding anything to your sign or welding your sign onto something, aluminum will do so easily.
However, you will need to keep in mind that aluminum has a lower melting point than some of the other metals, meaning that you have the possibility of forming dross. Dross is melty pieces of metal that adhere to the tops and bottoms of your material, as well as occasionally on your actual cutter. If you are outsourcing, you will not need to worry about this, but if you go the DIY route, keep it in mind.
Cold Rolled and Hot Rolled Steel
These types of metal differ in how they are processed. Neither are very common in sign making, but especially hot rolled. However, if you decide to go with this option, the main thing to keep in mind is that the finish will be a little different on each.
The cold-rolled will have a smooth and oily surface, and the hot-rolled will have a non-oily and scaley surface. As with the rest, I recommend taking a look at projects in this style to see if you like the look.
Brass and Copper
Brass and Copper will result in a very specific finish. However, there is not anything too different about them from other metals.
You should cut similarly to steel, and also release toxic fumes like many others. Brass will be even more corrosion resistant than steel, but unless you plan on submerging your sign, it will not make much of a difference. Make sure to take the proper safety precautions if you plan on cutting these materials yourself.
[googleadsycc adunit=”inarticle”]
Cor-Ten
This is one of the more interesting metals on this list, in my opinion. Corten was originally a brand name product, but like Kleenex and Band-aid, it has become a proprietary eponym. It is also unique in that its rusty surface is a defining characteristic.
This rust that forms actually serves as a protective coating for the metal and more of it will form over time. Additionally, if you want to speed up the process of this rusty look, you can spray it with diluted hydrochloric acid as well as water a few times a day.
Make sure to practice proper safety precautions when handling hydrochloric acid because it can melt through the skin easily.
Stainless Steel
A tougher material that, as the name implies, does not corrode. This means you can be sure that the shiny metal finish of your sign will stick around. The cuts on your stainless steel should be clean, but dross can form.
Dross formed with stainless steel will be more difficult to clean up than aluminum dross. An important factor to keep in mind is that the fumes released from cutting stainless steel are toxic, so make sure to have a method of dealing with them to ensure you are protected.
The best gas to use for cutting this is up to debate, but if you want more information on cutting stainless steel specifically, this article answers some of the most commonly asked questions.
Where Can You Find Them?
If you plan on ordering from a company, there are plenty of options online that offer a variety of services and products. Make sure to do your research and see what is offered, what pricing looks like, and how much shipping costs will be.
Additionally, you can also see if there are local shops that offer services near you. Going in and talking in person could be a great way to get more information. However, if you do plan on making it yourself, the process will be a little different. In this case, you will need to find a way to source your metal and tools.
There are plenty of metal shops, and chances are there is one near you. But, doing it yourself also comes with many more factors to consider.
How to Make Your Own?
To begin with, you will need to pick a plasma cutter. When picking out your cutter, you will need to consider the amps output, the voltage, the size, and what other components it comes with.
All of this will affect your cuts cleanliness, how thick of material you can cut, what materials you can cut, and the speed at which you can cut them. Additionally, some plasma cutters will come with a replacement or different styled torches.
If you plan on using your plasma cutter for a variety of projects, the ability to change your torch style could be important.
The next thing you will need to pick is your metal type. I covered some of the basic aspects earlier in this article, but I cannot stress enough the importance of looking up information about your chosen material.
Not only will this yield the best results for your sign, but more importantly, it will keep you safe. Each type of metal can come with its own quirks such as melting points, gas emissions, ability to weld, and many more.
Additionally, picking out your metal will also dictate what kind of gas you need for your plasma cutter as well as which plasma cutter you will need.
Safety
I have mentioned taking safety precautions a few times in this article because you will be working with hot metal, noxious gasses, and bright light. That being said, many people do this on their own, so if you have your heart set on trying it yourself, then it is possible to do safely. You will need:
A well-ventilated area to disperse the toxic gasses
Eye protection in the form of glasses or helmet. There are many different shades of eye protection, so you will need to make sure you find the proper amount of shade for the type of metal and plasma cutter you are working with. Each metal and gas burns differently, so make sure you do your research and are getting eye protection that is a high enough grade to keep your eyes safe.
CNC vs. Hand
So far, we have mostly only covered hand plasma cutting. However, there is the option of using CNC. CNC is short for computer numerical control, and as the name implies, it is when you use a computer to cut out a set path on the selected material.
CNC is not only limited to metal but instead has many applications. If you choose to outsource your cut, most places will use CNC to cut out your sign because of how precise it is. However, if you choose to cut yourself, you will need to purchase a CNC table and learn how to use software to control it.
In the long run, this can be an extremely useful skill to have, but it does have a learning curve.
CNC is a great option due to its precision and automated nature. If you have a file with the necessary information, you can leave your machine running, and it will do all the work for you cleanly.
However, CNC tables can also be pricey, so make sure the investment is worth it for you. Lastly, purchasing your own CNC table for plasma cutting comes with a variety of other factors to consider. Having a way to get rid of the fumes is a common consideration when purchasing, as there are options for water tables and downdraft tables.
There is too much to cover for the scope of this article, but if you are interested in this, a quick online search will open up to a whole new world.
[googleadsycc adunit=”inarticle”]
Gas
When outsourcing, the type of gas used will not really be a factor you have to consider, but when going the DIY route, it will. Each gas burns and reacts with specific metals differently, meaning that the type of gas you use can be as important as the type of plasma cutter you use.
Again, there is too much to cover for the scope of this article, but for the most commonly used metal for beginners, stainless steel, nitrogen is the best option. If you decide to cut different materials, you can find some useful information in this article as well as here near the bottom of the article.
Additional Customization
Along with metal type and design, there are many more ways to customize your sign. There are options for backlighting, finish, and frame. Backlighting may be offered by some companies, but doing it yourself is also an option.
For a finish, there are many options to get your desired look, from powder finish to exterior coats. For the frame, you can choose to have a frame in the back to add support to your larger designs or as part of your design.
Custom plasma cut signs can be a great addition to any space and have a load of customization options to get it looking exactly how you want it. While there are a lot of factors to consider, it also means there are a lot of options for how your sign looks in the end.