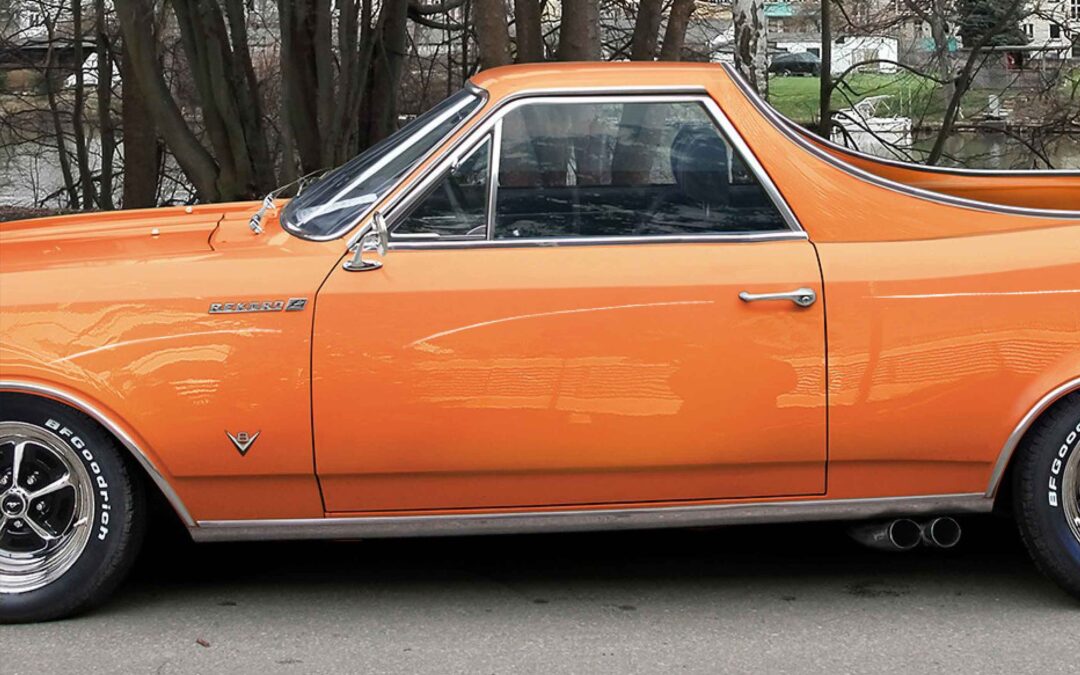
It happens. You’re proud of your car and take care of it but, one day, in a grocery store parking lot or while you’re at work, your car gets a scratch or a chip. It can ruin the look of the car and depreciate your vehicle even more.
Read below to find different ways to fix your car’s minor dings and scratches. We’ll give you detailed instructions and list all the tools you’ll need. You’ll first need to determine what type of scratch it is.
Categorizing Your Scratch
There are different fixes to car scratches, depending on how bad the scratch is. Here are the different categories of scratches we’ll discuss:
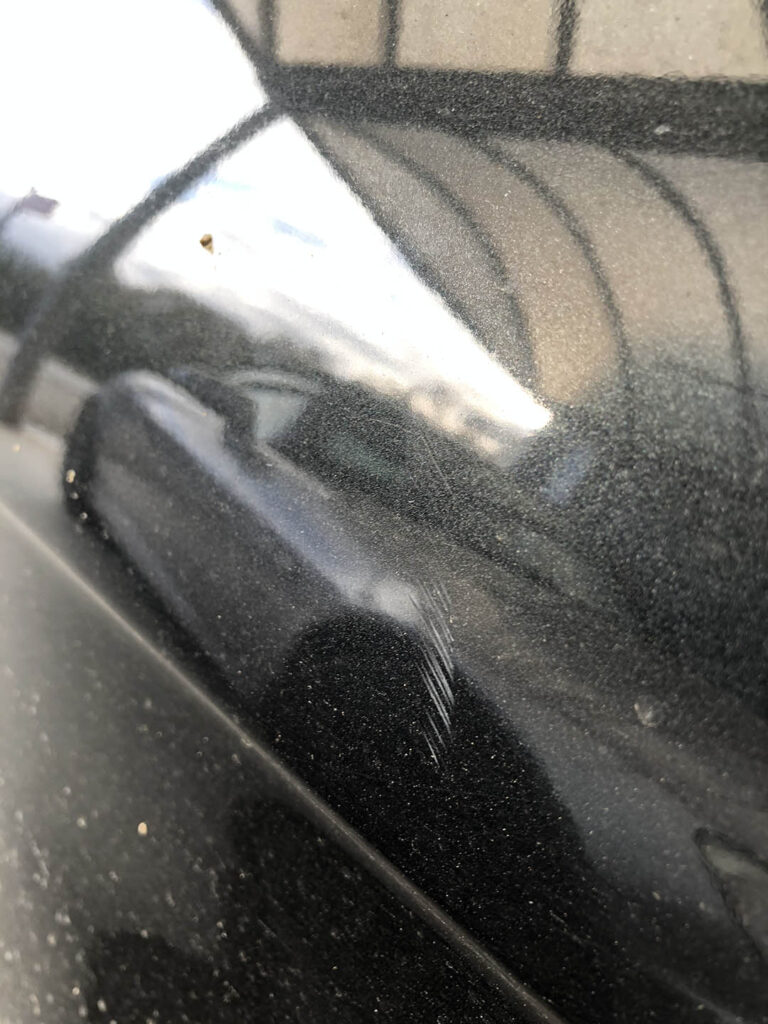
Clearcoat Scratch
On top of your car paint is a thin layer of clearcoat, a material that protects your paint from environmental issues like:
• Dust
• Acid Rain
• Direct Sunlight
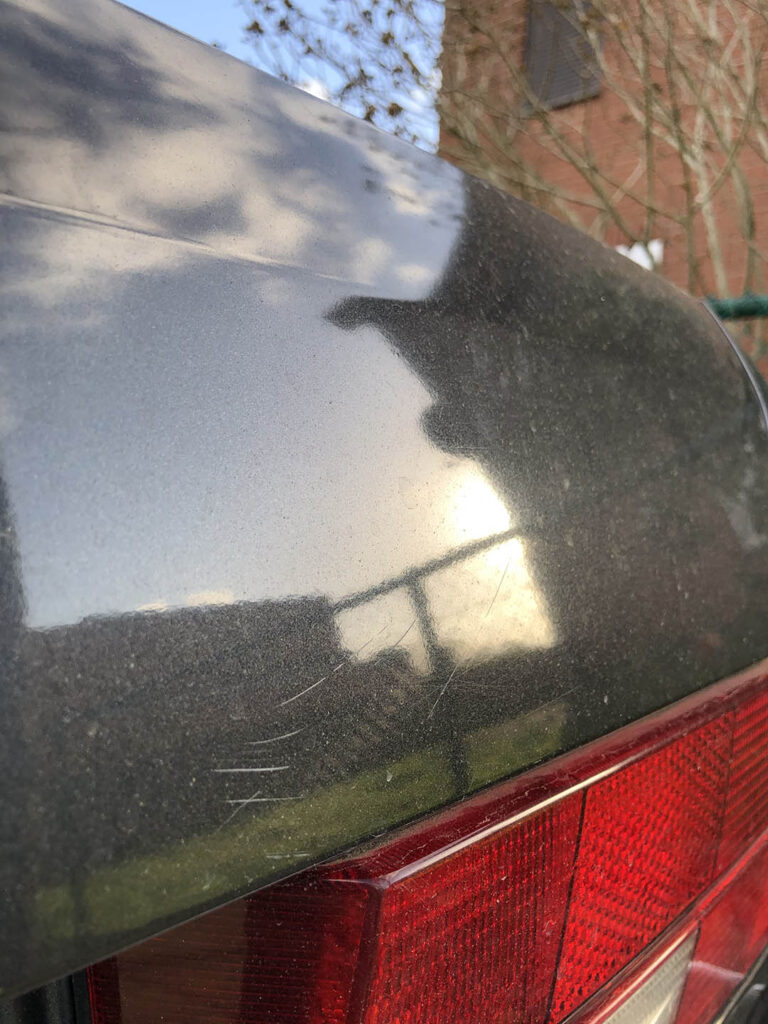
If your scratch only damages your clear coat, this is a minor surface scratch and the easiest to repair.
[googleadsycc adunit=”inarticle”]
Primer Scratch
The primer is another layer car manufacturers give to cars to give vehicles a shinier, smoother surface. If you have a scratch that has cut through the clear coat into the primer, this can ruin the paint job and even cause rust if not repaired on a timely basis. This is a more complex scratch and will require more work on your part.
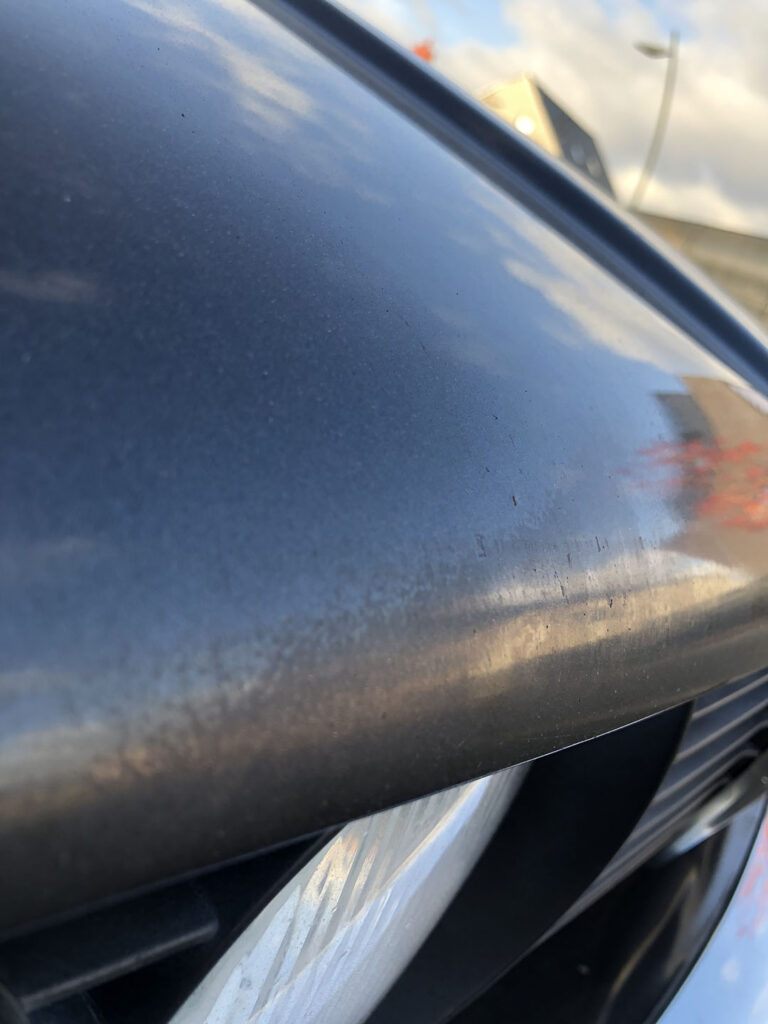
Paint Scratch
If you can see the metal sheet under your car’s layers, you have a paint scratch. This is the worst scratch of all and the hardest to repair. This is the kind of scratch you get from someone keying your car or a major accident. For this type of scratch, you will need to use paint.
4 Easy Ways To Repair Scratches
Once you’ve identified which type of scratch you have, you can then see which scratch repair works for you. There are different ways to solve the problem of car scratches. Depending on your car and the scratch, there’s not really a “one size fits all” scenario. You can choose from the following:
You will want to take care of deep scratches quickly. If you don’t, they will get worse. A deep scratch is considered a scratch that has ripped through the clear coat and paint layers to penetrate the innermost primer layer.
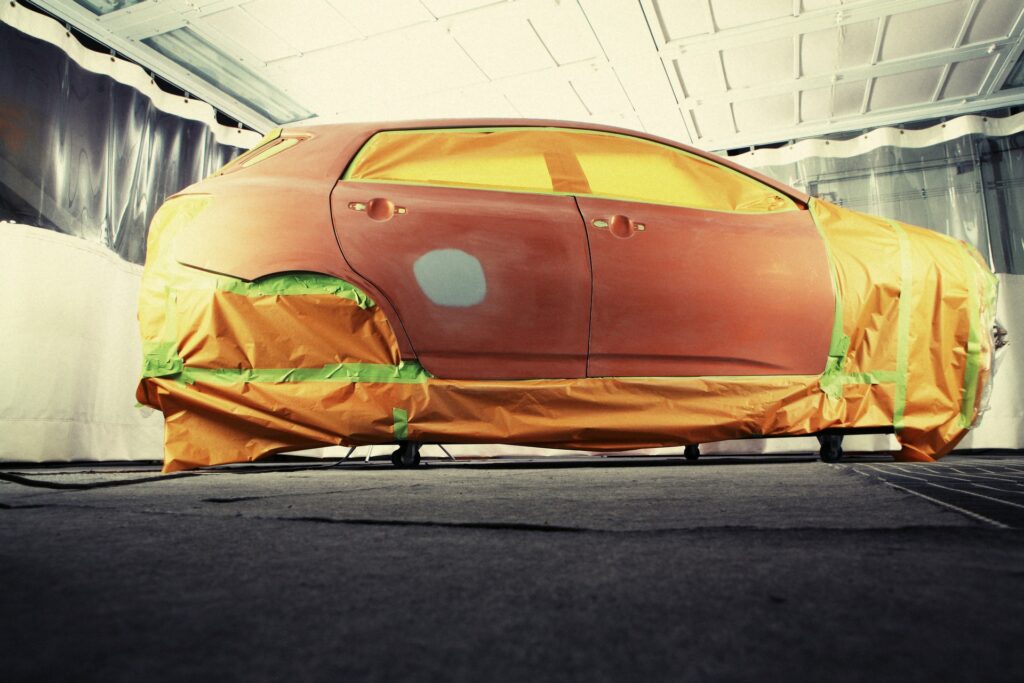
You will need some supplies to get you going. You can opt for a complete kit from your local auto parts store, which should have everything you need. If you have some items lying around, you may just want to buy them piecemeal. Here are the supplies most useful in painting scratches, large and small:
• Prep solvent
• Rubbing compound
• Sandpaper of various grits
• Rubber gloves
• Dust rag
• Pre-taped plastic to block overspray
• Primer
• Basecoat
• Clearcoat
Here are the steps that will most easily let you spot paint your car:
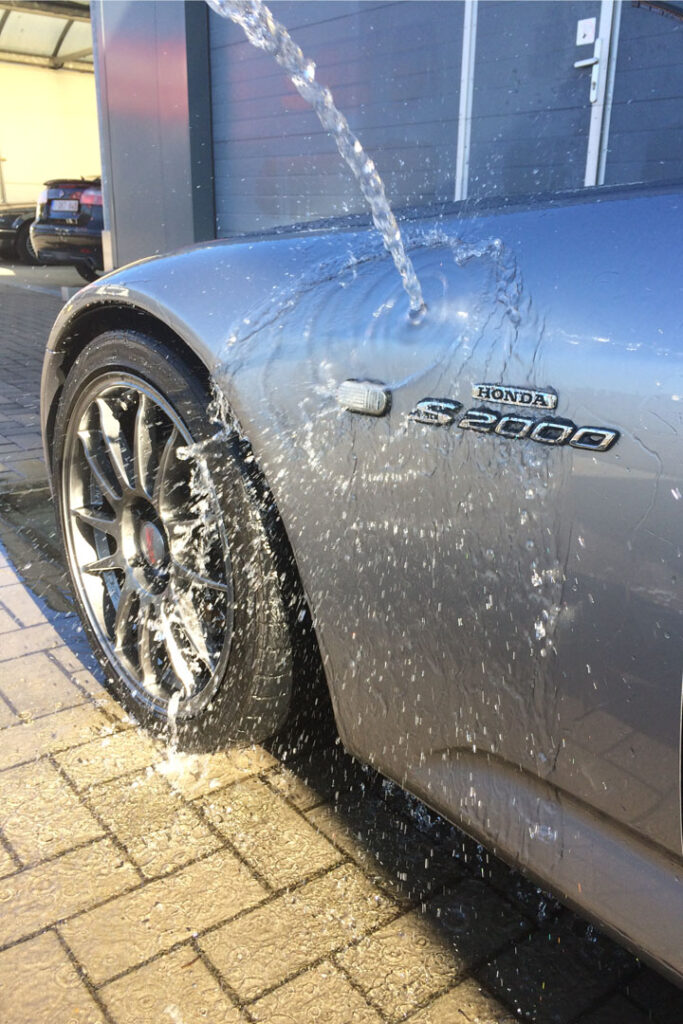
Wash and Dry your Car Carefully
Wash your entire car, thoroughly. Not only do you want the scratched area and the area around it to be very clean but you also want to make sure the paint matches the original vehicle color. It’s best to do this with a completely clean car.
After washing, use microfibers to dry your car. If you have other soft cloth around your home, you can use it as well. Before moving on to the next step make sure the entire vehicle is dry, especially the scratched area.
Sand the Scratched Area
This is an important step. You’re going to get down to bare metal in and around the scratched area. For a brief while, your car will look much worse. Don’t stress. You’re going to fix it. To accomplish this, do the following:
• Use 200 or 250 grit sandpaper to sand area for about 15 seconds – Use a higher grit if the scratch is not that deep
• Check the scratched area to see if you need any more sanding
• Do not sand so much that you rub through the last layer
• Sand the scratched area in the direction of the scratch
• Use a clean piece of sandpaper so dirt on the sandpaper doesn’t cause even more small scratches in the area
Rinse and Dry the Area
Now, rinse the scratched area and get off all the sandpaper and small particles that appeared when you sanded. Make sure you use a clean cloth to dry the area after you rinse.
Do not use dirty rags for this purpose as it could result in more small scratches on your car.
Spray a Few Primer Coats onto the Sanded Areas
Before beginning this step, put up your pre-taped plastic so you don’t overspray your scratched area. You have to be very careful with the primer coats. Remember that this is only to fix deep scratches in your paint job, normally due to catastrophic damage, like keying or a wreck.
The primer will fill in the small scratches made by the sandpaper, which is what you want.
[googleadsycc adunit=”inarticle”]
When you spray your primer coat, spray it for just a few seconds at a time. Don’t spray in one place for too long. Spray the entire scratched area. Wait 5 to 10 minutes for the primer coat to dry and then spray another layer if needed. It may take more than one coat of primer. Just be patient and let it dry between paintings.
Some car enthusiasts sand with very fine grit sandpaper between sprays.
Try to choose a primer close in color to your original paint color. It makes it easier.
Apply a Few Paint Coats Matching with your Car Color
In the same way that you applied the primer, apply the paint. Gently spray the paint in a back and forth motion for a few seconds.
Wait until the painted area dries thoroughly before deciding whether or not to add another coat. Your object is to have the repainted area match as closely in color to your original paint job as possible.
Finish with a layer of clear coat for protection.
Wax the Repaired Area to Seal the Paint
Once the paint has dried, and the color has matched to your satisfaction, it’s time to wax the scratched area. You can use one of the following to wax your car:
Microfiber cloth
Other soft cloth
Buffing pad
You will want to have a high-quality wax to give your car a good sheen.
Once the wax is put on, buff it out. The wax fills in tiny scratches and gives the entire vehicle a shiny, new look.
You can buy a waxing kit at any auto parts store, and it will include everything you need to wash and buff your car.
Important: Press down on your cloth using medium pressure and move in circular motions.
Keep waxing until you see that the car surface looks like your original paint job. You should go ahead and wax the entire car so that you can make sure the repainted area matches the original.
Using a Scratch Removal Product
Scratch removal products may be your best bet for scratches that don’t damage the inner-most metal surface of the car. Scratch removal products basically fill in the scratched area, working the paint layer to repair the scratch. Best of all, it’s easy to do. Just follow these simple steps:
Purchase a Scratch Removal Product
There are a lot of scratch removal products on the market, all claiming to be the best at what they do. Sometimes it’s difficult to know which ones really work as well as they claim. We’ve broken it down for you. Here are excellent choices for the best scratch removal products currently on the market.
Before doing any type of scratch repair on your car, you will want to wash it, and this is no exception. Use a non-abrasive cleaner and a soft cloth, if possible.
Note: A gentle dishwashing liquid or automotive soap is a good choice for washing your car.
Get rid of all the dirt in or near the scratch. Rinse very well and repeat if needed to get all the dirt out of the area. Make sure you dry the area thoroughly before moving on to the next step.
Apply A Small Amount of Product to The Scratched Area
The amount of the scratch removal product you use will be directly related to the size of the scratched area. Start with a small amount of product in the palm of your hand.
Put onto your cloth and work the amount around the cloth or pad so that it covers the majority of the cloth.
Work Product into The Scratched Area
Work the product using a circular motion into the scratched area of your car. Make sure you work the product in thoroughly, covering the entire area. You want to get deep into all the scratches.
Wait and Wipe
Once you’ve rubbed the product thoroughly into the scratched area, let it sit for a good 10min before you wipe off the residue. Let it dry completely but do not allow any of the excess to dry on the vehicle. Wipe away the left-over product with a soft cloth.
Repeat if Needed
You can put scratch remover on about three times before you need to stop. If you put it on any more than that, it may start eroding the clear coat layer of your vehicle.
DIY fixes should only be attempted on surface scratches. These may work well if the clear coat is scratched but not as well if the primer or paint coats are compromised.
WARNING: Household remedy fixes may only provide a temporary fix and the effects may wear off over time!
Here’s a good way to tell if you can use a DIY fix on your scratches: Run your nail over the scratch or chip. If your fingernail doesn’t get caught on any scratch, your scratches are likely to be only surface or shallow scratches, and you can proceed with your DIY fix.
If you do have a surface scratch, you can potentially save yourself some money by using items you may have lying around your home.
What You’ll Need
Here are some items you can use to fix the scratches on your vehicle:
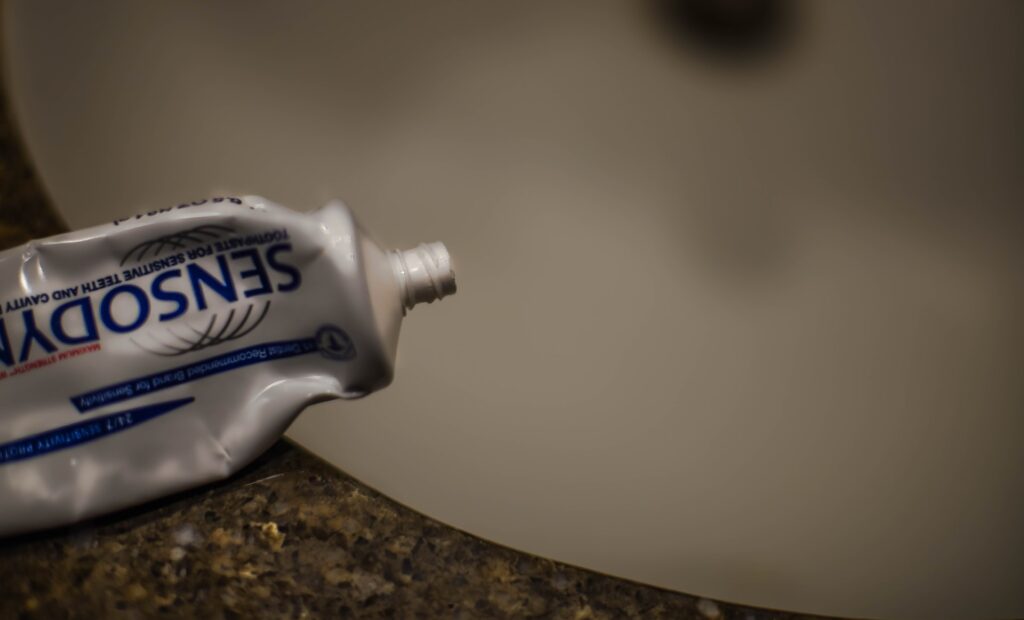
• Toothpaste – Works as a polishing compound and is as abrasive as 3000 grit sandpaper
• Nail polish – May be able to cover the scratches that sanding and buffing cannot remove
• Candle wax – While not actually a scratch remover, it can cover up light scratches
• Super glue – This is good as a transparent material that levels the minor scratch with the surrounding area
Once you have your DIY scratch remover, you should also have these items:
• Sandpaper of various grits
• Microfiber or some other soft cloth
• Non-abrasive soap and water
• Shoe polish
• Wax
• Liquid detergent
[googleadsycc adunit=”inarticle”]
Repairing The Scratch
All that’s left to do is to repair the scratch. For the below tips, we used toothpaste.
Wash with non-abrasive soap and water. Dry with soft or micro-fiber cloth afterward
Apply shoe polish of a darker color than your vehicle. Use a soft or micro-fiber cloth to apply. The shoe polish will spread out and fill the scratch.
Sand the scratched area. Mix a couple of drops of liquid detergent into a bowl of water and dip 2000 grit sandpaper into the bowl. Sand using a gentle motion until shoe polish has been removed.
Put toothpaste on scratch. Clean area first and then put toothpaste onto a wet cloth. Rub in the toothpaste using circular strokes. Repeat until the scratch has disappeared.
Wax your car. Use a soft cloth and use circular strokes. This will be your protective layer.
Be aware that the DIY solutions mentioned above are not necessarily long-term solutions. The candle wax, for instance, will wear off with time and you will have to reapply.
Tip: If you’re using nail polish, all you have to do is clean and dry the area before applying. That way, there is no need for sandpaper or shoe polish. This is a cover-up, not a repair for a scratch or a chip. You can also better match the nail polish to your color car.
If you want better results with DIY, definitely read on!
Using a Paint Pen
Using a paint pen is a quick and easy fix to repair any scratches or chips you may have on your vehicle. They will fill in deeper scratches and binds itself to the original paint in a short period of time.
You must first pick the paint that is closest to your car’s paint color. There are color codes associated with vehicles. Somewhere on your car is a factory paint code, and it is probably on a sticker under the hood or in the doorsill. If you have that code, you can request the exact paint to match your car.
If you can’t find the code, you can always take in a paint sample so that an auto paint dealer can match it. For this, you can take in a a chip of paint that has fallen off or take in a gas cap, as they’re easiest to remove.
How to Get Going
As mentioned, it’s very easy to use a paint pen. You may need some primer if the scratch is deep enough. This also comes in a pen format, and you can pick it up when you get your paint pen. Here are the steps to apply:
Look the vehicle over thoroughly
You want to make sure you discover any scratches or chips on your vehicle, so you only have to do the work once.
Prepare the scratched surface
Using a non-abrasive soap and water, clean the scratched areas. Once this is done, dry off thoroughly with a microfiber or other soft cloth.
Apply primer, if needed
If a primer is needed, this is the point where you apply it. If the color underneath the paint has been exposed, you will need to use a primer as well as paint. Shake pen very well before applying and press down hard on the pen tip when applying.
After applying primer, let dry and sand down with very fine-grit sandpaper, like 2000 or 3000 grit. Wipe away any residual dust and clean the excess primer off the tip of the pen.
Apply the paint
Shake vigorously. You want the liquid to flow down to the tip of the pen. Press down hard on the pen tip as this will allow the liquid inside to flow outside. Apply the paint evenly and smoothly. Don’t stay in one spot too long. Allow the paint to dry completely.
The Final Word
Repairing scratches on your vehicle doesn’t have to be difficult or expensive. You can do it yourself in just a short amount of time. Depending on the depth of the scratch, you may even be able to polish scratches out using household products.
If your car has been keyed or been in an accident, you will probably want to use the painting DIY explained above. For smaller scratches, you can use a scratch removal product.
Whatever you choose, it’s good to tackle scratches and chips before they spread and ruin the look of your vehicle. With a little prep, you can tackle these yourself.
Fixing a keyed car on your own is challenging, but not impossible. The damage to the body of your car from being keyed is typically deeper than regular wear and tear, or even a dent. However, taking your keyed car to a body shop can cost a small fortune, so a DIY job might be your best bet.
You can repair a keyed car on your own, but it requires a few tools and a lot of patience. It’s up to you to decide if you’d rather spend the money to have your keyed car repaired or take the time do fix it yourself. A DIY keyed car repair isn’t out of reach, but it will take time and patience.
If your car has damage from being keyed, and you’re wondering what a DIY repair job will look like, stick around. This article has everything you need to know about how DIY keyed car repair works.
How to Repair a Keyed Car On Your Own
If you’ve decided to take on your keyed car repair, you’ll be happy to know that this a fairly straightforward repair.
First, you will need to obtain the proper equipment to complete this repair. It boils down to cleaning and polishing materials, sanding materials, and painting materials.
Many of them you may already have in your house! Then you will have to follow a few simple steps to take your car from scratched up to shining!
Equipment
There are two options for obtaining the equipment you need -premade kits or your local hardware store. There are different repair kits on the market for people who are fastidious about maintaining their car’s appearance.
Most DIY repair kits are designed to fix all manner of scratches and nicks. It comes with a special blending solution for correcting mistakes made during the process and is guaranteed to come with the exact paint color that you need.
If buying a kit isn’t in the cards, you can still repair the damage on your own. Most of the supplies needed can be purchased at your local home improvement store. Some items, like a bucket and sponge for washing the car you already have on hand; other things like the paint you will likely need to purchase.
These are the materials that you are most likely to have on hand at home. Grab a bucket and your favorite sponge for washing your car.
After you’ve done this step, you will still need to use the soapy water for wet sanding your car. You can keep the bucket around, or you can prepare a fresh soapy water solution in a spray bottle
You will also need several microfiber cloths. Use microfiber instead of a regular towel so that you won’t leave behind lint and streaks when drying your car.
You may also want to consider grabbing a heat gun or hairdryer if you have one handy; this will help speed up the drying process in certain steps.
Masking Tape
The masking tape is used to tape a perimeter around the scratch on your car. This will help protect your car from rogue paint or sandpaper. Since you don’t want to damage the rest of your car, it is important to use tape that will adhere properly without scratching the paint any further. You should also consider grabbing some old ads or newspapers to protect the rest of your car.
Gloves and Eye Protection
These are optional but are highly recommended since you will be working with sandpaper and paint. The gloves will protect your hands from the sanding block and will make cleanup much easier.
Goggles are best used on windy days to keep the blowback from sand and paint out of your eyes. If you are highly sensitive to fumes, consider wearing a simple face mask to prevent breathing them in.
Sandpaper
Evenly sanding the scratched area is key to a smooth finish. Depending on the depth of your scratch, you will need at least two to three different gradients of sandpaper, ranging from 1000-3000.
These are all ultrafine grades of sandpaper, which you will use to carefully even out the scratch with the rest of the paint.
While having a sanding block is optional, it is highly recommended for the best results. A sanding block allows for better control of the paper and will help protect your hands from getting scraped. If you don’t have a sanding block, you can use the paper alone, but you will need to be extra cautious.
Primer and Paint
If you have a very deep scratch, you will need to prime the scratched area before painting. The primer will help fill in any remaining space that wasn’t sanded away and will create a smooth surface for the paint.
Primer is optional if you have a very shallow scratch, but you should still have it handy either way in case you overspend or if you just want an even application of paint.
Choosing the right paint is the most important part of this repair. The incorrect color will still make the affected area stand out. For best results, find the exact paint color that was used on your car.
This can be found online and in your owner’s manual, if you have it. Some cars will have a color code somewhere in the engine bay, door sill or on the VIN tag. There are quite a few options for applicator tips; a spray can is recommended, but an applicator tip works well for small scratches.
Even if you use a spray can, you still need a fine brush to help even out the paint so that there are no harsh lines. The brush does not need to be expensive, but you do want the brush to be in condition. That way, there is no risk of loose bristles setting in your time-consuming paint job!
Clear Coat
Clearcoat is essentially a layer of clear paint. Car manufacturers use it to seal the paint on your car and give it a glossy finish. While small dings and scratches don’t always penetrate your clear coat, keying almost always will. Any car produced in the last thirty years will have a layer of clear coat that you will need to replace. If your car is any older than that, consult your manual before applying a clear coat to the affected area.
Polish or Wax
After you’ve repaired the scratched area, you will want to make the car shine! For this step, you will need polish and wax. A non-abrasive polish will help minimize the appearance of scratches and return lost shine to paint.
Since polish actually removes a fine layer of paint from the car, only use polish if you are using it on the whole car. This is recommended to even everything out but is not required if you are pressed for time.
Wax makes the paint shine and smooths everything out. For minor scratches, you will only need your favorite wax for the affected area. If you are using polish, make sure to use the wax after your polish. If you use the wax first, the polish will simply undo all the work that the wax did.
The most cost-effective way to apply polish and wax is with a microfiber towel or sponge. However, if you have access to or the budget for a polishing wheel, you should use it! It will definitely be faster and easier, especially if you apply polish regularly.
[googleadsycc adunit=”inarticle”]
Time
In addition to the equipment listed above, you will need plenty of time to complete this project. Repairing a keyed car scratch on your own will take several hours. If you are determined to finish in one day, you will need to start very early. Or, you can wash and sand on one day, then return the next day to paint after the car is completely dry.
You will also need a lot of patience, especially during the sanding stage. There are a lot of repetitive motions, and it can be tedious to spend hours standing in the same direction. If possible, enlist a friend to help you with the job or at least to be a second set of eyes.
How to DIY a Keyed Car Repair: Step by Step
Your DIY repair can be broken down into four steps – preparation, sanding, painting, and cleanup. None of these steps require special skills; you are basically going to wash your car, sand the scratch down, and paint over it.
Park your car in a place with a lot of space. If you have your own driveway, that’s perfect, but if you live in an apartment, you may want to park away from other cars just to be safe. Assemble all of your equipment before you begin, and bring a speaker to play your favorite tunes!
Preparation
The very first step in the process is to thoroughly wash your car, paying special attention to the affected area. Getting rid of any dirt on the car will make sanding and painting easier. If you want to trim some time, you can focus on only washing the affected area; however, the overall effect will be better if you wash the entire car.
This also a good time to assess the extent of the damage. Spray the scratch with soapy water – if the scratch disappears, then reappears it is a shallow clear coat scratch. A shallow scratch is easily fixed at home.
If the scratch does not disappear, this means that it reaches down to the primer or metal of the car. You can still try to repair it on your own, but deep scratches are best handled by a professional.
Thoroughly dry the car with a microfiber cloth, focusing on the area where the scratch is located. You don’t want any moisture left behind because it will affect the application of the paint.
Use masking tape to outline the scratch to protect the original paint from being sanded and keep the rest of the area from being painted. Drape old newspapers on other areas of the car to protect from blowback from the paint.
Sanding
Now that your car is clean and dry, it’s time to begin sanding. This step is the most labor-intensive and may take several hours, so be patient and take breaks as needed.
It is recommended that you apply something of a different color than your car’s paint to help you ascertain how much to sand. Use spray paint in white or black, depending on the color of your car, and spray it on top of the scratched area. Once it’s gone, you’ll know you’ve sanded enough.
[googleadsycc adunit=”inarticle”]
Wrap your 2000-3000 grit sandpaper around the sanding block and dip it in a solution of soapy water. Holding the block at a 60-degree angle, move it from side to side over the scratch. Be careful to only apply gentle pressure.
Moisten the sanding block with every pass, either by dipping it in a bucket of soapy water or spraying the area if you’re using a spray bottle. The scratched area may seem cloudy after sanding, but don’t worry! This will be gone by the time you’re finished.
If your cut is only a clear coat, this may be enough to even out the scratch. If the cut is down to the primer, break out the 1500 grit sandpaper and wet sand perpendicular to the scratch. Once you’ve evened the scratch out, wipe the area with a microfiber cloth and then use the 3000 grit sandpaper to sand up and down, side to side, in overlapping strokes.
You can stop sanding once the scratch is evened out. If you have used the shoe polish trick, the absence of the polish is a good indicator. Use your best judgment, and get a second pair of eyes if you need it since this is the most critical step in the process. Once you’re happy with your sanding job, let the area dry completely before moving on to the next step.
Priming and Painting
Once the affected area is completely dry, it’s time to move on to priming and painting. Wipe the affected area with a dry cloth to make sure there is no sand or debris left from earlier steps. Use the primer and your brush to apply it in two thin coats covering the scratch. Let each coat dry completely before applying another.
Once the primer has dried, you can start painting. If you’re using a spray can, stand 6-8 inches away and spray the paint, sweeping the can in a side to side motion. Let each coat of paint dry before applying the next. Use the brush to even out any paint dribbles. Repeat until the level of the new paint matches the old paint.
Once your paint has dried, apply the clear coat in the same fashion. You will likely need only one coat of clear coat. Once you have applied it, remove the tape. If you have a heat gun or hairdryer, you may use it now to speed up the drying process. If not, simply let the affected area air dry.
Clean-Up
Once the clear coat is dry, you’ve done most of the work! Now it’s time to clean up the rest of the car to make the recently repaired area blend in with the rest of the car. It’s up to you the extent to which you want to polish and wax your car, but it is highly recommended.
Only use polish if you are polishing the entire car; this will even out all of the paint and get rid of any other small scratches or flaws in your paint. Once you have finished polishing, or if you have skipped this step, break out your favorite wax and give your car one final shine! Be sure to use small, circular motions for maximum effect.
Should I DIY My Keyed Car Repair?
Cosmetic fixes are a minor but disheartening occurrence, especially in the case of keying. Whether it was random or personal, the damage is often too extensive to ignore. You may be wondering if you should handle the repair yourself or take it to your local auto body shop. There are three elements to consider when determining whether or not to fix this yourself – cost, time, and the extent of the damage.
Cost
Cost is a major factor in deciding to tackle this project yourself. It can cost between $800-$1500 to have your keyed car repaired in the shop, depending on the depth of a scratch. In comparison, it will only take about $100-$150 to do it yourself if you have to buy all of the materials yourself.
If your car is new or expensive, it may be better just to take the car to a professional. If not, it’s worth trying to fix the scratches yourself.
[googleadsycc adunit=”inarticle”]
Time
By deciding to save money on your keyed car repair, you will have to sacrifice time. It will take about 8-10 hours from start to finish to complete this repair in optimal conditions.
Much of the time will be spent sanding and waiting for paint to dry, but it can be frustrating for an impatient person. Before you start, determine if you can handle devoting a whole day to completing this project.
Damage
The depth of the scratch is the major factor in whether or not a keyed car can be repaired at home. There are four layers to a car door – clear coat, paint, primer, and the door’s metal. A shallow scratch may be easily buffed out and repainted if it’s only on the protective clear coat or paint.
If it’s through the paint and clear coat (reaching primer or metal), then you may need to repaint the whole door, or maybe the entire vehicle. If this is the case, it is best handled by a professional.
Final Thoughts
It is possible to DIY your keyed car repair. If you decide that it is a project that you can handle, all you need is time, patience, and some simple equipment to help your car look new again.
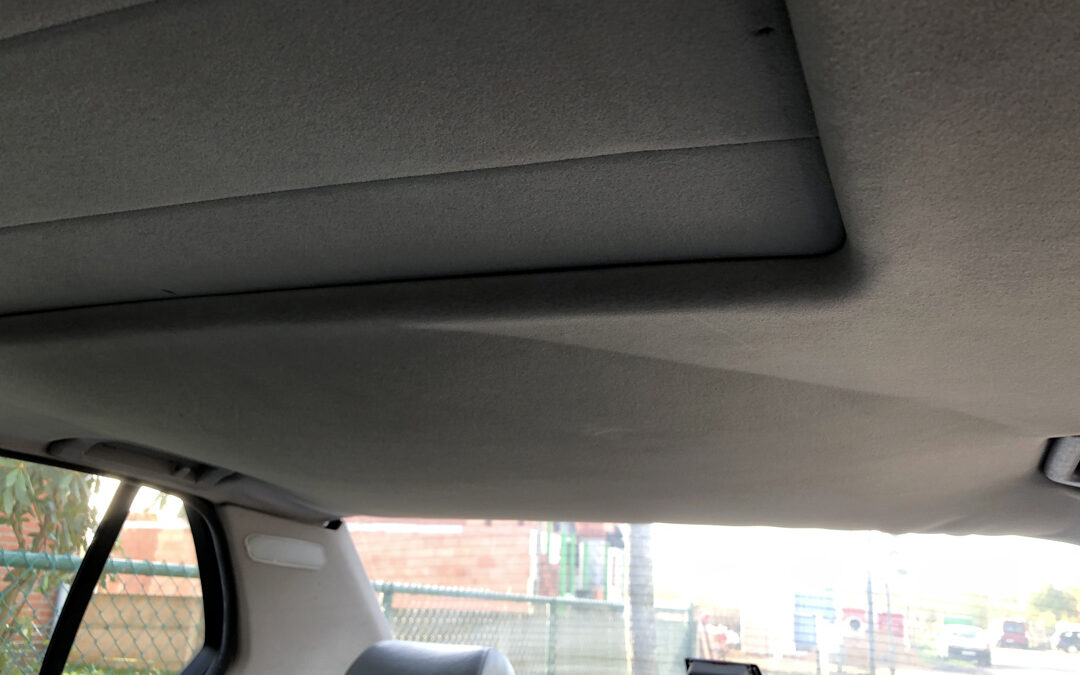
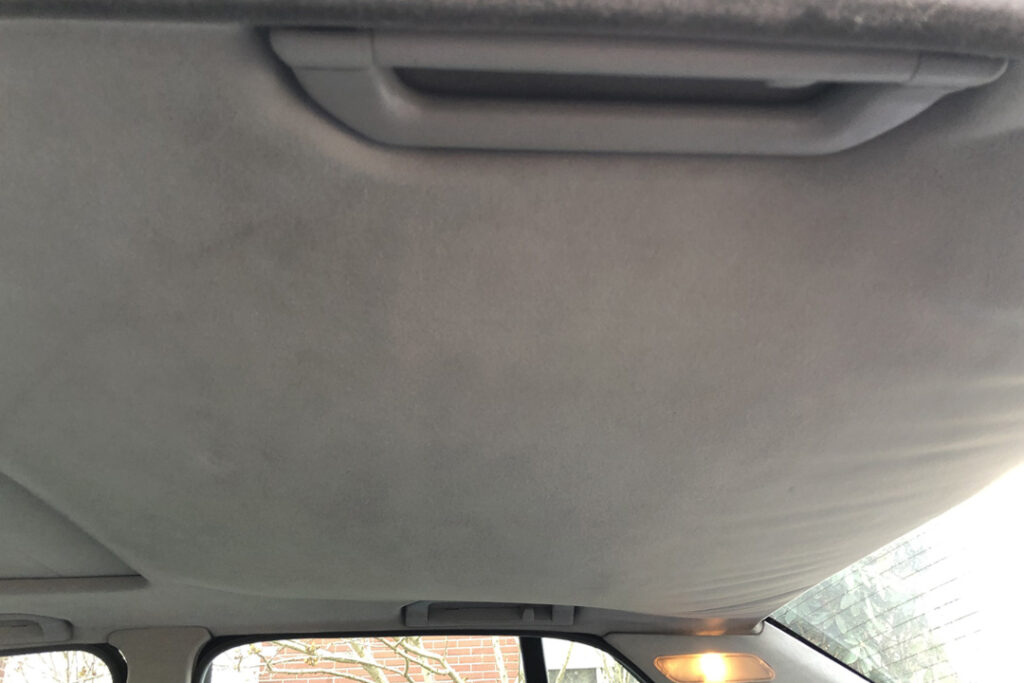
Replacing or repairing your car’s headliner is a job that you can do yourself as long as you have the right tools and have attention-to-detail. Here you will find guidelines for repairing your headliner the right way.
Car headliner repair can involve either temporary or permanent solutions. If you notice that sections of the headliner are drooping, you may be able to reattach these sections using a steam cleaner. A full repair will involve removing the headliner board itself and attaching a new fabric.
In this article, tips for both short-term fixes and permanent repair are included. You will get an idea for how doable of a job this really is. There are a plethora of adhesive products on the market that are designed specifically for the fabrics in your vehicle. Make sure that you are using headliner adhesives like the ones that are listed in this article so that you do not damage any fabric.
When Does A Car Headliner Need To Be Repaired?
The car headliner is a foam-backed cloth covering that is attached to the ceiling of the car. This part of the car’s upholstery can become detached, often as a result of damage from moisture. Fortunately, this is a part of the car that can be fixed quite easily at home, provided that this repair is performed the right way the first time.
Signs that the car headliner needs to be repaired/replaced include:
The ceiling is drooping down
You begin to notice more cuts/tears
The sound of traffic is noticeably louder; you’re more likely to experience this with a convertible cover
There are a lot of ways to perform patchwork maintenance on the headliner, as will be discussed in the section below—this is an effective measure for saving both time and money, at least in the short-term.
While occasional patchwork may be effective, you may not find years of patchwork to be aesthetically pleasing in the long run. Fortunately, there are ways to remove and replace the headliner on your own, as will also be discussed later.
You May Not Need To Remove The Headliner
Completely removing the headliner may be unnecessary. You can save time, effort, and money by simply taking steps to get the headliner to get back into a position where it adheres back to the roof liner.
If the headliner fabric is sagging or detached, but not damaged or torn, you should be able to easily reattach the fabric to the roof liner using one of the methods found below. Using these methods, you very well may be able to avoid having to remove and replace the entire headliner.
[googleadsycc adunit=”inarticle”]
An Adhesive Spray Safe For Car Upholstery
One way to reattach the headliner would be to apply an adhesive spray or glue to the affected area. Look for a spray or glue that is specifically designed for vehicle upholstery fabric, such as 3M Headliner & Fabric Adhesive.
The instructions for 3M Headliner & Fabric Adhesive state the following:
Peel back the detached portion of the headliner to expose the roof liner beneath
Turn the nozzle on the bottle of solution to alter the spray pattern
Apply the adhesive spray to an area 4-8 inches in size
Evenly reattach the headliner
This is a pretty simple way to try and reattach the car headliner to the roof. All you really need is a bottle of adhesive spray and gloves to protect your hands. You are also encouraged to use a plastic spreader tool to ensure that you apply the adhesive evenly to the target zone.
You may also find success with a type of super glue like Amazing Goop Automotive Adhesive. The glue can be effective if you are trying to reattach small sections of the headliner that are falling off, especially around corners.
Short-Term Solutions To Hold You Over
You may find success with some short-term solutions that will hold you over, at least until you have an opportunity to invest the time and effort into a permanent solution, such as replacing the headliner entirely. Good short term reattachment options make use of staples, pins, and heavy-duty types of tape.
A heavy-duty carpet tape such as this heavy-duty double-sided fiberglass tape will certainly do the trick. You can connect the inside of the headliner and the roof liner. The benefit of using tape is the fact that you do not have the potential to see wet spots that you may see if you use a fabric adhesive like the one listed in the section above.
The disadvantage is that even the heavy-duty tape may not hold up for very long. At best, this is a temporary solution that should buy some time before you decide on whether or not to replace the headliner in your car. It’s possible that this could be an effective measure if the affected area is very small and not clearly worsening.
Perhaps one of the most effective tools for this purpose is the Ricwina Headliner Repair Button. These buttons fasten into the liner beneath the car roof with piercing parts, similar to thumbtacks. This is an effective method for reattaching the headliner to the car. The main question mark would be the style. Some may not appreciate the visuals of the buttons, while others won’t mind and will actually find them quite effective. In the end, it’s all a matter of personal preference.
Using A Steam Cleaner To Treat A Car Headliner
Steam cleaners, like this McCulloch heavy-duty model, are often suggested as tools for cleaning car headliners. The theory is that the steam will help re-adjust the adhesive material so that it will no longer drool down. This technique can produce results, as long as you are careful.
Be sure not to oversaturate the car headliner with steam. This will only make the situation worse as it will potentially cause damage to occur from excess moisture. Avoid spending too much time on any one section of the headliner. This is a hit-or-miss technique as far as taking care of a droopy car headliner.
The steam cleaner can be effective for other reasons other than removing damage, though. It can be an effective way to prepare the headliner for complete removal. The steam can help separate the sometimes stubborn adhesive material from the underside of the roof liner. If you are planning on removing the car headliner, you may find that there are sections of the headliner that are quite difficult to remove. These are designed to last a long time.
How To Remove The Headliner From A Car
The most difficult part of the job is removing the headliner. This is a part of the upholstery that will still be adhered strongly to the frame of the car. There are a variety of safe tools that will make it much easier to remove the stubborn headliner. Here are the steps that you must take to remove your car headliner without issues. These instructions are adapted from this helpful video:
These instructions involve removing the headliner board itself. You will then be able to remove the fabric from the board or get a new board if the board itself has been become damaged.
The age of the car may determine how easy it will be to remove the headliner. Old cars may have headliners that are installed in place and before the windows were installed. As a result, you will have to remove the windows before removing the headliner. You will also need to decide if you want to replace the headliner board itself too.
Before you remove your headliner, you should take pictures of what the interior of your vehicle looks like. This will prevent any confusion later on when you have to re-install the many lights and panels that you remove.
You should place all the parts you removed in a safe location where lights and panels will not become scratched or otherwise damaged. You are encouraged to place all removed parts in a container like a Weikog Plastic Storage Container. There is no need to go overboard, as you should be able to keep parts scratch-free by wrapping them in a shop towel and then placing them within the storage container.
Tools That You Will Need To Remove Your Car Headliner
Phillips Head Screwdriver, such as this magnetic screwdriver that is more convenient than an entire set
Cover Your Seats
Before removal and installation, you should consider covering your seats and dashboard. This will prevent the possibility that you accidentally spill a chemical or otherwise damage your car seats. A simple blanket that you have lying around should suffice.
Start Out By Disconnecting Your Car Battery
If you plan on removing your car headliner yourself, you must first disconnect your car battery. The reason for this is the fact that your movements will interfere with the mechanisms that set off the airbags in your car. You need to disconnect your car battery at least 1 hour prior to work to prevent yourself from accidentally deploying the airbags.
[googleadsycc adunit=”inarticle”]
Remove The Dome Light
Once you have made sure that the battery has been disconnected for at least an hour, you can move on to the next step. This next step involves removing the dome light from your vehicle. Specific instructions may vary from vehicle to vehicle, so be sure to consult your owner’s manual if you have any questions.
In most vehicles, you will probably not be able to remove the headliner without removing the dome light, as there will probably be screws adhering the dome light through the headliner.
Disconnect the dome light and wires
In some cars, this may be as simple as adjusting a few clips
The purpose of this article is to let you know how to repair your headliner in a general sense.
Look for professional resources for detailed instructions.
After Removing The Dome Light
The dome light is just the beginning of this process. It is not particularly difficult to remove these parts, and you certainly will not need very many tools. The most difficult part is removing the airbag panels without setting off the airbags. You are encouraged to have a work partner present to help you remove these parts.
Remove the visor by unscrewing it from the headliner, then disconnecting it from the interior wire that it is attached to
Disconnect and Remove any other lights located along the headliner
Remove any handles
You must remove side panels carefully without triggering the airbag
The final step will involve removing any additional panels and lights and finessing the headliner out of the car without damaging any parts of the car
Removing the headliner yourself is a process that takes careful work, as you can see in the abridged directions above. If you have the right tools, it can certainly be done. One of the most difficult aspects is not triggering the airbags. Always be sure to turn off the airbags at least an hour before removing any panels.
If you have just removed the headliner from your vehicle, there is a chance that there may be pieces of foam or fabric that have been left attached to the roof liner even after you took out the old headliner. There also may be remnants of residue left behind from the adhesive material that was originally used to attach the headliner to the interior of the car.
[googleadsycc adunit=”inarticle”]
These stubborn materials can be removed with a scraper. This can be the same type of scraper that you would normally use to scrape decals off your glass windows. One of the preferred scrapers would be one that is like this double-edged plastic razor blade scraper. Whatever you use, you want to make sure that it is not so harsh that it scrapes and damages the interior of your vehicle.
Installing A New Headliner
Installing a new headliner in your vehicle requires special attention. For one thing, you have to double-check the fabric fits the dimensions of your vehicle. You will also need to cut out sections to fit all the various panels and lights located along the headline of your vehicle.
Start out by placing the headliner board flat on a shop table or other sturdy surface. Make sure that the side where you will add the fabric is facing upwards. Overlay the fabric over the entire board to make sure that it fits. You should have 2 inches of excess fabric along each side so that you can stretch the fabric out if you make any mistakes.
Then fold the headliner in half and apply it to the headliner board. Place adhesive on the section of the headliner board that is exposed. After applying this section of the headliner, you will peel back the unattached half and apply adhesive to this section of the headliner.
You will have some choices when it comes to what kind of adhesive you use to install a new headliner:
Make sure that the adhesive you are using is suitable for use with automotive fabrics. Apply the adhesive liberally and evenly so that you will not have to contend with sections of the headliner dropping down later on.
Once you have attached both halves of the headliner, you should be able to cut out all the spots for the panels and lights that you had to take out. To do this, flip the entire headliner board over after you have ensured that the material has adhered to the board. It should be easy to see the outline of the spots that need to be cut out.
A simple utility knife, such as this Internet’s Best Premium Utility Knife, will be sufficient for cutting out the spots for panels, seat belts, lights, and other inserts. This type of knife will be sharp enough to cut through the foam of the headliner, which is generally not as thick as most carpets.
A garage can be more than just a place to keep your cars. If you have the right storage system for it, your garage can become a valuable space for keeping things organized and out of the house.
With garage storage systems, you want something that’s sturdy and provides a lot of space for many different types of items. The four best storage spaces that provide this are:
The following is a list of four of the best storage systems for multiple sizes of garages. There is also a detailed description of different types of storage systems for garages.
Best Garage Storage Systems
There is a garage storage system for every type and size of garage out there. But the following is a list of the four best storage units that you can invest in.
Seville Classics Heavy Duty UltraHD Storage Stacker Cabinet
To start off the list, the Seville Classics Heavy Duty UltraHD Storage Stacker Cabinet is the most highly rated cabinet storage system. It’s light weight and compact size make it a good addition to your storage space, or you can use it as a singular cabinet.
The cabinet measures:
Thirty-six inches long
Eighteen inches wide
Eighteen and a half inches tall
The cabinet weight includes:
Twenty-eight pounds for the cabinet itself
Pre-installed shelves can hold up to 300 pounds all together.
[googleadsycc adunit=”inarticle”]
The stainless steel material is:
Extremely durable
Painted over with a powder coat
Scratch resistant
Dent proof
Fingerprint resistant lock and key
This cabinet will definitely keep your most valuable tools and equipment safely locked away.
The cabinet is also very simple to assemble and you can add it onto any other brand of cabinets to increase your storage space. The main complaint about this cabinet is that it doesn’t come with a shelf, so storing smaller items is a little difficult.
STERILITE Five Shelf Unit
If you want something that will take up more space upwards rather than outwards, then the STERILITE Five Shelf Unit is the best shelf storage system to get.
This five shelf heavy duty storage shelf includes the features of:
Made of a durable tubular material designed for heavy duty usage.
Weight capacity of 300 pounds
Seventy-five inches tall and eighteen inches long, so it will fit easily in most garage spaces
This shelf is capable of holding the heaviest of your lawn equipment without the need for a bulky shelf. With mostly five star ratings, purchasers are raving about how easy it is to assemble and how well it stands the test of time. You can also purchase as many as you want and set them side by side, rather than one giant shelf which could cost you more. You can make your shelving a little more customizable with how compact these shelves are, tailored to what you need and what space you have.
The main complaint among reviewers is that the shelves seem to come in different heights. This results in the shelving being uneven and not being able to store what they need. However, a solution has been found to fix this. You simply have to push the shelves all the way down into the corner posts until you hear a popping sound. This will make them securely fastened to each other and make all of the shelves an even height.
Koova Wall Mount Bike Storage Rack Garage Hanger
This type of garage storage is designed to keep your bikes and other bike accessories off of the garage floor. The Koova Wall Mount Bike Storage Rack Garage Hanger is capable of fitting up to six bikes and six helmets, along with some other bike accessories like water bottles and tire liners.
The steel cut bike rack is designed to last a long time with features such as:
A powder coat to prevent scratches or dents
A sturdy build constructed from solid steel
Can fit all different types of bikes, so you don’t have to worry about removing fat tires or having to stuff a large bike into a small rack
Very easy to install and has a compact design to fit in any garage space
The main complaint about this bike rack is that it’s a little difficult to lift the bikes off of the rack when you want to use them. The bikes overlap each other when they’re hanging on the wall, which makes it easy for them to get entangled. But if you need more storage space, purchasing another of the racks can be a solid solution.
Keter Masterloader Resin Rolling Tool Box
Whether you have a profession or a hobby that requires tools, this storage system was made for organizing all of your tools. The Keter Masterloader Resin Rolling Tool Box looks smaller to a rolling cooler but for tools.
It measures twenty-four inches long and sixteen inches high and is supported by two large rolling wheels for easy transportation. The material is coated with a weather and scratch resistant resin that also prevents denting and rusting. The tool chest itself only weighs about thirteen pounds, but it is able to hold up to sixty pounds.
The five star reviews are mostly because of all of the accessories it comes with. For security, this tool chest features a central locking mechanism to keep your tools safe and stable during travel or just for peace of mind. It has an extendable handle to make it easier to roll around and prevent you from having to do any heavy lifting. Some other accessories it includes are:
Six removable bins in two sizes for organizing small parts and hardware
Bottom divider for deep storage space and large tools
Tool divider to keep different tools separate and organized
Sliding lids for easy access to any tool you need
The main complaints are about the sliding lids and the drawers. If not slid out completely straight, then they can fall off the rails and create a minor annoying inconvenience. But if you’re already a handyman, finding a simple fix for this should be no problem.
[googleadsycc adunit=”inarticle”]
Garage Storage Accessories
Aside from the main storage systems used in garages, you can also use a few garage storage accessories to make your organization game even better. Garage storage accessories include:
Pegboards
Hooks
Baskets
Bins
Garage storage accessories can help you minimize the clutter that may be inside your storage systems rather than in your garage itself. Pegboards can provide a small space for storage in a work area to grant easy access and keep the space clean. Hooks can give you some extra options to place small items such as lanterns for better light. Baskets and bins can help you sort tools and equipment that are similar so you can easily and quickly find what you need.
Just like garage storage systems, there are garage storage accessories that are worth the extra money, and those that aren’t.
Best Garage Storage Accessories
From baskets to hooks, the following is a list of the best garage storage accessories to help keep your storage systems organized as well.
Wall Control Pegboard Organizer
Similar to how you can use a cork board to hang up papers, the Wall Control Pegboard Organizer can be used to hang up and organize building tools.
The pegboard is constructed out of solid metal that’s ten times stronger than conventional pegboard material. Despite its durability, it’s very easy to install. Mount on any wall with studs or sheetrock, and no framework required.
The main reason it has primarily five star reviews is because of how customizable it is. It comes with small shelves and hooks that you can arrange in any way you like. The hooks will hold any tool no matter how heavy, and the shelves are compact but can hold a weight of up to twenty pounds.
Right Arrange Wall and Pegboard Mounted Baskets
If you find yourself needing something a little bigger and sturdier to mount onto a pegboard or into another storage space, then the Right Arrange Wall and Pegboard Mounted Baskets is a good option. They’re made with a simple square design from lightweight but sturdy wire.
The baskets come in small to large sizes and are able to fit into any storage system. Each basket can hold up to thirty pounds and they are much larger than most baskets are. They are very quick and easy to install and allow you to keep your most used tools organized and close by. You can also use these baskets for any organizational needs, not just garage equipment.
These are the best garage storage hooks that you can add onto any storage system. The CoolYeah Steel Garage Storage Utility Double Hooks are capable of holding any types of tools and other accessories.
These hooks are made from a heavy duty iron clasp that holds double hooks coated with durable plastic, able to hold up to forty pounds. They come in different sizes to fit on any storage space and hold any size tool or equipment you need. In addition to tools, these hooks are capable of holding:
Ladders
Bikes
Folding chairs
Power tools
Garden tools
Most reviews say that the hooks last for a long time and they are very easy to install on any type of storage system. The main complaint is that the hooks sometimes leave patches in the walls when they are removed, but it’s nothing a little paint can’t fix.
[googleadsycc adunit=”inarticle”]
Types of Garage Storage Systems
There are more options for garage storage than you might think, so there’s many options depending on how much storage you need and how much space you have. The most common types of garage storage are:
Shelves can be either free standing structures separate from the garage or you can mount them on the wall to maximize storage. There’s also the option to attach add-ons that can connect to each other in different ways.
Free standing shelves usually have features like:
Between two and twelve shelves that can be fixed or adjustable
They sometimes come with a selection of bins to store items in
Add ons to free standing shelves that usually attach by the sides or the corners. Attaching them to the sides will make the shelf longer so you can store longer items such as sleds or bikes. Attaching it by the corners will make it into an L shape so you can fit it to the size of your garage.
Wall and ceiling shelves attach to the wall or get mounted to the ceiling to maximize garage space. These are great for small garages or for belongings you want to keep off of the garage floor. The only downside with these types of shelves is that you want to use them to store items you don’t use too much. Otherwise, you might need to use a ladder to access them.
Shelves can also give you the option to attach racks to them, especially if they’re made of wire. This can save you from having to mount more storage directly onto the wall or ceiling. You can save you some extra time with how quick it is and have additional space to make the most of your storage materials.
Sports Equipment Racks
If you’re an outdoor sports fanatic, this type of garage storage was made for you. Racks can store almost any type of sports equipment, including:
Bikes
Kayaks
Snowboards
Skis
Surfboards
Fishing Gear
Bike racks have ceiling/wall mounted and free-standing options to fit your garage size. Free-standing racks take up more space, but they can fit more bikes in them. Racks that can store skis and snowboards are only available in the wall or ceiling mounted options. You can decide whether to store the skis and snowboards vertically or horizontally.
Kayak racks typically store up to three kayaks. There’s racks that have hooks to hang the kayaks on, or slings to slide your kayaks into. Surfboard racks can also store paddle boards, and the wall or ceiling mounted options store more than any free-standing options.
[googleadsycc adunit=”inarticle”]
Racks that store fishing gear are the smallest since fishing rods and tackle boxes don’t take up too much room. You can purchase a wall/ceiling mounted or free-standing rack and both will hold plenty of fishing gear.
Cabinets
Cabinets are the most secure way to store your belongings in your garage. They can prevent things from falling and you can add a padlock to them for extra security. They are available in free standing or wall/ceiling mounted varieties, so garage size isn’t an issue.
Cabinets can also come with a variety of extra additions to make storage easier, including:
Adjustable or fixed shelves
Wheels
Drawers
Locks
There are also different types of doors that can come with cabinets. Manual cabinets have doors that 180 degrees and will self-latch when they’re pushed close. Sliding doors are on a spring loaded track that allow the doors to latch and close by themselves.
Complete storage systems are made up of any combination of cabinets, including safety cabinets and storage cabinets. You usually need about three sets of cabinets to make a full storage set, but you can add as many as your garage space will allow. You can also make the free-standing, wall or ceiling mounted, or a combination of both.
Tool Chests
Tools can also clutter your garage and be a dangerous hazard for other people and for other equipment. Fortunately, there’s a selection of tool chests to store your tools in. The most popular types of tool chest storage solutions are:
Top chests
Middle chests
Bottom rollaway chests
Combinations of the three
Top chests usually have one to three drawers, but some can have more than twelve drawers. Depending on how many tools or how big your tools are, any of the options can suit what you need. Top chests usually have extra features like:
Handles
Locking mechanisms
Rolling wheels
[googleadsycc adunit=”inarticle”]
Middle chests are smaller than top chests, and only have between one and six drawers for storage. You can purchase them with the options of locks or handles, but they don’t have wheels. It’s a good tool chest option if you don’t have a lot of tools to store or you have a smaller garage or workspace.
Bottom rollaway chests are the second most customizable tool chest option. The options that you can choose from include:
Wheels or no wheels
Lock or no lock
Handle or no handle
Number of drawers; one, three, or twelve plus
A combination chest is like all of the above chests in one. It consists of a top chest, middle chest, and bottom chest. They are the most customizable because of how you can rearrange the chests and what you can add on to them.
No matter the type of garage storage space or unit that you need, there is an option that fits for everyone.
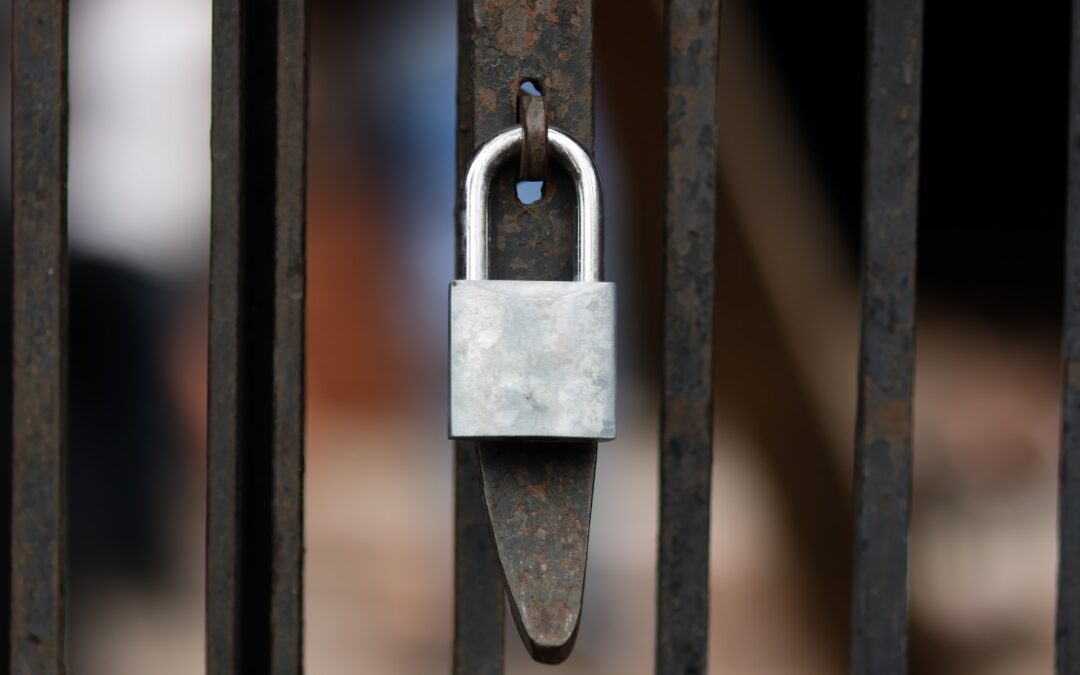
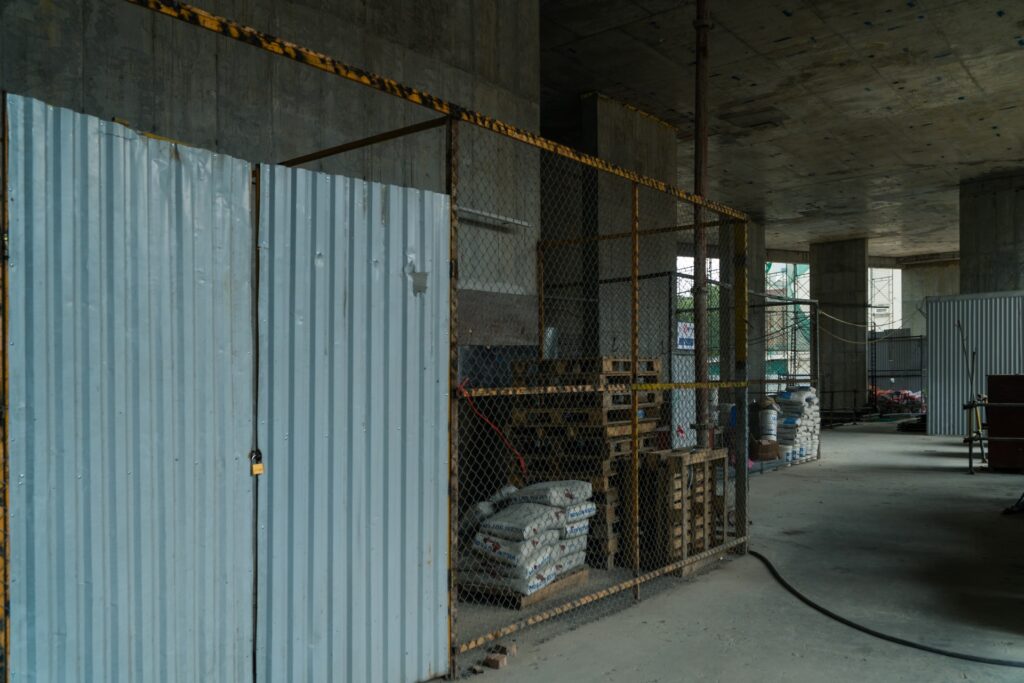
Tools are a large expense for homeowners. Lawnmowers, weed trimmers, shovels, rakes, and every variety of equipment can be found in the average garage. Construction workers use tools for their trade that they store in their garage or shed. Theft can be costly, so avoiding that is optimal and easy – just build a lock cage for your garage tools.
Whether you share a garage or just want some extra security for your tools, building a locking cage inside your garage is a viable option. The quickest way to do that is with pre-fab cages anchored to the studs in the garage frame. But that isn’t the only solution to keep your tools safe.
Beginning with determining your needs to completing your locking tool cage is a weekend project that can offer restful sleep and peace of mind. Like many people, you may have no clue where to begin or this may just be a refresher for you. Either way, the solution to securing your tools is awaiting your hammer and saw.
Let’s Build a Lock Cage for Your Garage Tools
As we stated earlier, the easiest and most expedient way to build a lock cage for your garage tools is by using pre-fabricated panels. These are sold by the piece or in kits. They are easy to assemble and include all the hardware you will need to complete the project.
Rather than going through the step-by-step instructions for this type of enclosure, we are going to help you with the set up and layout issues. The kits come with assembly instructions, so we are avoiding redundancy.
We are also including step-by-step instructions for building your own enclosure using panels you can make in your garage. The materials list does not include exact measurements or amounts, as your list will vary depending on the size of your enclosure.
The first step is to determine your needs. Some questions that need answers:
What tools do you need to keep in your lock cage?
Will you be including shelving in the design?
Are you planning on purchasing new tools in the future?
How much room do you have to work with?
Will your structure be free-standing, or anchored?
Those are the basics. Normally, when beginning any project we recommend starting on paper. List all the pertinent information about your project, including your proposed budget. When you are ready to start, your shopping is easier, and the entire project is more organized. Let’s examine some options.
Clearing Space and Laying Out Your Design
We mentioned that you need to determine where you will place your storage cage. This is important if you use your garage to park a vehicle or as a workshop. If you have decided to place the cage at the back of your structure, you will want to make sure that your vehicle still fits.
When laying out your cage, it is helpful to use masking or duct tape on the floor to show the cage size. Whether you place your cage at the rear or along a side wall, you can make necessary adjustments before you begin building. This also allows you to get more accurate measurements if you are designing and building your cage using raw materials rather than pre-made panels.
[googleadsycc adunit=”inarticle”]
Another important thing to factor into your design is the storage cage entrance. If you need to move a vehicle to access the cage when you need a tool, it may interrupt your workflow. Mark the door area when you are masking out the design, including the outward swing needed to access the cage. Before you start building, this allows you to check the space with the vehicle in the garage.
You can also adjust the size of your storage cage to make sure that you have sufficient anchor points along a wall. If you are building a free-standing cage you can adjust the placement during this phase to accommodate your other space requirements.
Free-Standing or Anchored
We’re going to add a few notes on the differences between these types of enclosures. There are distinct differences between the design, cost, and overall security of each.
A free-standing cage or structure means that it stands on its own, without being anchored or secured to anything. With a smaller enclosure, this may not seem to provide as much security as an anchored structure. There are ways to secure a free-standing tool cage, though, so don’t toss this idea out yet.
In this area are the pre-fab cages that you buy, set up, and presto – you have a secure tool cage. The neat thing about the pre-fab units is that they come in bits and pieces based on your design. While there are standard size cages available, you can use the individual pieces to make your cage any size you need. These cages also provide options for shelving, drawer units, and various types of locking mechanisms.
With some pre-fab cage systems, you need to pay attention to the design of the locking mechanism. Your cage will only be as secure as its weakest component. Cages are available from many online outlets and at your local big box home improvement warehouse. Each has advantages and disadvantages, so the choice boils down to evaluating your personal needs.
If you are building a secure storage inside your garage, you will need to examine how much room you have available. If you park a vehicle in your garage, you want to make sure your tool cage is accessible while the vehicle is parked.
Cages can be anchored in a variety of ways also. They can be bolted directly to a wall, using the garage framing. Additionally, the bottom of the enclosure can be bolted into the concrete flooring using concrete anchors.
Shelving or Wooden Cubbies
If your tools are all on wheels and will be rolled in and out of your security cage, you probably don’t need shelving. But, like most people, you worry more about securing hand tools and things that are more easily carried off by thieves. If you are in the construction industry, your hand tools are your livelihood. Keeping them organized and easily accessible will add to your efficiency too.
But do you want open shelving, drawer shelves, or individual cabinets within your security cage? Again, you need to evaluate your personal needs. This means you may end up with a variety of shelving options to hold your tools.
Items such as circular saws can be stored quite well on open shelving. Smaller things like drill bit kits, spare saw blades, and other random items are well-suited to drawer or bin storage. If you have cordless tools with batteries and charging units, those might be well-suited to cabinet storage. Making your storage adaptable to fit your needs will allow the space to grow with your tool inventory.
Because we care about your safety, we should mention using caution while building your security cage. Wear gloves to protect your hands. Use goggles or safety glasses to protect your eyes. Practice proper tool use. When welding, use approved welder’s gloves and a safety helmet or face shield designed for welding.
Keep children and animals away from your work area. You know the routine. Stay safe.
[googleadsycc adunit=”inarticle”]
Where to Get Materials and Hardware
Where you purchase your supplies will depend on whether you want to order your equipment online or buy from a local vendor. The ultimate choice is yours, but we wanted to cover some of the finer points for you before we get into the actual building phase.
While ordering online has the advantage of delivery directly to your doorstep, there are disadvantages also:
Some vendors add shipping costs
No pre-purchase ability to inspect items for damage
Damage can occur during shipping
Incorrect orders can lead to delays waiting on replacement parts
When shopping online, check out previous customer reviews, professional reviews, and other available information. Selecting a vendor with the cheapest price might result in unsatisfactory results with your final project. Research is the key to a satisfying experience with any online purchase.
Using a local vendor carries many advantages. If you forget the whoozit bolt for the whatzit fitting, you don’t have a two-week wait while it gets shipped to you. Some other benefits include:
You can hand-select all your parts
It supports your community
Spare parts or replacements are close at hand
If you are building from pre-fabricated materials, make sure that you account for all hinges, latches, wall and floor anchoring hardware, and all the bits and pieces you need to complete your project. Many vendors, both local and online, have customer service representatives that can review your list to make sure you thought of everything. Use these services as they will save you headaches.
Beginning the Assembly
Assuming you are using pre-fab panels to create your security cage, assembly is pretty straight-forward. Follow the instructions included with your kit. If you have opted to create your own cage entirely from scratch, we recommend following the directions outlined below for optimum results.
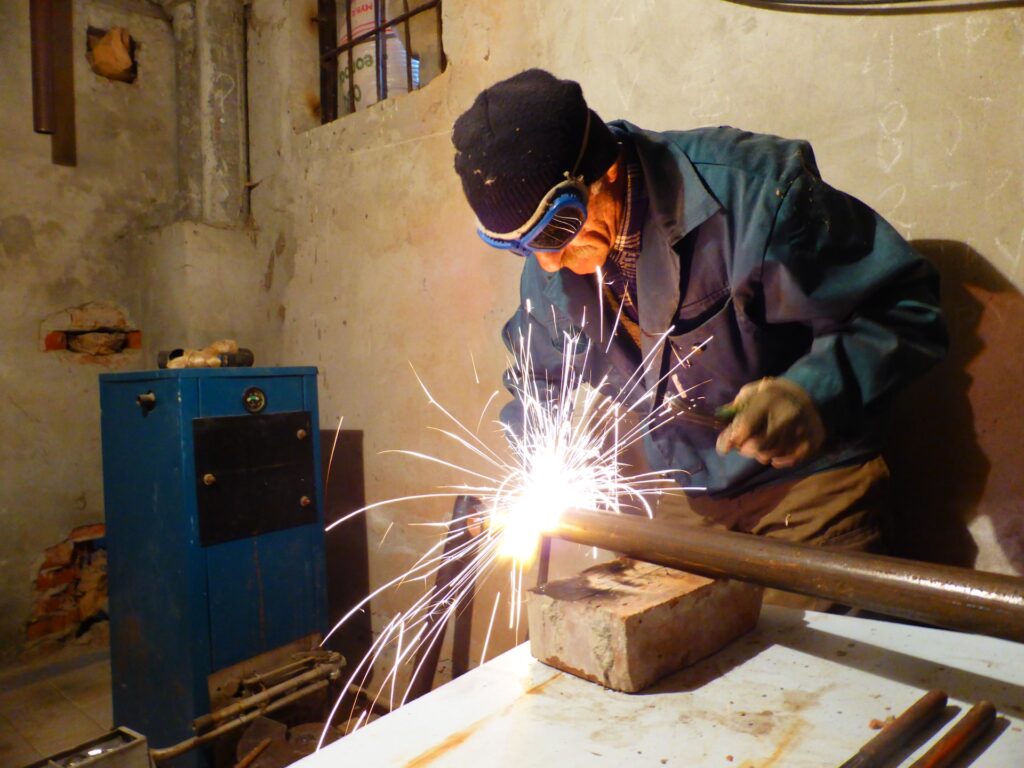
Building Your Security Cage Using Raw Materials
If you have decided that none of the pre-fab kits meet your needs, it is possible to build a cage using raw materials. You will need a little know-how about welding. If you don’t know how to weld, you can always ask a friend for help. MIG and TIG welding machines can often be rented from your local home improvement warehouse. They will offer quick instructions on safety and usage, but you’ll still need a bit of practice.
Clamps (to hold completed panels together for drilling or welding)
Step 2: Make Your Panels
Cut your angle iron pieces to the appropriate size to make the end panels. These will be welded together, so you have options. You can either use 45-degree angles for the corners, which makes a more professional finished product. The other option is to square-cut the corners and overlay them, welding at the overlay points. Both methods work well, so it is a matter of personal preference which is used.
Once you have your basic frames made, lay them with the angle iron flat side down. Measure and cut the chain link or wire mesh to fit inside the frame. You will be welding this to the inside of the frame to complete your panel. As an alternative method, you can drill anchor holes and use u-bolts or j-bolts to attach the fencing or mesh to your frame. The second method is labor-intensive and does not increase the level of security.
Repeat the above steps to build the remainder of your frames. Make the frame for your door a half-inch narrower along the width to allow clearance for opening and closing it.
[googleadsycc adunit=”inarticle”]
Step 3: Assembling Your Structure
Once your panels are assembled, it is time to assemble your cage. If you are building a three-walled enclosure, you will begin by anchoring your first end panel to the existing wall. You can construct the three walls and then anchor the entire structure if that is easier for you. To build your structure:
Take and end panel and a front panel. Place them upright, corner to corner, flat-side of the angle iron out. This will form a 90-degree angle.
Using a separate piece of angle iron (smaller scrap pieces at least 4 inches long can be used for this) clamp the two panels together. The angle iron will keep the panels at 90 degrees and provide stabilization.
If you are bolting your panels together, you will need to drill bolt holes through the stabilizing angle iron and the frame. Place your bolts, washers, and locknuts and tighten them finger-tight for now. Leaving some “play” is necessary at this stage and allows for adjustments and squaring your structure. (NOTE: Be sure to place your bolts with the threaded end on the inside of your enclosure.)
If you are welding your structure rather than bolting it together, be sure that your first corner is squared properly. Welding is pretty much permanent, so you will have trouble making adjustments later.
Continue adding panels to your structure. Straight-line joints will not need the extra angle iron, as the two panels will attach to one another. Use clamps and bolt or weld these panels together.
To add additional stability, you can attach angle iron or straight flat iron to the seams between panels and over the door. While this is a good safety and security addition, it is not a required part of the cage.
Step 4: Adding Your Door
Your security cage will only be as strong as the weakest point. In most cases, this is the door assembly, or more specifically the hinges. We recommend finding good, 4 to 6-inch heavy-duty hinges and using at least three. To attach the hinges, use strong bolts, locknuts, and then weld the hinges to the framing. While this may seem like a bit much, it will increase the security of your weakest point.
We mentioned decreasing the width of the door panel by at least a half-inch. This will allow clearance to open and close the door without effort. If you make the frame too snug, the cage will be difficult to open and close.
When you add a locking mechanism, there are several options. You can purchase a sliding lock and hasp assembly or you can easily make one. We recommend using two heavy eyebolts, one placed on the door and one placed on the frame of the structure. This allows you to use a standard lock to secure your cage and provides more stability than a sliding bolt/hasp-type assembly. We found a great video that shows how to attach eyebolts to your cage.
Once your door is attached, your cage is ready for use. If you did not anchor it to the wall or floor, now is the time to do that.
Finishing Touches
Once all your frames are assembled and welded, you may choose to paint them any color you like. Check all your welded joints and grind down or sand any sharp points in the welds before painting. We recommend a high gloss finish with a rust protector. Since the cage will be inside a building, paint is not required, but it will keep humid air from causing rust.
Once you have painted (if you chose to do that), it is time to finish off the inside. Begin by assembling any shelving systems that you have for the inside of your security cage. Keep in mind the size of the finished shelving unit. If it won’t fit through the door, you’ll want to assemble it inside the cage.
[googleadsycc adunit=”inarticle”]
A Few Words on Selecting a Lock
A lock is a lock, right? Wrong. Locks are available in four basic styles – long shackle, straight shackle, open shackle, and closed shackle. Some use key lock mechanisms while others use a combination dial. They all have advantages and disadvantages. The closed shackle is the most secure, but are limited in uses. Long shackles are easy to attack, but allow greater versatility in use.
There is a difference between indoor and outdoor locks too. While your cage will be indoors, it will also be subject to changes in humidity. Also, key locks are generally thought to be more secure than combination locks. That depends greatly on the style of lock. A locker-style lock with the combination dial on the face is not as secure as a tumbler-style combination lock.
Most locks contain a security rating that is listed on the packaging. This video demonstrates the different ratings and describes how secure they are. While the video only describes keyed locks, the security ratings apply to combination locks also.
Don’t Forget to Lock the Garage Door Too
Now that you know how to build a lock cage for your garage tools, we have another simple reminder for you. Don’t forget to lock the garage door too. While it may seem like your tools are secure (and they will be), why invite additional trouble? Keeping your garage door locked just makes sense.
We hope you enjoyed this step-by-step guide and found it helpful. Let us know about your lock cage experiences in the comments.